# Drag & Drop Form Builder for WordPress

An advanced, flexible yet easy to use premium form builder for WordPress.

Download **Super Forms** installable plugin file:

* [super-forms.zip](https://super-forms.com/download-super-forms-stable.php) (<mark style="color:green;">stable release v6.3.316</mark>).
* [super-forms-beta.zip](/developers/beta-version) (<mark style="color:red;">v6.4.007 - Jul 17, 2026</mark>).

### Quick links

{% content-ref url="/pages/Qzg82nE8LuIlLKiDCT45" %}
[Quick start](/quick-start/installation)
{% endcontent-ref %}

{% content-ref url="/pages/9SgkUjnJjLKQtGlDdnw1" %}
[FAQ](/quick-start/faq)
{% endcontent-ref %}

{% content-ref url="/pages/d14mfw86zUxhWECGbnl1" %}
[Common problems](/common-problems/index)
{% endcontent-ref %}

{% content-ref url="/pages/vaOX3BE3IW2AqgsDIhfG" %}
[Account](/account/dashboard)
{% endcontent-ref %}

{% content-ref url="/pages/zIslKQA3Mw7E9aYp2dYD" %}
[Changelog](/changelog)
{% endcontent-ref %}

{% content-ref url="/pages/5OO1jSKOdfZl6jUlwkFx" %}
[Support](/support)
{% endcontent-ref %}

### Elements

{% content-ref url="/pages/vwDojP8tmFe8nVoCBpg2" %}
[Layout elements](/elements/layout-elements)
{% endcontent-ref %}

{% content-ref url="/pages/fSoKJ23uO9Y2Ks9nA6pG" %}
[Form elements](/elements/form-elements)
{% endcontent-ref %}

{% content-ref url="/pages/9nTDMDaU5XrYmQwYZ5eE" %}
[HTML elements](/elements/html-elements)
{% endcontent-ref %}

### Features

{% content-ref url="/pages/sGGdyrmSRXZmGD1C8lRu" %}
[Basic](/features/basic)
{% endcontent-ref %}

{% content-ref url="/pages/SRJI5IKxJFvDjsJcukDJ" %}
[Advanced](/features/advanced)
{% endcontent-ref %}

{% content-ref url="/pages/xIyzFUv1tjbqXZnam6G2" %}
[Integrations](/features/integrations)
{% endcontent-ref %}

### Tutorials

{% content-ref url="/pages/DCKKd7CFhcjAUVZfbXND" %}
[Tutorials](/tutorials/wordpress-form-to-google-sheet-integration)
{% endcontent-ref %}

### Developers

{% content-ref url="/pages/nl5V45DdZLeHQku4xkUF" %}
[Code Examples](/developers/code-examples)
{% endcontent-ref %}

{% content-ref url="/pages/9TqmKOjug4RZyZNfjqaO" %}
[Data storage](/developers/data-storage)
{% endcontent-ref %}

{% content-ref url="/pages/WhmL3AO7WEQ5a5bJ4kEc" %}
[BETA version](/developers/beta-version)
{% endcontent-ref %}


# Installation

Installing the Super Forms plugin .zip file on your WordPress site

1. Download the [**super-forms.zip**](https://super-forms.com/download-super-forms-stable.php) (or checkout the [BETA version](/developers/beta-version) instead)
2. Login to your WordPress site
3. Navigate to **Plugins > Add New**
4. Click **\[Upload Plugin]** and click **Choose File**
5. Upload the super-forms.zip you downloaded at step 1
6. Click **\[Install Now]**

{% hint style="success" %}
Wait for the .zip file to be uploaded and for the plugin to be installed, this might take a while depending on your hosting so be patient.
{% endhint %}

{% hint style="info" %}
If for some reason the installation fails, you can try to upload the plugin via FTP by unzipping the file, and uploading the `super-forms` folder into your WordPress plugins folder (normally located at `/wp-content/plugins`. If you are not sure how to do this, you can [**create a ticket**](/support) and we will help you with this. Just make sure you provide a temporary WordPress admin login, and if possible the FTP credentials.
{% endhint %}

After you successfully installed the plugin you should now see a **Super Forms** menu item in the WordPress Dashboard menu.

{% hint style="warning" %}
On some servers it might be required to re-save your permalinks via **Settings > Permalinks > Save Changes.** This may resolve some common issues with exporting/downloading data within Super Forms.
{% endhint %}

In case you do not see **Super Forms** from the WordPress menu, try to reload the page. If that doesn't help, double check that the plugin is both *installed* and *activated* via the *Plugins > Installed Plugins* page. If so, it might be that you are not logged in with an Administrator account. Or you do not have the correct permissions for your account. To resolve this you will require to login as administrator.

{% hint style="success" %}
Now that Super Forms is installed you can continue to the next guide which covers how to [register your account](/quick-start/registration).
{% endhint %}


# Registration

Registering a Super Forms account

After downloading the plugin ([**super-forms.zip**](https://super-forms.com/download-super-forms-stable.php)) and [installing the plugin](/quick-start/installation), you will require a Super Forms account to activate and use the plugin.

{% hint style="warning" %}
In case you already have an account you can skip this guide and go to [**Starting your 15 day trial**](/quick-start/starting-your-15-day-trial) or [**Purchasing a license**](/quick-start/purchasing-a-license) (in case your trial period ended).
{% endhint %}

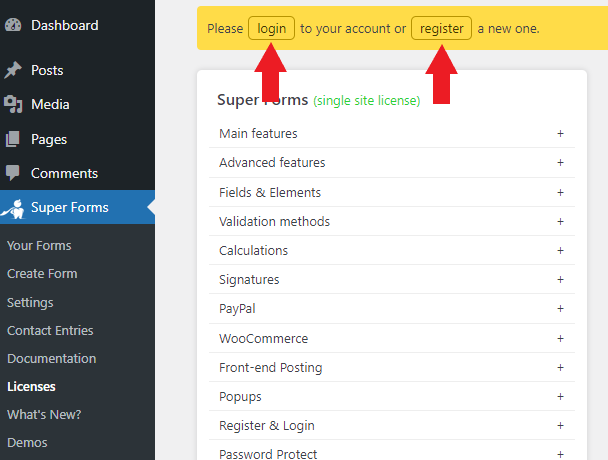
There are two ways to create an account. You can create one manually or automatically upon making your first purchase. The easiest and quickest way to create an account would be to navigate to **Super Forms > Licenses** from your WordPress menu. Now choose your license(s) and enter your primary email address as shown below:

<div align="left"><figure><img src="/files/mDVi6Akdt2SZSWmgMrai" alt="Purchasing your Super Forms license(s)."><figcaption><p>Purchasing your Super Forms license(s).</p></figcaption></figure></div>

During the checkout process an account will automatically be created for you and you will be able to use the plugin instantly. You will still be eligible for the [**15 day free trial**](/quick-start/starting-your-15-day-trial) even after making the purchase.

### Registering a new account:

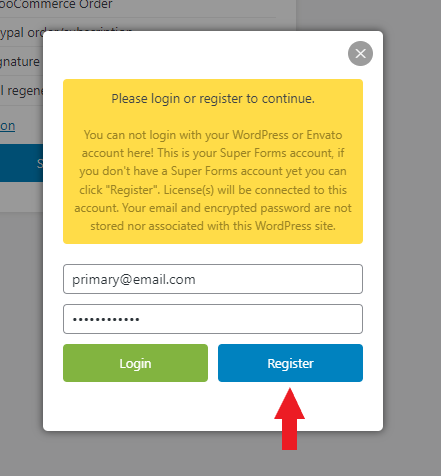
Register a new Super Forms account (or login if you already created one):

<div align="left"><figure><img src="https://webrehab.zendesk.com/hc/article_attachments/4419667657361/mceclip1.png" alt="Register a new account or Login to an existing account"><figcaption><p>Register a new account or Login to an existing account</p></figcaption></figure></div>

<div align="left"><figure><img src="https://webrehab.zendesk.com/hc/article_attachments/4419661388177/mceclip3.png" alt="Register a new account"><figcaption><p>Register a new account</p></figcaption></figure></div>

### Confirming your E-mail address:

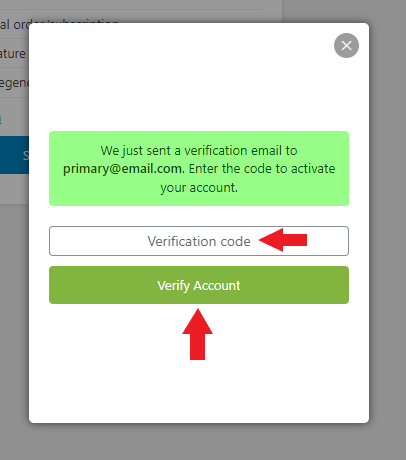
Upon registering you will have to confirm your E-mail address by clicking on the link that you received (also check your SPAM). Enter the verification code as seen below.

{% hint style="warning" %}
In case you didn't receive the verification email, please [**contact us**](/support).
{% endhint %}

<div align="left"><figure><img src="https://webrehab.zendesk.com/hc/article_attachments/4419675145233/mceclip4.png" alt="Enter the verification code received via E-mail to activate your account"><figcaption><p>Enter the verification code received via E-mail to activate your account</p></figcaption></figure></div>

{% hint style="success" %}
After verifying your email address, you can continue to the next guide to [start your 15 day trial period](/quick-start/starting-your-15-day-trial).
{% endhint %}


# Starting your 15 day trial

Start a 15 day free trial and try out the plugin for free

{% hint style="info" %}
If you have previously trialed the plugin you won't be able to trial the plugin again. In this case you will have to [**purchase a license**](/quick-start/purchasing-a-license) or enter an existing license that you already own.
{% endhint %}

After installing the plugin ([**super-forms.zip**](https://super-forms.com/download-super-forms-stable.php)) you can activate your 15 day trial by navigating to **Super Forms > Licenses** from your WordPress dashboard menu.

Now login with your Super Forms account, or [register a new account](/quick-start/registration) if you haven't already.

Once you are logged in click the **\[Start 15 days Free Trial]** button as shown below:

{% hint style="warning" %}
**Important:** Once your trial is active make sure to read the [First time setup](/quick-start/first-time-setup) which covers some basics about Super Forms.
{% endhint %}

<div align="left"><figure><img src="https://webrehab.zendesk.com/hc/article_attachments/9868763830289" alt="Start 15 day free trial"><figcaption><p>Start 15 day free trial</p></figcaption></figure></div>

{% hint style="success" %}
You should now be able to create your first form, but before you do we highly recommend to read through the [**First time setup**](/quick-start/first-time-setup) guide.
{% endhint %}


# Purchasing a license

Activate your plugin by purchasing a license

{% hint style="warning" %}
**Note:** Make sure you read the [Installation](/quick-start/registration) and [Registration](/quick-start/registration) articles before reading this section.
{% endhint %}

There are two ways to purchase licenses.

You can [purchase license in bulk](#purchase-licenses-in-bulk), or [purchase single licenses](#purchase-a-single-license).

{% hint style="info" %}
When purchasing in **bulk** you will have the extra option to choose an extended lifetime (expiry) in years for your license(s). **Volume discount** will also be applied, which allows you to benefit from **extra discounts**.
{% endhint %}

### Purchase a single license

To purchase a single license simply select "No" when asked if you already have a license code. Then click the "Add to cart". From here you can proceed to choosing your preferred billing and payment method.

<div align="left"><figure><img src="https://webrehab.zendesk.com/hc/article_attachments/9868868740369" alt="Add license to the cart."><figcaption><p>Add license to the cart.</p></figcaption></figure></div>

Choosing your billing and payment method:

<div align="left"><figure><img src="https://webrehab.zendesk.com/hc/article_attachments/9869134854033" alt="Choosing your preferred billing frequency and the payment method."><figcaption><p>Choosing your preferred billing frequency and the payment method.</p></figcaption></figure></div>

After your payment has been processed, the plugin will be activated.

{% hint style="danger" %}
**Note:** depending on your payment method it could take a couple of days before your payment has been processed. Once your payment has been cleared by the payment provider the plugin should automatically be activated.

If you believe there was an issue with your payment please [**reach out to us**](/support).
{% endhint %}

### Purchase licenses in bulk

To purchase licenses in bulk, simply choose a quantity and the lifetime (expiry) in years. Based on the selected quantity and your currently active licenses a volume price will be applied.

{% hint style="info" %}
An extra additional **discount** will be applied based on the selected lifetime (expiry) of the license.
{% endhint %}

{% hint style="warning" %}
Please note that your license **will not expire** until you actually activated the license on one of your sites.
{% endhint %}

When you are logged out, you will have to enter your Super Forms email account address. If you do not have an account a new one will be created upon completing the payment. After your payment has been processed you will receive the license codes in your email inbox. You can then [enter your license code](/quick-start/activating-a-license).

<div align="left"><figure><img src="https://webrehab.zendesk.com/hc/article_attachments/9869291548561" alt="Purchase license in bulk and register a new account instantly."><figcaption><p>Purchase license in bulk and register a new account instantly.</p></figcaption></figure></div>


# Activating a license

How to activate Super Forms using your license code

When you received your license code(s) you can activate the plugin or Add-on via **Super Forms > Licenses**. Click on **Yes** when asked if you have a license code and enter the license code.

Click **Activate plugin** to activate your plugin or Add-on.

<div align="left"><figure><img src="https://webrehab.zendesk.com/hc/article_attachments/9868823467665" alt="Activating your license"><figcaption><p>Activating your license</p></figcaption></figure></div>

{% hint style="success" %}
You should now have a working copy of Super Forms. It is now time to build your first form. Go to the next article to learn more on how to build your form.
{% endhint %}


# First time setup

What you should understand before you start building forms

{% hint style="danger" %}
**Important:** Before creating your first form, please read this article in full. It contains important information about some of the core Super Forms functionalities which shouldn't be overlooked. Especially understanding the [differences between Global settings and Form settings](#h_01evm3d182pegrfy3r2zxyvka0) and the configuration of [Secure file uploads](/quick-start/secure-file-uploads).
{% endhint %}

After you have [installed Super Forms](/quick-start/installation) ([**super-forms.zip**](https://super-forms.com/download-super-forms-stable.php)) you will probably want to change a couple of settings depending on your use case. In regards to settings in Super Forms, there are two different types of settings. Your "local" **Form Settings**, and your **Global settings**.

* [Global settings](#h_01evm3ctsvapkbst5j5kq9bk3y)
* [Difference between Global settings and Form settings](#h_01evm3d182pegrfy3r2zxyvka0)
* [File Upload Settings](#h_01evyfcgswjf598zgamfqdg85w)

### Global settings <a href="#h_01evm3ctsvapkbst5j5kq9bk3y" id="h_01evm3ctsvapkbst5j5kq9bk3y"></a>

Global settings are used to determine what settings you prefer whenever you create a brand new form from scratch. Any settings you have defined here will be used for a newly created form.

You can find your global settings under **Super Forms > Settings** menu.

When you first start using Super Forms, you will want to make sure you went over the most important settings and update them to your liking.

{% hint style="info" %}
**Note:** It is important to understand the difference between Global settings and Form settings. Changing your global settings will not affect existing forms as long as the existing forms did not share the same global setting at the time of saving the form. This means that in most cases you should and will be changing your Form settings (on the form builder page) instead of Global settings.
{% endhint %}

There are a couple of exceptions such as when setting up **SMTP server** settings. These type of settings are not form specific and are settings that all of your forms will be using. A couple of examples are:

* Global Overriding
* SMTP server
* [File Upload Settings](#h_01evyfcgswjf598zgamfqdg85w)
* Custom CSS
* Custom JS

### Global Overriding

{% hint style="danger" %}
Global Overriding can be used to hardcode a specific setting to always be exactly what you defined it to be, no matter what an individual form might use. There are only a couple of settings which you can overridden for the time being. It is generally a good idea not to use Global Overriding unless you really have to.
{% endhint %}

### Difference between Global settings and Form settings <a href="#h_01evm3d182pegrfy3r2zxyvka0" id="h_01evm3d182pegrfy3r2zxyvka0"></a>

When creating a form for the first time it will populate it's settings with those defined under **Super Forms > Settings** (which are your global settings).

Upon saving the form it will compare any settings with your global settings. Any settings that are equal will not be stored. While those that didn't equal will be stored. This allows you to have many forms with different settings but also settings they share. You could then change them under your global settings to so that all of those forms would reflect that change and point to the global setting. This is totally optional and in many cases you would just want to setup your global settings upon plugin installation and "never" look back. It's just much easier to make form changes on forms individually unless you are managing many different forms.

Again, in general it is good practice to setup your global settings upon plugin installation, and to make changes to settings on form level simply by editing your form and navigating to the "Form Settings" tab.

### File Upload Settings <a href="#h_01evyfcgswjf598zgamfqdg85w" id="h_01evyfcgswjf598zgamfqdg85w"></a>

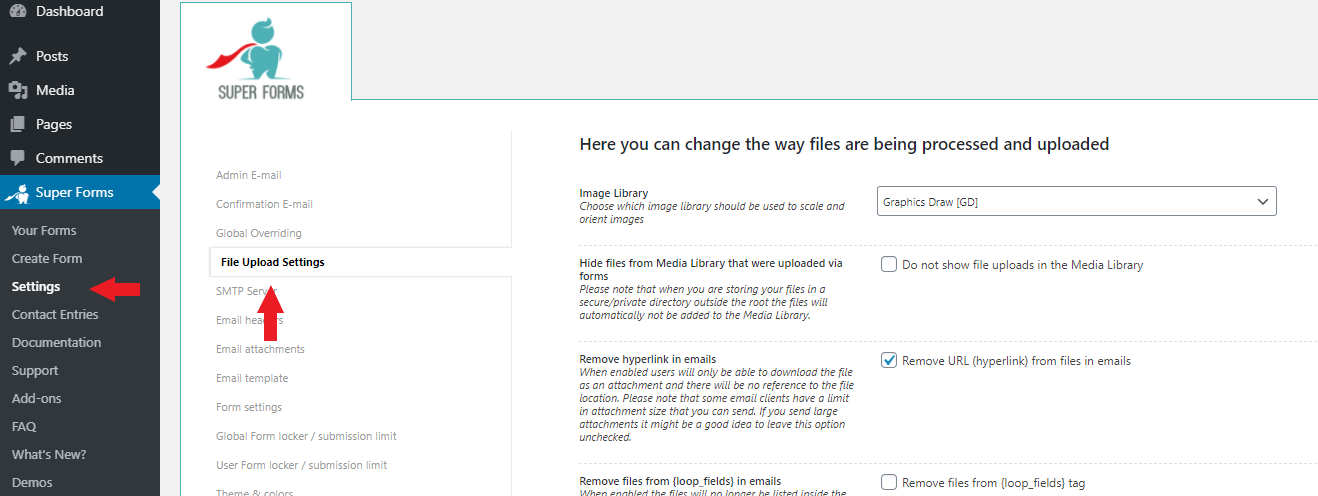
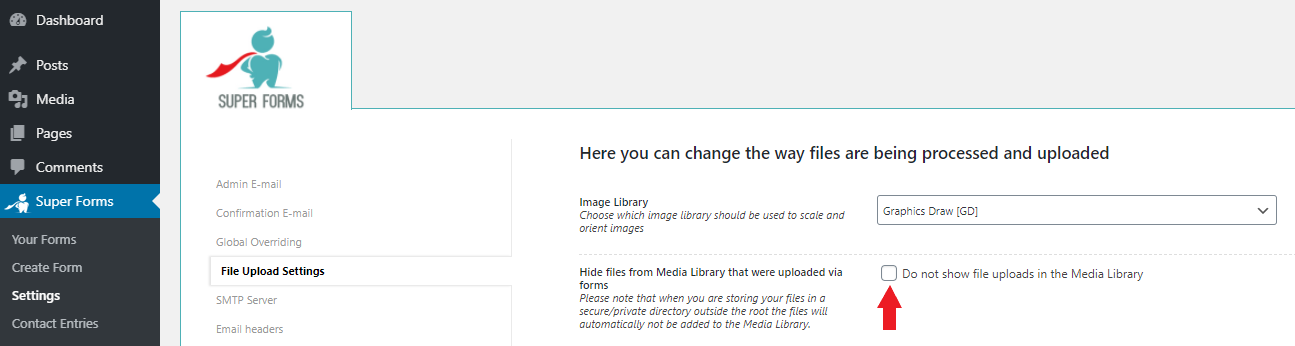
When you are going to use file upload elements inside your forms, it is a good idea to first head over to **Super Forms > Settings > File Upload Settings**. You can change many options in regards to how your files are being processed, uploaded and deleted.

{% hint style="warning" %}
It is highly recommended to read the [Secure file uploads](/quick-start/secure-file-uploads) article for more information on how to configure secure file uploads.
{% endhint %}

<figure><img src="https://webrehab.zendesk.com/hc/article_attachments/360015849737/mceclip0.png" alt="WordPress form file upload settings"><figcaption><p>WordPress form file upload settings</p></figcaption></figure>


# Secure file uploads

Understanding and configuring file upload settings for your WordPress forms

## Secure file uploads <a href="#h_01evyfxh09d6g79c75vgx9mjyj" id="h_01evyfxh09d6g79c75vgx9mjyj"></a>

By default Super Forms will not display files uploaded through any of your forms inside the WordPress Media Library.

When you update to Super Forms **v4.9.500+** any files that were previously uploaded will no longer be visible in the Media Library.

If you require these to be visible you will have to go to **Super Forms > Settings > File Upload Settings** and uncheck **Do not show file uploads in the Media Library**.

<div align="left"><figure><img src="https://webrehab.zendesk.com/hc/article_attachments/360015849977/mceclip0.png" alt="Enable or disable the option to not display uploaded files in the Media Library"><figcaption><p>Enable or disable the option to not display uploaded files in the Media Library</p></figcaption></figure></div>

If you want to store your files **securely** you will have to make sure that the files are uploaded outside the root folder of your site. To do this you can define a custom upload path relative to your site root directory.

### Example upload directories <a href="#h_01evyfx4p5e323djpgzbv9thhq" id="h_01evyfx4p5e323djpgzbv9thhq"></a>

#### Examples for secure file upload directories are:

| Path:                  | Use case:                                                       |
| ---------------------- | --------------------------------------------------------------- |
| `../my-private-dir`    | To store files just one directory above your site root          |
| `../../my-private-dir` | In case your site is running inside a subdirectory in your root |

{% hint style="warning" %}
**Note:** On some servers it isn't possible for Super Forms to create the private directory due to permissions, in that case contact your provider for a solution.
{% endhint %}

#### Examples for public file upload directories are:

| Path:                           | Use case:                                                     |
| ------------------------------- | ------------------------------------------------------------- |
| `my-public-dir`                 | Upload folder directly inside the root of your site           |
| `subdir/my-public-dir`          | Upload folder inside a subdirectory in the root of your site  |
| `wp-content/uploads/superforms` | The default directory that Super Forms uses out of the box is |

## Automatically delete uploaded files from server <a href="#h_01evyfwy3bs08b5bvy0mgx5zpq" id="h_01evyfwy3bs08b5bvy0mgx5zpq"></a>

You can optionally delete any uploaded files automatically from your server after a form submission by enabling the option **Delete files from server after the form was submitted**.

When this setting is enabled, any E-mails will still contain the file as an attachment (unless you defined to exclude the file from emails on the file upload element itself), but these files will no longer be stored on your server.

## Delete associated files after deleting a contact entry <a href="#h_01evyfwsanc8x2g9fkdkjs9s8m" id="h_01evyfwsanc8x2g9fkdkjs9s8m"></a>

To automatically delete any associated files from the server after deleting a Contact Entry you can enable **Delete associated files after deleting a Contact Entry**.

{% hint style="success" %}
Once you configured your Global settings and File upload settings, you should be ready to create your first form. Continue to the next article to start building!
{% endhint %}


# Creating a form

How to create your first form in Super Forms

{% hint style="danger" %}
**Important:** Before creating your first form, please read the [**First time setup**](/quick-start/first-time-setup) article in full. It contains important information about some of the core Super Forms functionalities which shouldn't be overlooked. Especially understanding the [differences between Global settings and Form settings](#h_01evm3d182pegrfy3r2zxyvka0) and the configuration of [Secure file uploads](/quick-start/secure-file-uploads).
{% endhint %}

To create a new form navigate to **Super Forms > Create Form**.

<div align="left"><figure><img src="/files/hYbKAKs2MXft7Ifsf0bX" alt="Create a new WordPress form"><figcaption><p>Create a new WordPress form</p></figcaption></figure></div>

{% hint style="info" %}
If you don't want to build a form from scratch you can checkout many of the available demo forms under **Super Forms > Demos** menu. Use them as a starting template or to simply learn about the possibilities of the plugin.
{% endhint %}

If this is the first time you create a form, you will see a walkthrough guide. Don't skip it, just follow along until you finished it. When you finished come back to this guide and continue reading below.

If you previously created a form you will now see the Form setup wizard where you will be able to review the most important form settings based on your global settings.

Change them accordingly when necessary and click on the **Save settings** button. If not, you can proceed by clicking the **Skip wizard** button.

<div align="left"><figure><img src="/files/CaR7uvq0JVonBQKUbYVT" alt="WordPress form setup wizard"><figcaption><p>WordPress form setup wizard</p></figcaption></figure></div>

This will create a new form from scratch with the settings based on your [**Global Settings**](/quick-start/first-time-setup#h_01evm3ctsvapkbst5j5kq9bk3y) with the selected settings defined during the wizard.

{% hint style="warning" %}
**Note:** The [**Global Settings**](/quick-start/first-time-setup#h_01evm3ctsvapkbst5j5kq9bk3y) will never affect previously created form settings if they do not share the same values. It is good practice to change settings on the form itself after creating one.
{% endhint %}


# Adding form elements

Adding elements to your form canvas

Once you [created a form](/quick-start/creating-a-form), you can start adding elements. There are currently three different types of elements:

* [Layout elements](/elements/layout-elements)
* [Form elements](/elements/form-elements)
* [HTML elements](/elements/html-elements)

To add an element to your form open the section for your type of element e.g "Layout elements".

Hover over the element, hold down your left mouse button and drag it onto the canvas where it says "Drop elements here" like so:

<div align="left"><figure><img src="/files/uGhcIyGEKa9hWaKiwx50" alt="Drag and drop WordPress form builder"><figcaption><p>Drag and drop WordPress form builder</p></figcaption></figure></div>

{% hint style="info" %}
**Note:** In general it is good practice to always use columns when building your forms. This will allow you to move multiple elements around, and makes it easier to re-arrange, delete, duplicate elements in bulk.
{% endhint %}


# Editing elements

Editing elements inside your form

### Editing a single element

Each element can be edited via the **Pencil** icon.

<div align="left"><figure><img src="/files/99WbjqxDWKU28jJUxSWV" alt="Edit text input field element."><figcaption><p>Edit text input field element.</p></figcaption></figure></div>

The **Element Settings & Options** section will open up where you can change the available settings for this specific element.

By default it will display the **General** settings which are settings that you most commonly will be changing. Depending on what element you are editing you can browse to different sub-settings by clicking on the dropdown and choosing the specific setting category like so:

<div align="left"><figure><img src="/files/EIYWdOPTLkI37EftL0V5" alt="Switching to a different element setting category/section."><figcaption><p>Switching to a different element setting category/section.</p></figcaption></figure></div>

After you are done making the necessary changes for your element click **Update Element** button.

<div align="left"><figure><img src="/files/0ac61FUjUvl0AueEEaAe" alt="Updating the element settings."><figcaption><p>Updating the element settings.</p></figcaption></figure></div>

After you made changes to your form, you can update it by clicking the **Save** button.

<div align="left"><figure><img src="/files/u6C2PtzS7d0YKA7sOMLs" alt="Saving changes made to the form."><figcaption><p>Saving changes made to the form.</p></figcaption></figure></div>

A quick demonstration on how to edit an element, updating the settings and saving the form.

<div align="left"><figure><img src="/files/g9UeCnFGAbQSteY2lJgH" alt="Edit the element, update the settings and saving the form."><figcaption><p>Edit the element, update the settings and saving the form.</p></figcaption></figure></div>

### Deleting elements

To delete an existing element you can click the **X** icon at the top right of any element. If the element has inner elements (think of a column or multi-part) then all of it's inner elements will also be deleted. If you deleted an element by accident you can use the Undo/Redo buttons to revert the change.

<div align="left"><figure><img src="/files/WujUsO0ZpWOWOFstqN8B" alt="Delete element."><figcaption><p>Delete element.</p></figcaption></figure></div>

<div align="left"><figure><img src="/files/HmwqmobUGqgS9HDzVwlW" alt="Demonstration on how to delete elements."><figcaption><p>Demonstration on how to delete elements.</p></figcaption></figure></div>

### Minimizing & maximizing elements

To **minimize** or **maximize** elements you can click the \[-] icon at the top right of each element. When you minimize an element that contains inner elements, it will hide all of it's inner elements. This makes it easy to move or rearrange many elements at the same time. Once an element is minimized you can click the same icon to maximize it again.

<div align="left"><figure><img src="/files/o3Ff3NMruNWOZZaFNesO" alt="minimize element."><figcaption><p>minimize element.</p></figcaption></figure></div>

To minimize or maximize **all elements at once** you can use the following buttons instead:

<div align="left"><figure><img src="/files/70Jh1gLTXjelsdC69nb5" alt="minimize or maximize all elements."><figcaption><p>minimize or maximize all elements.</p></figcaption></figure></div>

Demonstration on how to minimize and maximize your elements:

<div align="left"><figure><img src="/files/vySUCtlAjQU7pn3jydz1" alt="minimizing and maximizing elements demonstration."><figcaption><p>minimizing and maximizing elements demonstration.</p></figcaption></figure></div>

### Undo & Redo changes (revert changes)

When working on your form Super Forms will keep track of what your last changes were. If you accidently deleted an element you can click the **Undo** & **Redo** buttons to get back to the previous change.

<div align="left"><figure><img src="/files/HmwqmobUGqgS9HDzVwlW" alt="revert changes."><figcaption><p>revert changes.</p></figcaption></figure></div>

### Restoring from an automatic backup

Backups will be created automatically by Super Forms each time you **Save** the form. This can come in handy when you wish to revert the form back to a previous "version".

{% hint style="info" %}
In total, a maximum of **50** backups **per form** will be created. Once this limit is reached any older backups will be deleted automatically in order to keep your database clean.
{% endhint %}

<div align="left"><figure><img src="/files/Y0hGjWBYyoERxg8wVHBg" alt="Restoring form backups."><figcaption><p>Restoring form backups.</p></figcaption></figure></div>


# Publishing your form

Adding your form to be displayed on the WordPress front-end

Once you have created and tested your form you can publish it to your WordPress front-end. Grab the form shortcode from the builder page and put it inside your page content.

<div align="left"><figure><img src="/files/blgjd172qaTX7GnFL8Mx" alt="Copy the shortcode on your WordPress page where you want to display your form."><figcaption><p>Copy the shortcode on your page where you want to display your form.</p></figcaption></figure></div>

{% hint style="info" %}
**Tip:** If you are using a builder plugin or theme, you might want to insert the shortcode inside a native shortcode element if available. Otherwise you can put it inside a Text element.
{% endhint %}

Congratulations! :tada:, you just finished the [Quick start](/quick-start/installation) guide.

Use the menu to learn more about Super Forms [features](/features/basic), [elements ](/elements/layout-elements)and [third party integrations](/features/integrations) to build even more advanced forms!


# FAQ

Frequently Asked Questions

{% content-ref url="/pages/2pqZdA0nyKCeZgVTUvQE" %}
[Why is my form not sending emails?](/common-problems/index/email-delivery-problems/why-is-my-form-not-sending-emails)
{% endcontent-ref %}

{% content-ref url="/pages/eGcGrQlrzYS1igbGcEEJ" %}
[Why are emails going into spam folder/inbox?](/common-problems/index/email-delivery-problems/why-are-emails-going-into-spam-folder-inbox)
{% endcontent-ref %}

<details>

<summary>How can I make all fields to be required?</summary>

This can be done per field individually because each field can have different type of Validations. To do this you can edit the field you wish and select the required validation under `General` > `Validation`, there you have several option to choose from.

</details>

<details>

<summary>Why do I get an error message when uploading a file?</summary>

If you are unable to upload files via your form the first thing you should try is to check if the server returns a 403 error (Forbidden) on the following URL: `http://yourdomain.com/wp-content/plugins/super-forms/uploads/php/`

If it returns a **403 error**, please contact your hosting company to let them fix this issue. It should return a blank page in order for the file upload field to work correctly.

Check if uploading a small file works. If this doesn't work, it is most likely due to incorrect file permissions on the plugin folders, contact your hosting company to let them look at the file permissions.

If you are able to upload smaller files, it is most likely due to your PHP settings regarding file uploads. In this case you can adjust the `post_max_size and`, `memory_limit` and `upload_max_filesize` values in your **php.ini** file or ask your hosting company to increase these values to suite your needs. Remember the following rules when changing these values:

1. To upload large files, `post_max_size` value must be larger than `upload_max_filesize`.
2. `memory_limit` should be larger than `post_max_size`

</details>

<details>

<summary>Will data be lost when updating to a newer version of Super Forms?</summary>

No, all data will remain and will **not** be deleted. Even if you would delete Super Forms through FTP.

</details>

<details>

<summary>How to redirect a user after submitting the form?</summary>

When editing the form you can enable redirect under: `Form Settings (panel)` > `Form Settings (TAB)` > `Form redirect option`.

When using **custom URL redirect** you can retrieve form values with {tags} to parse them in your GET request like so:

<http://domain.com/page/?name={first_name}+{last_name}&age={birthdate}>

</details>

<details>

<summary>Is it compatible with Visual Composer?</summary>

Super Forms has it's own Visual Composer (JS Composer) element.

With this element you can simply **Drag & Drop** any form at a specific location in your page. After you dropped the element you can choose which form it should load simply with the use of a dropdown that will list all the forms you have created.

The Super Forms \[shortcode] can also be inserted into a Visual Composer **HTML element**. This makes it easy to insert it into any area within your Visual Composer pages.

</details>

<details>

<summary>Is it compatible with Elementor?</summary>

Super Forms has it's own widget inside Elementor.

With this element you can simply **Drag & Drop** any form at a specific location in your page. On this widget you can easily choose which form to load.

</details>

<details>

<summary>Where can I change the error message of a field?</summary>

You can change the error message per field by editing the element and changing the `Error Message` option under the `General` TAB.

</details>

<details>

<summary>Where can I change the form font styles?</summary>

You can change the font styles when editing a form under `Form Settings` > `Font Styles`.

</details>

<details>

<summary>How to make the file upload required/mandatory?</summary>

When editing the file upload element under `Advanced` you can set a `Max` and `Min` value. If you set the Minimum to 1 or higher the field will become required.

</details>

<details>

<summary>Can I do price calculations based on user selection?</summary>

Yes, you can do this with the \[Calculator Element]

</details>

<details>

<summary>Where can I add a tooltip when the user hovers over the field?</summary>

You can add a tooltip when editing the element under `General` > `Tooltip text`

</details>

<details>

<summary>I changed the settings but it doesn't seem to affect the form?</summary>

Please make change to the form it self, and not via the global settings under `Super Forms` > `Settings` from the menu. Each form upon creating will grab the global settings, and use them. When a setting is changed for a form and it equals to the global setting, it will use the global setting *now* and in *the future* **untill they differ** from each other and only then the form will use it's own setting.

</details>

<details>

<summary>Is it compatible with MailChimp?</summary>

The `MailChimp Element` makes it possible to integrate your form(s) with MailChimp service.

</details>

<details>

<summary>Is it compatible with MyMail (Mailster) plugin?</summary>

The `MyMail (Mailster)` integration makes it possible to integrate your form(s) with MyMail (Mailster) plugin.

</details>

<details>

<summary>How to retrieve the Contact Entry ID in my email?</summary>

You can use the tag `{contact_entry_id}` to retrieve the created contact entry ID in your email. Of course you must have the option to create a contact entry enabled in order for this tag to work properly.

</details>

<details>

<summary>Can I import options for a dropdown from a CSV file?</summary>

Yes, dropdowns, radio buttons and checkboxes can retrieve options based on a selected CSV file that you uploaded in the media library of your wordpress site. It can contain the option `Label` in the first column and the option `Value` in the second column.

</details>

<details>

<summary>How can I use address autocomplete/search feature?</summary>

Please read the [Address Auto Complete](/features/advanced/address-lookup-auto-complete) guide on how to use this feature.

</details>

<details>

<summary>Is the plugin Multi-site compatible?</summary>

Yes, but the Contact Entries, Forms and Form settings will be saved individually per site and not on a global level.

</details>

<details>

<summary>Why does the submit button not do anything, or why does it reload the page?</summary>

This is normally due to either a **Theme** or **Plugin** having an JavaScript trigger on the submit button element of Super Forms. You can try and find out what plugin is causing this issue by disabling them one by one. You can also do the same thing with your Theme to see if the issue is caused by your theme. You can then contact the author of the Plugin or Theme to ask if they could look at this issue.

</details>

<details>

<summary>How to get the post or page author where the form was submitted from?</summary>

Add a `Hidden` field and set it's **Default value** to `{post_author_id}` or `{post_author_email}` depending on your needs. You can find a full list of [predefined tags](/features/advanced/tags-system#predefined-tags-that-are-useful) here.

</details>

<details>

<summary>Why are my conditional variable values on my hidden field not working?</summary>

You can check the output of any hidden field value by adding a **HTML element** to your form with HTML set like this:

{% code overflow="wrap" %}

```html
My hidden field: {replace_with_field_name}
```

{% endcode %}

If the value is empty then you must recheck your Conditional variable logic. In most cases the Conditional variable logic was set incorrectly.

</details>

<details>

<summary>Can I customize the layout to include collapse groups?</summary>

Depending on your use case you can either add an `Accordion` element or `TABs` element. Alternatively you can use `Columns` with [Conditional logic](/features/advanced/conditional-logic) defined to display or hide the column and it's contents based on user selection.

</details>

<details>

<summary>Is it translation ready / translatable?</summary>

Yes, Super Forms is fully translation ready. You can translate the back-end with translation files, or use for instance a plugin like [Loco Translate](https://wordpress.org/plugins/loco-translate/).

Super Forms comes with a build-in translation method. You can translate all your form elements, and form settings via the `Translation` TAB on the builder page.

</details>

<details>

<summary>I disabled autocompletion on a field but it's not working</summary>

Some browsers will simply ignore the `autocomplete` attribute. There are a couple of solutions which might help you:

* For most browsers the simplest way to solve this would be to change the field name to a random string e.g `xY2a9z` instead of a normal name e.g `address`
* For Safari browsers the best way to make autocompletion work is to make sure your field name contains the word `search`. So if you have a field named `address` and you wish to disable autocompletion make sure to rename it to either `search_address` (as long as it contains the word `search`).
* If the above methods both do not work, you might also need to remove the `Placeholder` for the field so that it doesn't contain any reference name to any possible autocompletion. For example, if your placeholder contains `Enter your address` then the word `address` might trigger autocompletion in a given browser.

</details>

<details>

<summary>I am getting an error while updating the plugin</summary>

If you are getting the following error while trying to update Super Forms:

`Unable to rename the update to match the existing directory.`

It is always a permissions problem on your server. In any case you should contact your host about this so they can correctly set the permissions for your WordPress installation.

</details>


# Dashboard

{% content-ref url="/pages/r9dA0mRrDmaV3sJsqSDQ" %}
[Billing details](/account/dashboard/billing-details)
{% endcontent-ref %}

{% content-ref url="/pages/BuciGbhJzZmJbNTCCp1j" %}
[E-mail Notification](/account/dashboard/e-mail-notification)
{% endcontent-ref %}

{% content-ref url="/pages/FPUXzkJll1RVJeB122B1" %}
[Your Licenses](/account/dashboard/your-licenses)
{% endcontent-ref %}

{% content-ref url="/pages/LopsVyh1jQIJhG3hjYlN" %}
[Your Invoices](/account/dashboard/your-invoices)
{% endcontent-ref %}

{% content-ref url="/pages/58lz9p22eBdu2IRYiUCa" %}
[Password reset](/account/dashboard/password-reset)
{% endcontent-ref %}


# Your Invoices

Here you will find your latest invoices

After you purchase a license for Super Forms, you will receive your invoice per E-mail. It will be attached as a PDF file.

All invoices can be found via **Super Forms > Licenses > \[Billing]** via your WordPress Dashboard.

{% hint style="warning" %}
In order to view your Invoices you will have to login with your Super Forms account first!
{% endhint %}

<figure><img src="/files/zJUMumMXhSwSGxn320iG" alt="Your latest invoices"><figcaption><p>Your latest invoices</p></figcaption></figure>


# Billing details

Updating your billing details or payment method

### Updating your billing details

To change your current billing details login to your WordPress site. Navigate to **Super Forms > Licenses** and login with your [Super Forms account](/quick-start/registration#registering-a-new-account). After you are logged in click on **\[Billing]**. Here you will be able to update your existing billing details.

<div align="left"><figure><img src="/files/SiNwcuD3jyxDZwFkEw3p" alt="Updating your billing details."><figcaption><p>Updating your billing details.</p></figcaption></figure></div>

### Updating your card details

To update an existing card or add a new one, you can login to your WordPress site. Navigate to **Super Forms > Licenses** from the WordPress main menu. Then login with your [Super Forms account](/quick-start/registration#registering-a-new-account). After you are logged in click on **\[Billing]**. Under "Payment methods" you can click the blue button "Add or edit payment method".

<div align="left"><figure><img src="/files/FkLdtpyuuJmTUHHlw42i" alt="Adding a new or updating an existing payment method (card)."><figcaption><p>Adding a new or updating an existing payment method (card).</p></figcaption></figure></div>


# Your Licenses

Here you can find a list of your active licenses

Any active licenses can be found under **Super Forms > Licenses** via your WordPress dahsboard. Login with your Super Forms account and click on `Licenses`.

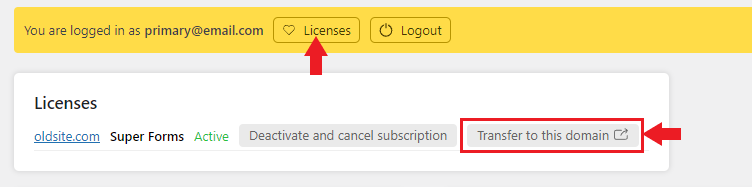
From here you can also transfer existing license(s) over to another site by logging into the new site. Click "Transfer to this domain" to transfer the license. You can now use the plugin on your new site.

{% hint style="warning" %}
**Note:** In order to transfer a license from site **A** to site **B**, you must be logged in on site **B**.
{% endhint %}

<figure><img src="https://webrehab.zendesk.com/hc/article_attachments/4419811049489/mceclip0.png" alt="Transferring your Super Forms license to the current domain"><figcaption><p>Transferring your Super Forms license to the current domain</p></figcaption></figure>


# E-mail Notification

Here you can change your E-mail notification settings

To change your account notification settings you can login to your Super Forms account by navigating to **Super Forms > Licenses** from your WordPress dashboard menu.

Click **\[Login]** and login with your credentials. After logging in you can click on **\[Account]** to view your email address and the notification settings.

By default you should receive notifications about your license expiring, notifications about payment/billing issues and notifications about new invoices.

You can add more recipients if required with each their own notification settings.

After you made changes click **\[Update]** to save them.

<div align="left"><figure><img src="/files/aGRUsDcHRGXpKuRaGNk8" alt="Configure E-mail notifications settings for your account"><figcaption><p>Configure E-mail notifications settings for your account</p></figcaption></figure></div>


# Password reset

Here you can reset your password

To reset the password for your Super Forms account, simply login to your WordPress site.

Navigate to **Super Forms > Licenses** from the WordPress menu. Now click **\[Login]**.

A popup will appear where you can enter your email address. After you entered your email address click the \[Reset password] link. If you tried to login with the wrong password you will also see the "Reset password" link.

<div align="left"><figure><img src="/files/Iw44tpwu0wpdFSPfHbgi" alt="Resetting your password for your Super Forms account"><figcaption><p>Resetting your password for your Super Forms account</p></figcaption></figure></div>

After you clicked "Reset password" you should receive an E-mail with a link to reset your password.

<div align="left"><figure><img src="/files/z6IU9LyUlWtcHs88gICh" alt="Check your email inbox for the reset link"><figcaption><p>Check your email inbox for the reset link</p></figcaption></figure></div>

By clicking on the link in the E-mail you will be redirected to the back-end of your WordPress site again. This time a popup will be visible where you can enter a new password:

<div align="left"><figure><img src="/files/1TjPrUeL3kpNpIHA3CsN" alt="Enter the new password for your account"><figcaption><p>Enter the new password for your account</p></figcaption></figure></div>

{% hint style="success" %}
After you completed this, you should be able to login with your new password.
{% endhint %}


# Cancel subscription

How do I cancel my Super Forms subscription?

Login to your WordPress site and go to **Super Forms > Licenses** from your WordPress menu.

Now login to your [Super Forms account](/quick-start/registration#registering-a-new-account) and click the **Cancel Subscription** button.

In case you no longer have access to your WordPress site you can contact us directly by submitting a [support ticket](https://f4d.nl/super-forms/support/) and providing the Super Forms account (email address) and which site(s) you wish to unsubscribe to.


# Common problems

Here you will find a list of frequent problems and possible solution(s).

{% content-ref url="/pages/nSvBP2feTLVrELoFh11x" %}
[Email delivery problems](/common-problems/index/email-delivery-problems)
{% endcontent-ref %}

{% content-ref url="/pages/xmOD2wwyxOXTTCfMBOhO" %}
[File upload problems](/common-problems/index/file-upload-problems)
{% endcontent-ref %}

{% content-ref url="/pages/bEdGpKbBxMQlYO0MKrwj" %}
[Session expired](/common-problems/index/session-expired)
{% endcontent-ref %}

{% content-ref url="/pages/CjpCp5t6iezirL686Oq0" %}
[reCaptcha Troubleshooting - Fix “Not Loading” & Verification Errors](/common-problems/index/recaptcha-troubleshooting-fix-not-loading-and-verification-errors)
{% endcontent-ref %}

{% content-ref url="/pages/ZjiSBQ57KDkzfrkGXnXJ" %}
[Datepicker Styling Conflict Issues](/common-problems/index/datepicker-styling-conflict-issues)
{% endcontent-ref %}


# Email delivery problems

Solutions that might resolve email delivery problems

{% content-ref url="/pages/2pqZdA0nyKCeZgVTUvQE" %}
[Why is my form not sending emails?](/common-problems/index/email-delivery-problems/why-is-my-form-not-sending-emails)
{% endcontent-ref %}

{% content-ref url="/pages/eGcGrQlrzYS1igbGcEEJ" %}
[Why are emails going into spam folder/inbox?](/common-problems/index/email-delivery-problems/why-are-emails-going-into-spam-folder-inbox)
{% endcontent-ref %}


# Why is my form not sending emails?

{% hint style="info" %}
**Tip:** Install a Mail logging plugin to see if WordPress is processing emails.
{% endhint %}

First check your **SPAM** folder, it might have been flagged as spam. If your email was inside your **SPAM** folder then read this guide on how to possibly resolve this:

{% content-ref url="/pages/eGcGrQlrzYS1igbGcEEJ" %}
[Why are emails going into spam folder/inbox?](/common-problems/index/email-delivery-problems/why-are-emails-going-into-spam-folder-inbox)
{% endcontent-ref %}

Check if WordPress is sending E-mails when using the forgot password form. You can test this on the login page e.g. `yourdomain.com/wp-login.php` by clicking on the **Lost your password?** link.

<figure><img src="/files/WKUOK0E1U5jkuuqMIqQl" alt="Check if the default WordPress &#x22;Lost your password?&#x22; email work."><figcaption><p>Check if the default WordPress "Lost your password?" email work.</p></figcaption></figure>

If you do not receive any E-mails it could be that your hosting disabled PHP `mail()`. If this is the case you mostly see an error message that notifies you about this.

If you did receive the lost password email then double check that your `Send email from:` setting is properly configured to match your domain name (see image below). Some mail servers do not allow to use a From header different from the domain name it is being send from.

<figure><img src="/files/mXyTLnwHakTc5yWjbbcM" alt="Changing the email From header to match your current domain name."><figcaption><p>Changing the email From header to match your current domain name.</p></figcaption></figure>

If you are still unable to receive E-mails after the above steps, check if any other plugin is being used that overrides WordPress `wp_mail()` functionality.

If you are using a **SMTP plugin** or configured Super Forms to send emails via SMTP (from your WordPress menu: Super Forms > Settings > SMTP Settings), recheck if they are configured correctly.

To help track down the issue further you can also install a E-mail Log plugin. That way you can see if your WordPress site actually is sending the E-mails (programmatically speaking). You can also determine if the From E-mail is properly setup that way. If you don't see any E-mails being logged, it means the issue is on your WordPress installation. In these cases you will have to try to track down what plugin is causing it by disabling them. And re-enabling them one by one.

If the E-mails are being logged, and the From header is setup properly, but you are still unable to receive any email you will need to dig deeper (outside of your WordPress site).

Here are some extra checks to consider:\
\
**1. SPF/DKIM/DMARC Alignment:**\
Verify that the SPF, DKIM, and DMARC records for '@yourdomain.com' are correctly aligned with the email sending infrastructure. Inconsistent or misconfigured authentication records can lead to delivery issues.\
\
**2. Recipient Mailbox Full:**\
Confirm with the recipient whether their mailbox is full. If the mailbox is full, new emails may not be delivered.\
\
**3. Recipient Inbox Rules:**\
Check if the recipient has any specific inbox rules or filters that could be affecting emails from '@yourdomain.com'. Some email clients allow users to set up rules for sorting or filtering incoming emails.\
\
**4. Email Content or Format:**\
Examine the content and format of the emails sent by WordPress. Some email servers may be more strict in filtering emails based on content or formatting issues.\
\
**5. Domain-specific Filtering:**\
Check if there are any specific filtering rules or settings configured for the domain '@yourdomain.com'. It's possible that certain security measures or filters are affecting emails from this domain.\
\
**6. Recipient Server Configuration:**\
Review the configuration of the email server that handles '@yourdomain.com' emails. There might be specific settings or configurations causing the emails to be treated differently.\
\
**7. Domain Reputation:**\
Verify the overall reputation of the domain '@yourdomain.com'. If the domain has a poor reputation, it might result in emails being treated differently by recipient servers.\
\
**8. Check with WordPress Hosting Provider:**\
Contact the hosting provider for the WordPress site and inquire if there are any known issues or restrictions related to sending emails to '@yourdomain.com'.\
\
**9. Server or Network Issues:**\
Investigate if there are any server or network issues specifically affecting the communication between the WordPress server and the email server responsible for '@yourdomain.com' addresses.\
\
**10. SMTP Configuration:**\
If WordPress is using SMTP for sending emails, review the SMTP configuration settings.\
Ensure that the SMTP server and credentials are configured correctly for '@yourdomain.com'.\
If you are currently not using SMTP consider configuring your WordPress site to deliver E-mails via your SMTP server. This helps with deliverability.


# Why are emails going into spam folder/inbox?

It is important to note that emails are not marked as spam by Super Forms. Instead they are marked as spam by internet spam protection measures. Because spam protection rules are constantly getting stricter, a form that previously worked can sometimes stop working out of the blue, even when nothing was changed on your website.

One way to solve the problem is to let your site send emails over SMTP rather than the built-in WordPress mail service. E-mails send over SMTP "look" more legitimate and will help your emails pass spam filters.

**Other things you should check on your form settings:**

* The `From` address must match the domain of your website e.g. noreply@`mydomain.com`
* Your `To` address should never match your `From` address because it can trigger spam deletion
* If you specified a `Reply-To` address, it should never match your `To` address
* Even though you can add multiple recipients in your `To` setting, it is recommended to use `CC` and `BCC` for multiple recipients
* Minimize the links you include. E-mail messages with a ton of links might trigger spam filters

<figure><img src="/files/mXyTLnwHakTc5yWjbbcM" alt="Set the correct From header for your WordPress emails to match your current domain name"><figcaption><p>Set the correct From header for your WordPress emails to match your current domain name</p></figcaption></figure>


# File upload problems

How to resolve file upload problems on your WordPress site

If you are unable to upload files via your form the first thing you should try is to check if there are any updates available for the plugin, and update to the latest version if so.

Check if uploading a small file works. If this doesn't work, it is most likely due to incorrect permissions on the server, contact your hosting company to let them look at the folder permissions. If you are able to upload smaller files, it is most likely due to your PHP settings regarding file uploads. In this case you can try to increase the following values in your **php.ini**.

```
memory_limit = 256M
max_input_vars = 5000
upload_max_filesize = 2024M
post_max_size = 2024M
max_execution_time = 3300
max_input_time = 600
```

Check if you are able to upload files via your Media library from the WordPress menu. If this doesn't work the issue is with your WordPress site or server. You will need to contact your host and inform them about this issue.

If your server is returning a timeout error, you can try to increase these settings instead:

```
max_execution_time = 3300
max_input_time = 600
```

Remember the following rules when changing above values:

1. To upload large files, `post_max_size` value must be larger than `upload_max_filesize`.
2. `memory_limit` should be larger than `post_max_size`

If you don't know how to change these values, ask your webmaster or your hosting company.

{% hint style="info" %}
When all the above checks and changes have been made, and you are still running into problems make sure to double check if the Super Forms file upload settings are properly configured under "Super Forms > Settings > [Secure file upload](/quick-start/secure-file-uploads)". Also make sure to check the **server error log** for any information about the incident.
{% endhint %}


# Datepicker Styling Conflict Issues

Troubleshoot and fix broken Super Forms datepicker styling caused by conflicting global jQuery UI CSS from other plugins.

### **Description**

Some plugins (such as **YITH Booking & Appointments**) load **jQuery UI CSS globally on every page**, even when their functionality is not used.\
Since Super Forms also uses the native jQuery UI Datepicker, this can cause **conflicting styles**, resulting in broken or inconsistent datepicker styling on the front end.

Super Forms already namespaces and scopes its datepicker styles correctly.\
The issue occurs when **another plugin overrides these styles by loading global jQuery UI CSS**.

This guide explains how to identify the conflict and how to safely resolve it.

***

## **How to Fix Datepicker CSS Conflicts**

### **1. Identify the Problem**

If your Super Forms datepicker looks incorrect on the front end, inspect the page and look for a CSS file similar to:

```
/wp-content/plugins/yith-woocommerce-booking-premium/assets/css/jquery-ui/jquery-ui.min.css
```

This stylesheet contains generic jQuery UI styles loaded on *every page*, overriding Super Forms' custom styles.

***

## **Recommended Fix: Remove the Conflicting CSS Only on Affected Pages**

### **Option A — PHP: Unregister the CSS on specific pages (best practice)**

Add the snippet below to your theme’s `functions.php`, a custom plugin, or a Code Snippet:

```php
add_action( 'wp_enqueue_scripts', function () {
    if ( is_admin() ) {
        return;
    }

    // Run only on this specific page (change 'example-page' to your page slug)
    if ( ! is_page( 'example-page' ) ) {
        return;
    }

    global $wp_styles;

    if ( ! $wp_styles ) {
        return;
    }

    foreach ( $wp_styles->registered as $handle => $style ) {
        if ( ! empty( $style->src ) 
             && strpos( $style->src, 'yith-woocommerce-booking-premium/assets/css/jquery-ui/jquery-ui.min.css' ) !== false ) {

            wp_dequeue_style( $handle );
            wp_deregister_style( $handle );
        }
    }
}, 200 );
```

***

### **Option B — PHP: Remove based on URL path**

Useful for dynamic or nested URLs:

```php
add_action( 'wp_enqueue_scripts', function () {
    if ( is_admin() ) {
        return;
    }

    $current_path = parse_url( $_SERVER['REQUEST_URI'], PHP_URL_PATH );

    if ( $current_path !== '/example/path/' ) {
        return;
    }

    global $wp_styles;

    foreach ( $wp_styles->registered as $handle => $style ) {
        if ( ! empty( $style->src ) 
             && strpos( $style->src, 'yith-woocommerce-booking-premium/assets/css/jquery-ui/jquery-ui.min.css' ) !== false ) {
                 
            wp_dequeue_style( $handle );
            wp_deregister_style( $handle );
        }
    }
}, 200 );
```

***

## **Alternative Fix: Remove the CSS Using jQuery**

This is simpler if you already use Elementor Custom Code or Code Snippets PRO.

### **Option C — Remove the CSS via jQuery**

```html
<script>
jQuery(document).ready(function($) {
    $('link[href*="yith-woocommerce-booking-premium/assets/css/jquery-ui/jquery-ui.min.css"]').remove();
});
</script>
```

***

### **Apply conditionally to a specific page**

```html
<script>
jQuery(document).ready(function($) {
    if (window.location.pathname.indexOf('/example-page/') !== -1) {
        $('link[href*="yith-woocommerce-booking-premium/assets/css/jquery-ui/jquery-ui.min.css"]').remove();
    }
});
</script>
```

Replace `example-page` with your actual slug.

***

## **How to Add the Script**

#### **Using Elementor → Custom Code**

1. Go to **Elementor → Custom Code**
2. Create new snippet
3. Paste the script
4. Set *Display Conditions* to specific pages
5. Publish
6. Clear cache

#### **Using Code Snippets Plugin**

* **PRO version:** supports page-level conditions
* **Free version:** use URL checking via JavaScript

***

## **Why Super Forms Is Not the Cause**

Super Forms:

* Uses custom datepicker classnames to prevent conflicts
* Loads styles only when a form is present
* Does **not** enqueue global jQuery UI styling
* Follows WordPress best practices for conditional loading

Conflicts happen when another plugin loads **unscoped, global CSS** for jQuery UI.

***

## **Summary**

| Issue                       | Cause                                         | Fix                                         |
| --------------------------- | --------------------------------------------- | ------------------------------------------- |
| Datepicker looks incorrect  | Another plugin loads global jQuery UI CSS     | Remove or block conflicting CSS             |
| Backend OK, frontend broken | Admin does not include conflicting stylesheet | Dequeue/remove stylesheet on specific pages |
| CSS override                | Global jQuery UI theme from booking plugin    | Conditional dequeue recommended             |

***

## **Final Tip**

If possible, contact the conflicting plugin developer and request that they load jQuery UI CSS **only on pages where their booking form is present**. This improves compatibility and site performance for all users.


# Session expired

Why am I getting a "session expired" error message when submitting the form on my WordPress website? And how to resolve it?

If you are getting a "Unable to submit form, session expired!" error message, there could be several reasons for this. And there could be a couple of solution. Below are the solutions you can try.

1. First check if **Allow storing cookies** is set to **"Enabled"** under **Super Forms > Settings > Form Settings**. If it was set to disabled, change it to enabled and test the form again. If it still doesn't work continue to step 2.
2. You can skip this step if you are not loading the form via an iframe. If you do load your form via an iframe, and this is done from a different origin address you must disable the CSRF check under **Super Forms > Settings > Form Settings** by setting it to "Disabled". This isn't recommended, so it's better to not load forms via iframes from a different domain. Use this as a last resort, and only if you don't have any other choice.
3. Go to **Dashboard > Updates > "Check again"** and install any updates if available. After updating, make sure to empty any cache (if you are using a caching plugin) and temporarily disable the caching plugin to test out the form.

If you are still getting the message after completing above steps, feel free to submit a [support ticket](/support).


# reCaptcha Troubleshooting - Fix “Not Loading” & Verification Errors

Learn how to resolve common Super Forms reCaptcha v2/v3 issues in WordPress: loading failures, verification errors, multiple-form conflicts, API key mistakes, and JavaScript conflicts.

When using **Super Forms** on WordPress, you may occasionally encounter issues where the Google reCaptcha element:

* Doesn’t display on the page
* Returns the error **“Google reCAPTCHA verification failed!”**
* Malfunctions when you have **multiple forms** per page

This guide walks you through all the major causes and step-by-step fixes.

### 1. Verify & Regenerate Your API Keys

Many reCaptcha errors stem from invalid or misconfigured API keys.

1. **Locate Your Keys**
   * In WordPress admin, go to **Super Forms → Settings** and search for **“captcha”**, *or*
   * go to **Super Forms → Settings** **→ Form Settings** and scroll to reCaptcha API settings
2. **Regenerate Keys**
   * Visit the [Google reCaptcha admin console](https://www.google.com/recaptcha/admin).
   * Delete the existing key pair for your site.
   * Create a **new** v2 (Checkbox) or v3 key, ensuring you enter your site’s exact domain(s) under **Allowed domains**.
3. **Update in Super Forms**
   * Copy the **Site Key** and **Secret Key** into Super Forms’ settings fields.
   * **Save** and **clear** any caches (see § 4).

{% hint style="warning" %}
**Note:** If you switch from v3 to v2, you must generate a fresh v2 key pair—v2 and v3 keys are not interchangeable.
{% endhint %}

### 2. Check Domain & SSL Configuration

Google will refuse to load reCaptcha if the domain or SSL settings don’t match.

* **Domain Whitelist:**
  * In the reCaptcha console, ensure **exact** match of your site’s URL (e.g. `example.com` vs. `www.example.com`).
  * Add both variants if necessary.
* **HTTPS Requirement:**
  * reCaptcha requires a valid SSL certificate on your domain.
  * Mixed-content (HTTP scripts on HTTPS page) will be blocked by modern browsers.

### 3. Resolve JavaScript & Plugin Conflicts

reCaptcha injects its own JS; conflicts can prevent the widget from rendering.

1. **Console Errors:**
   * Open your browser’s Developer Tools → **Console**.
   * Look for errors like `grecaptcha is not defined` or `Blocked script`.
2. **Defer / Async Optimization Plugins:**
   * If you use WP Rocket, Autoptimize, or similar, *exclude* `https://www.google.com/recaptcha/` from defer/minify lists.
   * Or disable JS optimization temporarily to confirm.
3. **Theme Hooks:**
   * Ensure your theme calls `<?php wp_head(); ?>` in the `<head>` and `<?php wp_footer(); ?>` before `</body>`.
   * Missing these hooks prevents plugin scripts from loading.

### 4. Caching & CDN Considerations

Caching layers may serve old JavaScript or block dynamic tokens.

* **Page Caching:**
  * Exclude pages with active forms from full-page caches (e.g. via WP Rocket “Never Cache URL”).
  * Or add query-strings to force fresh loads.
* **CDN Rules:**
  * If you use Cloudflare, create a **Page Rule** to *Disable Performance* on your form pages so Cloudflare doesn’t strip query parameters from reCaptcha scripts.

<figure><img src="/files/xyBI0G76RdNsx3pONita" alt=""><figcaption><p>Your WordPress form reCaptcha v2 and v3 API keys settings</p></figcaption></figure>


# Layout elements

{% content-ref url="/pages/mffkMsIu2GKwAZhAcnUk" %}
[Column/Grid](/elements/layout-elements/column-grid)
{% endcontent-ref %}

{% content-ref url="/pages/pQeoO85Mb5sXYczIqRg1" %}
[Multi-part / step](/elements/layout-elements/multi-part-step)
{% endcontent-ref %}


# Column/Grid

A responsive and flexible column/grid (layout) system for your WordPress forms

## What is a column?

In short a column is a section of your form where you insert a set of elements. A column will determine the layout of the elements that are inside the column. You could see a column as a table (or a grid system). You can put an unlimited amount of columns next to each other. This makes creating forms really flexible because you now do not have limitation on how many elements you need next to each other. A column can also be inserted into another column with unlimited nesting possibility.

## What features does a column have?

Each column has the following features:

* [Conditional Logic](#conditional-logic) - conditionally hide/show column based on other field values
* [Column Visibility](#column-visibility) - will make column invisible on front-end
* [Dynamic Add More](#dynamic-add-more) - allows users to add/duplicate a set of fields
* [Update Conditions Dynamically](#update-conditions-dynamically) - keeps conditional logic on the column itself when **Dynamic Add More** is enabled
* **Hide on mobile devices** - Based on form width (breaking point = 760px)
* **Keep original size on mobile devices (prevents 100% width)** - Based on form width (breaking point = 760px)
* **Hide on mobile devices** - Based on screen width (breaking point = 760px)
* **Keep original size on mobile devices (prevents 100% width)** - Based on screen width (breaking point = 760px)
* **Force responsiveness on mobile devices (always 100% width)** - Based on screen width (breaking point = 760px)
* **Styling options** - background (image, color, opacity), custom padding, positioning (static, absolute etc.)

### Conditional Logic:

Because conditional logic can be applied on almost all elements this part is covered in the [Conditional Logic](/features/advanced/conditional-logic) guide.

{% hint style="warning" %}
When a column or any element is **conditionally hidden** the fields will not be included in emails (if enabled) and will not be saved under contact entries (if enabled) nor can you use {tags} to retrieve them inside your form or email body. Basically the field does not exist when conditionally hidden. This is different from making a column "invisible". Which means the user just can't see it, but it actually exists.
{% endhint %}

### Column Visibility:

Whenever you want to hide a set of fields on the front-end you can enable the option to make the column invisible. In order to do this click on the :pencil2: icon of the column to start editing the column.

The `Element Settings & Options` section will open now. Make sure you are under the `General` TAB.

Now set the **Make column invisible** option to: Yes

Click the `Update Element` button to apply the changes to the column. You will notice that on the form builder the column will still be visible, this is because you otherwise wouldn't be able to edit it anymore. When you preview your form by clicking the `Preview` button at the top right of the page you will notice that the column and it's content will no longer be visible.

{% hint style="warning" %}
When a column is **invisible** the fields will still be included in emails (if enabled) and saved under contact entries (if enabled). If you still require specific fields inside a hidden column to be excluded, you can change this per field. To do this edit the field and go to `Advanced` TAB and change the **Exclude from email** and **Do not save field in Contact Entry** options accordingly.
{% endhint %}

### Dynamic Add More:

In some cases you want to allow the end user to add a new set of fields dynamically by clicking a :heavy\_plus\_sign: button.

**Example:** You have a team registration form and the teams vary from 2 up to 8 persons. For each person you need their first and last name.

What you will do is add a 1/1 column, enable the **Enable Add More** option. Then add 2 text fields to the column 1 for first name, 1 for last name. Now when you preview the form you will notice the :heavy\_plus\_sign: button which allows you to add another set of fields. So it basically duplicates the column on the front-end.

If you need it to have a maximum duplications of 8 (which is the case in our example) you can change the **Limit for dynamic fields (0 = unlimited)** option.

### Update Conditions Dynamically:

When you have enabled [Dynamic Add More](#dynamic-add-more) and you have elements inside the column that are using conditional logic based on a field inside this same column and you require these conditional logic to keep working on dynamically added columns you will have to enable the **Update conditional logic dynamically** option.

This will make sure that whenever a column is duplicated by the user on the front-end, it's conditions reference will be update to it's own column rather than the first original column.

## When to use a column?

A column comes in handy when you ever need to apply the same conditional logic on each of those elements. This prevents you from having to add the same conditions on each element one by one. Now you can just add the conditional logic to the column and it will affect all the elements inside it.

The same method can be applied whenever you need to hide a set of fields at once.

If you are working on a large form and you have a set of fields that need to be duplicated and adjusted only based on their field names it would be a good idea to put these fields in a column. You can then duplicate the column which will then duplicate all of it's elements inside it automatically.

Another useful thing about columns is that when you are working with larger forms you can easily collapse the column on the builder page. This will free up a lot of working space whenever you have finished this part of the form. This will make it also a lot easier to drag & drop new elements into the correct place of your form. When you otherwise would have to scroll down or up all the way, you now probably only have to scroll a little bit or not at all :wink:

## How to add a column?

In order to add a column you can open up the **Layout Elements** section on the builder page. You will see 4 elements, 3 of them are columns the other one is a so called Multi-part, which is not a column. The first one is a 100% width column or so called 1/1 column. The second column is a 50% width (1/2). The third is a 33% width (1/3) column. When added you can still change the column sizes to one of the following ratio's:

* 1/1 (100%)
* 1/2 (50%)
* 1/3 (33%)
* 1/4 (25%)
* 1/5 (20%)

Once you have added your column you can add any element inside it with the exception to **Multi-parts**.


# Multi-part / step

In short the multi-part allows to create WordPress forms that consist of multiple steps. This guide explains what a multi-part element is, what features it has, when to use the multi-part.

## What is a multi-part

A multi-part is an element that will become a so called "step" or section of the form on the front-end. This comes in handy when wish to separate specific sections of your form into one step each. Each multi-part represents it's own step. If you need a 3 step form, you will add 3 multi-part elements. Inside each of them you put the elements and fields that belong to this particulair step.

The end user will be able to navigate through the steps with the `Next` and `Prev` buttons. The end user will also be able to click on the step number, this way the user can navigate through the available steps of the form.

A progress bar will will show the progression that the user has made so far based on the current step the user is on.

## What features does a multi-part have

Each multi-part has the following features:

* [Automatically go to next step](#automatically-go-to-next-step)\
  When user filled out last field of current step proceed to the next
* [Disable autofocus on first field](#disable-autofocus-on-first-field)\
  When user goes to next step do not focus the first field
* [Check for errors before going to next step](#check-for-errors-before-going-to-next-step)\
  Only allow the user to proceed to the next step if current has no errors

#### Automatically go to next step

This option comes in handy whenever you only have 1 field in each step. For instance when you have radio buttons in all of your steps it would be more user friendly to proceed to the next step automatically after the user selected their option.

#### Disable autofocus on first field

By default whenever a user proceeds to the next step, the first field will be automatically focussed. If a dropdown is the first element in this next step, it will automatically be opened so the user can choose an option instantly. By default this option is enabled, so if you do not want this you can disable this setting on each of your multi-parts.

#### Check for errors before going to next step

This option allows you to lock remaining steps in case the user did not completely fill out the current step. This comes in handy whenever you do not want a user to walk through all the steps. This setting can prevent "lazy" users to not wanting to fill out the form because they might think it's to large or to much work.

## When to use a multi-part

You should use a multi-part for large forms. You can also use it when a form must be placed in a small area but still needs to have many fields (think of a survey or poll).

## How to add a multi-part

In order to add a multi-part you can open up the **Layout Elements** section on the builder page. You will see 4 elements, the last one is the so called Multi-part. You can simply drag & drop the Multi-part into the form. Not that a multi-part cannot be nested in a column nor inside another multi-part. Once you have added the multi-part you are allowed to add any element inside it that belongs to this step of the form.

## Multi-part Steps and Progress Bar Customization

To customize the colors of the Steps and Progress bar, you can find the settings under `Form Settings` > `Theme & Colors` on the builder page. From here you can scroll down to the part that says **Progress Bar Colors** and **Progress Step Colors**. Optionally you can also choose to **hide/show** the Steps and or Progress Bar.


# Form elements

List of available form elements for your WordPress form

{% content-ref url="/pages/xXUEnjzeGwbbWKLNhObS" %}
[Calculator](/elements/form-elements/calculator)
{% endcontent-ref %}

{% content-ref url="/pages/5vrakLNVPnTk1UJClNcW" %}
[File upload](/elements/form-elements/file-upload)
{% endcontent-ref %}

{% content-ref url="/pages/TIQYQPPgY1pPjUUPCDU9" %}
[Datepicker](/elements/form-elements/datepicker)
{% endcontent-ref %}

{% content-ref url="/pages/wsAWAcuWX82BLoMbXBpl" %}
[Variable field](/elements/form-elements/variable-field)
{% endcontent-ref %}


# Calculator

How to do create a calculation form for your WordPress site to calculate prices, discounts and other service costs.

## Introduction

With this element you can display calculations by doing any sort of complicated calculation based on user input.

{% hint style="success" %}
**Tip:** You can use any [Math()](https://developer.mozilla.org/en-US/docs/Web/JavaScript/Reference/Global_Objects/Math) JavaScript functions inside your **Math** setting.
{% endhint %}

{% hint style="info" %}
The **Math** setting is compatible with the {tags} system.
{% endhint %}

## When is this element useful?

* Simply display a total amount based of the product price and the selected quantity
* Sum up all the totals and create a subtotal
* Calculate taxes and display prices Incl. or Excl. taxes
* Calculate price for a modular product with a variety of options/settings example:
  * Determine the product price based on dimensions selected by the user
* Calculate loans based on specific variables selected or entered by a user

*the list can go on, having doubts about if something is possible, just contact support!*

## How to define your calculations?

Each **Calculator** element will have a setting called **Math**. Inside here you will define your calculations. For example if you want to calculate the total of `30x10` you would enter `30*10` inside your **Math** setting.

## Using tags inside calculations

Because the **Math** setting is compatible with the {tags} system you can do calculations based on user input. A very basic example would be when you have a quantity element and let the user choose a quantity. For example let's say we are selling a keyboards which cost **$150** each.

The user chooses a quantity of 3. When your quantity field is named `quantity` you can calculate the total amount for all 3 keyboards like so: `{quantity}*150`. The total costs would be **$450**.

Since this **Calculator** element acts as a regular field, we can retrieve the value of 450 through a {tag} inside the Form Settings. This allows us to use the value within any of the features available. For example you could redirect the user to the PayPal checkout to place the order and purchase it instantly online. Some features that are interesting to use alongside the Calculator element are:

* PayPal
* WooCommerce Checkout
* WooCommerce Instant Orders (IN PROGRESS)
* *of course you can use it with any feature for any purpose you require as long as they accept {tags}*

## Using dynamic columns

When using a Dynamic column in your form, you will not be able to use plain {tags} in your calculation like normal. This is because when the column is duplicated by the user the fields inside this newly added column do not have the same name. They will contain a suffix `_x` where `x` is the number of the column.

For example if you have a dynamic column with inside it a field named `amount`, as soon as the user adds a new column the second column will instead have a field named `amount_2`. If the user adds another column the next field will be named `amount_3` and so on. In many cases you will not be limiting the dynamic column to a specific amount, so you will not know how many of these fields there will be and thus you woudn't be able to define it correctly inside the calculation of your **Calculator** element. That's when wildcard tags come in place `{amount}+{amount_*}` translates to the value of `amount` plus all values of fields starting with `amount_`.

When a user added 4 columns the calculation would automatically be transformed to `{amount}+{amount_2}+{amount_3}+{amount_4}`

Let's try to explain it using a real example. We will be selling T-shirts with one of the following colors:

* Red ($10)
* Green ($15)
* Blue ($20)

We will have a dynamic column, and inside it we will have a dropdown named `product` where the user will choose one of the three colors. We will also have a quantity field named `qty` where the user can choose how many of these T-shirts they wish to order. And finally we will display the price with a **Calculator** element named `amount` based on the selected color and quantity. The dropdown item values contain the prices e.g: 10, 15, 20 which we can retrieve with `{product}`. Our **Calculator** calculation will contain `{product}*{qty}`. Of course we must make sure that Update Conditions Dynamically is enabled for our dynamic column, otherwise the calculation `{product}*{qty}` will not be adjusted to `{product_2}*{qty_2}` upon adding new columns, so make sure to enable it!

Now everything is set in place, we can add our final **Calculator** element **outside** the dynamic column and sum all the `amount` **Calculator** elements together to get our total. We can simply add the following calculation to do this: `{amount}+{amount_*}`

Now whenever a user chooses: Red T-shirt (3x) and Blue T-shirt (2x) the `amount` **Calculator** will contain the value **30**, and the `amount_2` will contain the value **40**. Our final **Calculator** will sum the two and will result in **70**, which will eventually display **$70.00** (depending on your **Calculator** [settings](broken://pages/WSZ55PaHwicLK48lPXbQ) of course)

## Settings

{% hint style="info" %}
Wen editing elements you can switch between different TAB's
{% endhint %}

* **\[General] TAB**
  * Calculation *here all the math will be defined*
  * Amount label *this is an optional prefix to be placed before the amount*
  * Amount format *this is the optional format of the amount e.g: %, EUR, USD*
  * Currency *this is an optional currency to be placed before the amount e.g: $, €*
  * Field label *title placed above the amount*
  * Field description *description placed above the amount*
  * Tooltip text *a tooltip which will be visible when hovering over the amount with the mouse*
* **\[Advanced] TAB**
  * Length of decimal *`0`, `1`, `2`, `3` etc.*
  * Decimal separator *`.` or `,`*
  * Thousand separator *`None/empty`, `.` or `,`*
  * Enable birthdate calculations
    * Return years (age)
    * Return months
    * Return days
  * Convert timestamp to specific date format

## Calculation examples

**Grabbing multiple values with advanced tags system:**

Let's say we have a dropdown with product options, in this case the dropdown will have the color, and it's price. We define the following items for this dropdown:

* Red / red;10
* Green / green;15
* Blue / blue;20

If you read the Advanced tags section you will know that you can retrieve the price with a tag like so: `{dropdown;2}`

So whenever you also have a quantity field and wish to calculate the total amount your math should look something like this: `{dropdown;2}+{quantity}`

**Regex tags example:**

To grab all fields and sum their value together you can use one of the following regular expressions inside your tags:

* Contains `*`
* Ends with `$`
* Starts with `^`

Let say we have 3 fields named `server_costs_1`, `server_costs_2`, `server_costs_3` etc. and we would like to sum up all the fields together without the need to manually type in each single one of them in our calculation. What we can do here is use either one of the following calculations:

* `{server_costs_*}` - *this will sum up all fields containing **server\_costs\_** (it does not matter what it starts or ends with as long as it contains this string)*
* `{^server_costs}` - *this will sum up all fields starting with **server\_costs** (it does not matter what it ends with as long as it's starts with this string)*

If you have 3 fields named `1_server_option`, `2_server_option`, `3_server_option` you could use the following regex in your calculation to sum up the fields

* `{server_option$}` - *this will sum up all fields ending with **server\_option** (it does not matter what it starts with)*

## Math functions

* **Plus (addition)**: `2+3` = 5
* **Minus (subtraction)**: `20-4` = 16
* **Obelus (division)**: `50/2` = 25
* **Times (multiplication)**: `100*2` = 200
* **Absolute value of a number**: `Math.abs(3, 5)` = 2
* **Arccosine of a number**: `Math.acos(8, 10)` = 0.6435011087932843
* **Hyperbolic arccosine of a number**: `Math.acosh(2.5)` = 1.566799236972411
* **Arcsine of a number**: `Math.asin(6, 10)` = 0.6435011087932844
* **Hyperbolic arcsine of a number**: `Math.asinh(2)` = 1.4436354751788103
* **Arctangent of a number**: `Math.atan(8, 10)` = 0.6747409422235527
* **Hyperbolic arctangent of a number**: `Math.atanh(0.5)` = 0.549306144334055 (approximately)
* **Arctangent of the quotient of its arguments**: `Math.atan2(10, 0) * 180 / Math.PI` = 90
* **Cube root of a number**: `Math.cbrt(64)` = 4
* **Smallest integer greater than or equal to a number**: `Math.ceil(7.004)` = 8
* **Number of leading zeroes of a 32-bit integer**: `Math.clz32(4)` = 29
* **Cosine of a number**: `Math.cos(1) * 10` = 5.403023058681398
* **Hyperbolic cosine of a number**: `Math.cosh(2)` = 3.7621956910836314
* **Returns Ex, where x is the argument, and E is Euler's constant, the base of the natural logarithm**: `Math.exp(2)` = 7.38905609893065
* **Subtracting 1 from exp(x)**: `Math.expm1(2)` = 6.38905609893065
* **Largest integer less than or equal to a number**: `Math.floor(5.05)` = 5
* **Nearest single precision float representation of a number**: `Math.fround(5.05)` = 5.050000190734863
* **Square root of the sum of squares of its arguments**: `Math.hypot(5, 12)` = 13
* **Result of a 32-bit integer multiplication**: `Math.imul(3, 4)` = 12
* **Natural logarithm (loge, also ln) of a number**: `Math.log(8) / Math.log(2)` = 3
* **Natural logarithm (loge, also ln) of 1 + x for a number x**: `Math.log1p(1)` = 0.6931471805599453
* **Base 10 logarithm of a number**: `Math.log10(2)` = 0.3010299956639812
* **Base 2 logarithm of a number**: `Math.log2(3)` = 1.584962500721156
* **Largest of zero or more numbers**: `Math.max(1, 3, 2)` = 3
* **Smallest of zero or more numbers**: `Math.min(2, 3, 1)` = 1
* **Base to the exponent power, that is, baseexponent**: `Math.pow(4, 0.5)` = 2
* **Pseudo-random number between 0 and 1**: `Math.random()` = 0.04564961619624275
* **Value of a number rounded to the nearest integer**: `Math.round(0.9)` = 1
* **Sign of the x, indicating whether x is positive, negative or zero**: `Math.sign(-3)` = -1
* **Sine of a number**: `Math.sin(2) * 10` = 9.092974268256818
* **Hyperbolic sine of a number**: `Math.sinh(2)` = 3.626860407847019
* **Positive square root of a number**: `Math.sqrt((5 * 5) + (12 * 12))` = 13
* **Tangent of a number**: `Math.tan(90 * Math.PI/180)` = 16331239353195370
* **Hyperbolic tangent of a number**: `Math.tanh(1)` = 0.7615941559557649
* **Integer part of the number x, removing any fractional digits**: `Math.trunc(42.84)` = 42


# Signature

The Signature Element allows you to collect digital signatures from users that fill out the form. You can attach them to the E-mails as well as include them in your generated PDF's

### Adding the Signature to your form

From the Form Elements panel on the builder page, simply drag and drop the Signature element to your form canvas. As shown below:

<div align="left"><figure><img src="/files/yQcLB68KOc3438Kpz1ST" alt="WordPress Signature Form"><figcaption><p>WordPress Signature Form</p></figcaption></figure></div>

### Customizing the signature appearance

After adding the signature to your form canvas, you can configure the size of the signature area if needed. Optionally you can also exclude it from the Admin or Confirmation E-mails if needed.

<div align="left"><figure><img src="/files/GrMO4oJFcb7lHmSKxlJZ" alt="Editing the signature for your form"><figcaption><p>Editing the signature for your form</p></figcaption></figure></div>

<div align="left"><figure><img src="/files/aodIWK6ZRBxSNEF1O83l" alt="Setting the signature width and height for your form"><figcaption><p>Setting the signature width and height for your form</p></figcaption></figure></div>

After changing the width and height to 500x200 the signature drawing area (box) would look something like this:

<div align="left"><figure><img src="/files/y763MupLivVL1oFz2lPd" alt="Custom signature drawing area dimensions"><figcaption><p>Custom signature drawing area dimensions</p></figcaption></figure></div>

Apart from these settings you can also set the line/stroke thickness of the signature, the color.

When you are using any of the Super Forms population methods to retrieve existing data from a previous form submission, you can enable the option to disallow the user to change the existing signature.

By default the signature will have a background image that indicates a signature can be drawn by the user. You can optionally change this image if nesscasary.

<div align="left"><figure><img src="/files/MOTVaNjhXAc7CBN9m7G4" alt="Changing the signature line thickness and color on your form"><figcaption><p>Changing the signature line thickness and color on your form</p></figcaption></figure></div>

### Displaying your signature in E-mails

By default the signature will be attached to your E-mails after the form is submitted. If you don't want this, you can configure it to be excluded from the E-mail.

### Storing the signature in the generated PDF

If you are composing a PDF file with the [PDF Generator Add-on](/features/integrations/pdf-generator), your signatures will be included in the PDF file by default unless you configured it to be excluded from the PDF file. Alternatively you can use the [Tags system](/features/advanced/tags-system) to retrieve the signature as specific locations by using the [HTML element](/elements/html-elements/html-raw).

In case you want to set up automation to send signed documents to relevant parties, update records, or trigger follow-up actions, checkout the [Zapier ](/features/integrations/zapier)integration for Super Forms to connect with almost any third party software.


# File upload

How to add a file upload field (element) to your WordPress form so that users can upload single or multiple images and documents at once.

{% hint style="danger" %}
**Important:** make sure to read the [Secure file uploads](/quick-start/secure-file-uploads) sections to understand how and where files are uploaded and handled based on your settings.
{% endhint %}

### About

The File upload element allows users to select an image or document from their device (mobile or desktop) for upload. This can be useful to gather additional information based on the use case of your WordPress form. For instance, if you own a car repair company and you want a customer to upload detailed photo's of the damage, they could do so via the File upload element. An example of how this would look on the front-end can be seen below:

<div align="left"><figure><img src="/files/kEG94twQPm9coEzI1G1b" alt="Example of a File upload element on your WordPress form."><figcaption><p>Example of a File upload element on your WordPress form.</p></figcaption></figure></div>

### Adding the File upload element to your form

Simply drag and drop the `File upload` element to your canvas:

<div align="left"><figure><img src="/files/6wV8xf5Wt1FBnMvC5yAV" alt="Adding the file upload element to your form."><figcaption><p>Adding the file upload element to your form.</p></figcaption></figure></div>

### Making the file upload required

To make the file upload required (at least 1 or more files are required) you can change the `Min characters/selections allowed` setting under the **Advanced** section when editing the File upload element as shown below. In the below example the user must upload at least 1 file.

<div align="left"><figure><img src="/files/oyqSgBXz5K4SovEymU2u" alt="Require a minimum amount of file uploads."><figcaption><p>Require a minimum amount of file uploads.</p></figcaption></figure></div>

### Setting a maximum file limit

If you want to limit the amount of files a user can upload you can change the `Max characters/selections allowed` setting under the **Advanced** section when editing the File upload element as shown below. In the below example the user is allowed to upload a maximum of 5 files in total.

<div align="left"><figure><img src="/files/dndwya8hNyQj3HYJZq05" alt="Allow a maximum amount of file uploads."><figcaption><p>Allow a maximum amount of file uploads.</p></figcaption></figure></div>

### Allow only specific extensions

If you want the user to only be able to upload specific file extension(s) then you can configure them via the below setting.

<div align="left"><figure><img src="/files/pOTvbwgilLfenvAi6mOr" alt="Define file extensions for your WordPress form file upload element"><figcaption><p>Allowing only specific file extensions for file upload for your WordPress site.</p></figcaption></figure></div>

### Limit the file size

<div align="left"><figure><img src="/files/sUwhONBDP65MaqvO9raw" alt="Define maximum file upload size"><figcaption><p>Setting a maximum file upload size.</p></figcaption></figure></div>


# Datepicker

Presenting you the most advanced date picker for your WordPress forms to cover a wide range of use cases.

### Date tags

When using the datepicker you may use the following `{tags}` in your conditional logic, variable fields and HTML elements

```html
{date;timestamp}
{date;year}
{date;month}
{date;day}
{date;day_name}
{date;day_name_short}
{date;day_name_shortest}
{date;day_of_week}
```

### Date Format

Date formats vary largely across the globe, which is why this setting will be much appreciated in case you need to change to a different date format.

You are also allowed to use your own custom date format if needed. Just keep in mind when doing so that some features within Super Forms are not always compatible with a custom date format.

Possible date formats you can choose from are:

* `European - dd-mm-yy` 31-08-2021
* `Default - mm/dd/yy` 08/31/2021
* `ISO 8601 - yy-mm-dd` 2021-08-31
* `Short - d M, y` 31 Aug, 21
* `Medium - d MM, y` 31 August, 21
* `Full - DD, d MM, yy` Tuesday, 31 August, 2021
* `Custom date format`

### Date range (min/max)

By default there is no date range defined. Meaning a user would be able to select an date based on the `Year range` you defined.

The date range comes in handy when you want to allow a user to only select a date between a specified range.

Let's say you want a user to choose a date between tomorrow and 2 weeks ahead. In this case you can enter `1` under `General > Date range (minimum)`, and `14` under `General > Date range (maximum)`.

It is also possible to define negative numbers, so if you wish to let the user to select 1 week in the past, and 3 weeks in the future then you can define `-7` (min) and `21` (max).

### Connecting 2 datepickers

Connecting datepickers is useful whenever you need to allow users to book for a specific weekend or perhaps a week or weeks.

**How to setup connected datepickers:**

Let's assume that we want a user to select a dat range where the dates must be at least 1 day apart from each other and may not be apart from each other for more than 6 days.

The first step is to add 2 datepickers named `from` and `till` (for example).

Now edit the `from` datepicker. Under `Min. Connect with other datepicker` choose the `till` datepicker.

The next step would be to define the total days they must be apart from eachother at a minimum. In our case we will set this to `2`.

Now when a user chooses `22 Jan 2021` in the `from` datepicker, the `till` datepickers first possible date to select would be `24 Jan 2021`.

Now we have to define tha maximum possible selection for the `till` datepicker.

We are still editing the `from` datepicker here, so we can now choose `till` for the `Max. Connect with other datepicker` option.

Now define the total days they are allowed to be apart from eachother at a maximum, which is `7` in our case, since we want to have the dates apart from eacother for a maximum of 6 days.

As you can see, we haven't touched the `till` date. All the changes where made on the `from` date which is the first date the user selects.

It is possible to also add more datepickers to this loop als long as it's logic to do.

You can also combine this with conditional logic so that a user would first need to choose date1, before date2 is visible and so on.

### Year range

With the year range you can allow your users to only switch to a year within the given range.

You can change the year range of your datepicker under `General > Year range`.

Let's say you want to allow your users to only select a data that is 2 years in the future and not beyond that. But you also don't want them to be able to select any year In that case you could define a range of `-0:+2`.

Another example could be that you want to allow users to select a date that is at maximum 20 years in the past, and 15 years in the future. In which case you could enter `-20:+15` as the range.

A couple of more examples:

* `-100:+5` 100 years in the past, 5 years in the future
* `-0:+5` 0 years in the past, 5 years in the future
* `-1:+3` 1 year in the past, 3 years in the future
* `0:+100` This allows all dates from 0 up to now and 100 years in the future

?> **NOTE:** Please keep in mind that the `General > Date range (minimum)` and `General > Date range (maximum)` will override the `General > Year range` setting.

### Return the current date as default value

There are many use cases that require the need for the current date. May it be the date of the order, or just a starting date for departure.

In this case you can enable the `General > Return the current date as default value`.

This will populate the datepicker with date of today.

{% hint style="info" %}
By default the user will be able to change/edit this date, if you want to prevent this you can set `Advanced > Disable the input field` to `Yes`. Another option would be to put the datepicker inside a [column](broken://pages/bft7eRFPFAmdrM8Ziw9G), and set the [column](broken://pages/bft7eRFPFAmdrM8Ziw9G) to be invisible via `General > Make column invisible` > `Yes`.
{% endhint %}

### Optionally allow users to select work days and or weekends

When your business or service is only during work days and not the weekends you can enable the `General > Allow users to select work days` and disable the `General > Allow users to select weekends`.

When your business or service is only during the weekends you can reverse them.

When your business or service is during both work days and weekends you can keep both enabled.

?> **NOTE:** Perhaps your business or service is only closed on Sunday, in this case you should use the `General > Exclude specific days` setting and leave above options enabled.

### Allow users to choose more than one date

By default a user can only choose 1 date. However you can change this by changing the `General > Allow user to choose a maximum of X dates` to anything bigger than 1.

Let's say you want to allow the user to choose 3 dates. In that case you can change the number `1` to `3`. That way the user will be able to choose 3 dates individually.

Optionally you can also define the minimum dates a user is required to select under `General > Require user to choose a minimum of X dates`.

{% hint style="warning" %}
When using this setting the dates selected by the user do not have to be next to each other, meaning the user could skip a specific date(s) in between their selected dates. For example: `01-01-2021, 01-02-2021, 02-05-2021` would be allowed. If you require a user to choose a date range without the option to skip dates in between you should instead use 2 datepickers that are connected with each other.
{% endhint %}

### Exclude dates or a range of dates

This setting comes in use when excluding holidays and perhaps specific dates that your business or service is closed by default.

You can define your ranges under `General > Exclude dates or a range of dates`.

You are also allowed to use [tags](broken://pages/bft7eRFPFAmdrM8Ziw9G) if needed.

**Examples:**

* `2020-03-25` (excludes a specific date)
* `2020-06-12;2020-07-26` (excludes a date range)
* `01` (excludes first day for all months)
* `10` (excludes 10th day for all months)
* `Jan` (excludes the month January)
* `Mar` (excludes the month March)
* `Dec` (excludes the month December)

### Exclude specific days

This setting is useful whenever your business or service is closed on a specific day of the week.

You can define which days you want to exclude under `General > Exclude specific days`.

Where: 0 = Sunday and 1 = Monday etc.

When you want to exclude both Sundays and Mondays from the datepicker you can enter: `0,1`

### Override days exclusion

This setting works exactly the same as [Exclude dates or a range of dates](broken://pages/bft7eRFPFAmdrM8Ziw9G) but is solely intended to override any days defined to be excluded under [Exclude specific days](broken://pages/bft7eRFPFAmdrM8Ziw9G)

This can become useful in the event of the excluded day being in a month where you are not closed on those days and instead opened for business or service.

Let's say you are always closed on Sundays, with the exception of the month December. In that case you can define `Dec`.

{% hint style="warning" %}
Any exclusion defined under `Exclude dates or a range of dates` will be left untouched.
{% endhint %}

### Allow users to change month/year

Enabled by default, to disallow users to change the month you can disable `General > Allow users to change month`

Enabled by default, to disallow users to change the year you can disable `General > Allow users to change year`

### Change appearance

There are a couple of appearance options that you can change:

#### Show the month after the year in the header

This option is disabled by default. When enabled under `General > Show the month after the year in the header` the user will be able to choose the month via a dropdown.

#### Show the week of the year

This option is disabled by default. When enabled under `General > Show the week of the year` it will display the week numbers for each week.

#### Display dates in other months at the start or end of the current month

Disabled by default, enable via `General > Display dates in other months at the start or end of the current month`

When enabled you can also optionally enable the option `General > Make days shown before or after the current month selectable` which allows the user to actually click on the date to choose it.

#### The number of months to show at once

By default this is set to `1`, which means only one month will be visible at once. When a user is viewing the month Jan, and clicks next, it will display the next month Feb.

When you increase this number to for instance `3`, it will show the months `Jan, Feb, Mar` at once. When the user clicks to view the next months, it will display `Apr, May, Jun`.

### Return age in years/months/days (Calculator element)

By default when you use a datepicker in combination with the calculator element, the datepicker will contain the timestamp of the selected date.

With this you can basically do any tipe of manipulation and calculation required.

To make things easier for you the [Calculator element](broken://pages/bft7eRFPFAmdrM8Ziw9G) simply adds an option for the **Datepicker** element called `General > Return age as value instead of the date`.

When enabled the datepicker will not return the date, but instead it will return the age in years.

This is useful in case you need to know the age of a user, or perhaps the age of an object.

Another option is to let the datepicker keep returning it's timestamp, and instead enable `Advanced > Enable birthdate calculations` on the calculator element itself.

This way you can have both the timestamp plus the age in years, months or days. Depending on what you choose under `Advanced > Select which value to return for calculations`.

### Localization

You can change the localization (language and format) of the datepicker via `General > Choose a localization`. The following languages/formats are available:

* English / Western (default)
* Afrikaans
* Algerian Arabic
* Arabic
* Azerbaijani
* Belarusian
* Bulgarian
* Bosnian
* Català
* Czech
* Welsh/UK
* Danish
* German
* Greek
* English/Australia
* English/UK
* English/New Zealand
* Esperanto
* Español
* Estonian
* Karrikas-ek
* Persian
* Finnish
* Faroese
* Canadian-French
* Swiss-French
* French
* Galician
* Hebrew
* Hindi
* Croatian
* Hungarian
* Armenian
* Indonesian
* Icelandic
* Italian
* Japanese
* Georgian
* Kazakh
* Khmer
* Korean
* Kyrgyz
* Luxembourgish
* Lithuanian
* Latvian
* Macedonian
* Malayalam
* Malaysian
* Norwegian Bokmål
* Dutch (Belgium)
* Dutch
* Norwegian Nynorsk
* Norwegian
* Polish
* Brazilian
* Portuguese
* Romansh
* Romanian
* Russian
* Slovak
* Slovenian
* Albanian
* Serbian
* Swedish
* Tamil
* Thai
* Tajiki
* Turkish
* Ukrainian
* Vietnamese
* Chinese zh-CN
* Chinese zh-HK
* Chinese zh-TW

### Demo Forms

The following demo forms are available under `Super Forms > Demos`:

* Calculate Days Between Dates (requires Calculator element)
* Calculate Age (requires Calculator element)

### Example & Tutorial

#### Different time range based on selected day

Let's say you have a reservation form and you have different working hours during the week.

* On Sunday and Monday you are closed
* On Friday and Saturday you are opened from 13:00 till 22:00
* On other days you are opened from 13:00 till 18:00

The full example code can be found below, which you can simply copy/past under the `Code` TAB on your builder page.

In order to accomplish this, there are a couple of things that you need to do. The steps made to create this form are as follows:

**1. Adding the elements**

1. Add a datepicker field `Form Elements > Date` and name it `date`
2. Add a total of 2 timepicker fields `Form Elements > Time` and name them `other`, `friday_saturday`
3. Add a hidden field `Form Elements > Hidden` and name it `time` (we will make it a [variable field](broken://pages/bft7eRFPFAmdrM8Ziw9G) which will hold either the value from `other` or `friday_saturday`)
4. Edit the `other` timepicker and change `General > The time that should appear first...` to `13:00` and `General > The time that should appear last...` to `18:00`
5. Edit the `friday_saturday` timepicker and change `General > The time that should appear first...` to `13:00` and `General > The time that should appear last...` to `22:00`

**2. Changing the date format**

In our example we need to know which day the user selected (not to be confused with "which date"). We need to know the day of the week as in "Monday", "Tuesday" etc. Based on this we can display the correct timepicker via [conditional logic](broken://pages/bft7eRFPFAmdrM8Ziw9G). Edit the `date` field and change the date format `General > Date Format` to `Full`.

Since we are closed on Sunday and Monday we must also exclude these days from the datepicker. To do so edit the `date` field and set `General > Exclude specific days` to `0,1`. This will make sure both Sundays and Mondays can't be selected by the user.

**3. Conditionally show the timepickers**

Now we have to define the [conditional logic](broken://pages/bft7eRFPFAmdrM8Ziw9G) for our timepickers so they are displayed accordingly.

First let's edit the `other` timepicker so that it will be displayed when the `date` does **not contain** the value `Fri` and `Sat`.

Set `Conditional Logic > Action` to `Show` and set `Conditional Logic > When to Trigger?` to `All`.

Define the conditional logic as follows:

\[`{date}` | `!! Not contains` | `Fri`] **AND** \[`{date}` | `!! Not contains` | `Sat`]

Now edit the `friday_saturday` timepicker so that it will be displayed when the `date` **contains** either the value `Fri` or `Sat`.

Set `Conditional Logic > Action` to `Show` and set `Conditional Logic > When to Trigger?` to `All`.

Define the conditional logic as follows:

\[`{date}` | `!! Contains` | `Fri`] **OR** \[`{date}` | `!! Contains` | `Sat`]

Test to see if the timepickers are displayed accordingly, if everything is correctly defined you should now only be able to choose a time between 13:00 and 22:00 for the Fridays and Saturdays. And for the other days between 13:00 and 18:00. You should also not be able to select the Sundays and Mondays because you excluded these days on the `date` field.

**4. Merging timepickers into one**

If you setup the conditional logic correctly you should only see 1 timepicker at once. Which means that only one timepicker will be send via E-mail and stored in the Contact Entry.

However they do not share the same field name right now (`other` and `friday_saturday`).

This might not be a problem in normal situations, because those fields can still share the same E-mail label. However when you are using a third party service, or doing a POST requires. Or any other data handling (exproting entries for instance) that depends on the field name(s), it might be required to always have the same field name no matter what field was conditionally visible.

?> **TIP:** In general it is good practise to use a [variable field](broken://pages/bft7eRFPFAmdrM8Ziw9G) in these situations.

If you decide to use a variable field to merge multiple fields into one, you will most likely want to exclude the others fields from both emails and from being saved in the contact entry. You can do so by editing both timepickers `other` and `friday_saturday` and setting `Advanced > Exclude from email` to `Exclude from all emails`. And disable `Advanced > Do not save field in Contact Entry`.

Now edit your hidden field `time` and set `Conditional Variable (dynamic value) > Make field variable` to `Enabled (make variable)`.

In this case there are 2 different ways to configure the conditional logic. The first one being the simples which is to do a check on the datepicker to see if it is not empty. When it is not empty we will apply the condition and therefore grab the values from the timepicker and combine them. In this case there will always be one timepicker conditionally hidden which makes this condition possible:

\[`{date}` - `!= Not equal` - `""`]

**When above conditions are met set following value:**

`{other}{friday_saturday}`

**Explanation of the above conditional logic:**

The above condition simply checks if the `date` field is filled out (an date was selected by the user) which means the tag `{date}` would not be empty. Which means the condition holds true and therefore is applied. Which means that the value of the hidden field would be updated to whatever the tags `{other}{friday_saturday}` holds. Which would hold the selected time by the user for both the `other` timepicker and the `friday_saturday` timepicker. However only 1 of the timepickers would be visible at a given time, so either `{other}` or `{friday_saturday}` will always be an empty string (undefined) because conditionally hidden. If the above conditional logic doesn't make sense to you right now then please see the below alternative which might seem more logical.

A more logical conditional logic (to merge the 2 timepickers) would be as follows:

\[`{other}` - `!= Not equal` - `""`]

**When above conditions are met set following value:**

`{other}`

Now add another conditional rule by clicking on the `[+]` icon

\[`{friday_saturday}` - `!= Not equal` - `""`]

**When above conditions are met set following value:**

`{friday_saturday}`

**Explanation of the above conditional logic:**

The above conditional logic consists out of 2 conditions. The first one checks if the `other` timepicker is not empty, and if so it will populate the `time` field to be whatever value `{other}` returns. Which is the time itself in case of the `other` timepicker being filled out by the user and not conditionally hidden.

The same applies for `friday_saturday` timepicker.

**Example form code**

You can copy/paste the below code under `Code` TAB on your form builder to see it in action.

The only difference in the below form code is that we added a HTML element to easily debug / display the selected values. This way you can see what a hidden field's value contains, and thus what our variable field contains when changing the datepicker and timepicker.

```json
[{"tag":"date","group":"form_elements","data":{"name":"date","email":"Date:","placeholder":"Select a date","range":"-100:+5","work_days":"true","weekends":"true","maxPicks":"1","minPicks":"0","excl_days":"0,1","format":"DD, d MM, yy","custom_format":"dd-mm-yy","first_day":"1","changeMonth":"true","changeYear":"true","showMonthAfterYear":"","showWeek":"","showOtherMonths":"","selectOtherMonths":"","numberOfMonths":"1","validation":"none","may_be_empty":"false","grouped":"0","width":"0","wrapper_width":"0","connected_min_days":"1","connected_max_days":"1","exclude":"0","custom_tab_index":"-1","icon_position":"outside","icon_align":"left","icon":"calendar","conditional_action":"disabled","conditional_trigger":"all","pdfOption":"none"}},{"tag":"time","group":"form_elements","data":{"name":"other","email":"Time:","placeholder":"Select a time","validation":"none","may_be_empty":"false","may_be_empty_conditions":[{"field":"","logic":"","value":"","and_method":"","field_and":"","logic_and":"","value_and":""}],"format":"H:i","step":"15","minlength":"13:00","maxlength":"18:00","duration":"false","grouped":"0","width":"0","exclude":"0","custom_tab_index":"-1","icon_position":"outside","icon_align":"left","icon":"clock;far","conditional_action":"show","conditional_trigger":"all","conditional_items":[{"field":"{date}","logic":"not_contains","value":"Fri","and_method":"and","field_and":"{date}","logic_and":"not_contains","value_and":"Sat"}],"pdfOption":"none"}},{"tag":"time","group":"form_elements","data":{"name":"friday_saturday","email":"Time:","placeholder":"Select a time","validation":"none","may_be_empty":"false","may_be_empty_conditions":[{"field":"","logic":"","value":"","and_method":"","field_and":"","logic_and":"","value_and":""}],"format":"H:i","step":"15","minlength":"13:00","maxlength":"22:00","duration":"false","grouped":"0","width":"0","exclude":"0","custom_tab_index":"-1","icon_position":"outside","icon_align":"left","icon":"clock;far","conditional_action":"show","conditional_trigger":"all","conditional_items":[{"field":"{date}","logic":"contains","value":"Fri","and_method":"or","field_and":"{date}","logic_and":"contains","value_and":"Sat"}],"pdfOption":"none"}},{"tag":"hidden","group":"form_elements","data":{"name":"time","email":"Hidden:","exclude":"0","code_length":"7","code_characters":"1","code_uppercase":"true","code_invoice_padding":"4","conditional_variable_action":"enabled","conditional_variable_method":"manual","conditional_variable_row":"date","conditional_variable_col":"date","conditional_variable_delimiter":",","conditional_variable_enclosure":"\"","conditional_variable_items":[{"field":"{date}","logic":"not_equal","value":"","and_method":"","field_and":"","logic_and":"","value_and":"","new_value":"{other}{friday_saturday}"}],"pdfOption":"none"}},{"tag":"html","group":"html_elements","data":{"title":"Debugging:","html":"<strong>date:</strong> {date}\n<strong>other:</strong> {other}\n<strong>friday_saturday:</strong> {friday_saturday}\n-------------------------\n<strong>time:</strong> {time}","nl2br":"true","conditional_action":"disabled","conditional_trigger":"all","pdfOption":"none"}}]
```


# Variable field

How to create a dynamic/variable field for your WordPress form

A variable field is a **Hidden field** that has variable conditions defined. More details on [how to create and use a variable field](/features/advanced/variable-fields).


# Dropdown

Adding a dropdown element to your WordPress form

### What is a Dropdown element?

A dropdown element (also know as "select menu" or "select") is an element where a user can choose an item (or multiple items) from a list. For instance when you ask what color they want for their t-shirt, you could use a Dropdown element with different colors to choose from.

### How to add a Dropdown element?

On the builder page, open the Form Elements panel. Search for the `Dropdown` element, and drag it to your canvas. You can now edit the element and configure it as desired by following the settings and the descriptions.

### How to set a maximum or minimum selection?

By default a user can only select 1 item from the dropdown. If you require a user to be able to select multiple items or a maximum of X items, you can configure this by editing the Dropdown element, navigating to the **Advanced** section. And configuring the max/min selections.

### How to disable the option to filter items?

By default a user is able to filter dropdown items by typing while the dropdown is opened (focused). In some use cases this might be undesired. In that case you can disable the filter by enabling "Disallow users to filter items" as shown below:

<div align="left"><figure><img src="/files/WM7iww3vL9mLIgpIn0DG" alt="Disabling dropdown search/filter."><figcaption><p>Disabling dropdown search/filter.</p></figcaption></figure></div>

### Retrieving WordPress taxonomy as items

To populate the dropdown with taxonomy items e.g. Post categories (category), or WooCommerce product categories (product\_cat) you can set the **Retrieve method** to "Specific taxonomy (categories)". Simply enter the **Taxonomy slug**. Optionally you can exlude specific category ID's to be excluded from the list. And to hide any empty categories as shown below.

<div align="left"><figure><img src="/files/orD3INuv9TXaTLpbPETA" alt="Retrieving taxonomy as items for your Dropdown element."><figcaption><p>Retrieving taxonomy as items for your Dropdown element.</p></figcaption></figure></div>

### Retrieving WordPress posts as items

To populate your dropdown with posts (or a custom post\_type) you can set the **Retrieve method** to "Specific posts (post\_type)". For example, you could return a list of WooCommerce products by entering `products`. You may also filter based on post status, and define a limit. Ordering by title, date or other parameters is also possible.

If you require to exclude a product you may enter the post ID's separated by comma's.

<div align="left"><figure><img src="/files/4c7kyBWTpVHKiI6wvHPG" alt="Retrieving posts as items for your Dropdown element."><figcaption><p>Retrieving posts as items for your Dropdown element.</p></figcaption></figure></div>

When you wish to filter posts by a specific taxonomy then you can define each filter. For instance to only return products based on a the taxonomy `books` and `movies`, you can define a filter like so:

```
slug|books,movies|product_cat|IN
```

Alternatively you can filter based on tags like so:

```
slug|red,green|product_tag|IN
```

Operators you may use are `IN, NOT IN, AND, EXISTS` and `NOT EXISTS`

Since you are retrieving posts, you can also define what value you'd like to return for the dropdown items. For instance you can choose to return the **Slug**, **ID**, **Title** or some **Custom post meta data** (which allows you to return multiple values for a single item). Which allows you to use [Advanced tags](/features/advanced/tags-system#advanced-tags) `{fieldname;2}` as shown below, which returns both the product ID and Product price. Which can be retrieve with `{fieldname;1}` and `{fieldname;2}` respectively.

<div align="left"><figure><img src="/files/0aN14vrpg0dcJohUub2k" alt="Returning custom meta data from posts for the Dropdown item value."><figcaption><p>Returning custom meta data from posts for the Dropdown item value.</p></figcaption></figure></div>

### Features & Options

This element shares the same options as the Checkbox element + the following extra feature:

* [Setting up Google Sheets for your Dropdown element.](/features/advanced/wordpress-form-with-google-sheets-dropdown)
* Distance / Duration calculation (google directions) setup instructions
  * Return distance in meters
  * Return duration in seconds
  * Return distance text in km/meters (metric) or miles/feet (imperial)
  * Return duration text in minutes


# Text field

Adding a simple Text input field to your WordPress form.

The **Text field** element is probably the most common element when building forms. It allows users to enter data inside an input area which consists of a single line. The Text field inside Super Forms allows you do several advanced things as listed below.

## Features

* [Auto Suggest](/elements/form-elements/autosuggest)
* [Validation](/features/basic/validation)
* [Conditional Validation](/features/basic/validation)
* [Distance & Duration Calculation](/features/advanced/distance-and-duration-calculation)
* [Address Auto Complete](/features/advanced/address-lookup-auto-complete)
* [Conditionally hide/show field](/features/advanced/conditional-logic)
* Tags/Keyword (let users enter tags/keywords)
* Contact Entry Search (populate form with previous entry data)

## Settings

**General:**

* Unique Field Name
* E-mail & Contact Entry Label
* Field Label
* Field Description
* Placeholder
* Default Value
* Field type (text, email, tel, url, number, etc.)
* Tooltip Text
* Validation (required, E-mail address, Phonenumber, etc.)
* Allow field to be empty (skip validation if field is left empty)
* Conditional Validation (?? contains, != is not, == equals, etc.)
* Validation error message

**Advanced Settings:**

* Disable The Input Field
* Make Field Read-Only
* Disable Autocompletion
* Individual / Grouped
* Masked Input
* Text To Uppercase
* Maximum Characters Allowed
* Minimum Characters Allowed
* Maximum Number Allowed
* Minimum Number Allowed
* Field Width
* Wrapper Width
* Exclude From E-mail
* Exclude From Contact Entry
* Error Message Positioning
* Custom TAB Index
* Custom Field Class
* Custom Wrapper Class

**Icon Settings:**

* Icon Positioning
* Icon Alignment
* Icon


# Autosuggest

With the autosuggest field you can let users filter through a set of predefined values by typing in a text field, yet still allow them to freely enter a value on your WordPress form.

The concept of **autosuggest** is to create a **Google Search** like Text field where users can search for a specific value, but also allow to enter their own value.

When a user starts typing into the text field, it will search for matches based on the entered characters and return a list/dropdown to the user. The user can then click on the suggestion to automatically fill the field with this value.

You can find the `Autosuggest` field under the **Form Elements** section. Alternatively you can add a Text field and enable the autosuggest feature manually.

When you edit the Autosuggest element you can configure it's values and options under the Autosuggest section from the dropdown. Here you can define the **Filter logic** and **Retrieve method**.

## Filter logic options

* Contains ??
* Starts with ..%
* Exact match ==
* Contains ?? (case sensitive)
* Starts with ..% (case sensitive)
* Exact match == (case sensitive)

## Retrieve method options

* [Custom items](#custom-items)
* [Specific taxonomy (categories)](#specific-taxonomy)
* [Specific posts (post\_type)](#specific-posts)
* [Tags (post\_tag)](#tags)
* [CSV file](#csv-file)
* Users (wp\_users)
* Product attribute (product\_attributes)
* Current Author meta data
* Current Page or Post meta data
* Current Page or Post terms (based on specified taxonomy slug)
* Specific database table

## Custom Items

This retrieve method allows you to enter your own predefined values by hand. It allows to enter a `Label` and `Value` for each option.

The `Label` represents the searchable string and will be visible for the user.

The `Value` will be used as the field value that will be stored upon a user selecting the filtered option and will not be visible to the user. The `Value` will be saved in the Contact Entry and used in the Admin E-mail and Confirmation E-mail send. In case no match was found, the entered string of the user will be saved instead, meaning the user is free to enter whatever they like for the field. If you do not want a user to have this permission you should consider using a Dropdown Field instead.

## Specific taxonomy

This retrieve method allows to filter a specific taxonomy (category) based on it's **slug** name.

* For **Post Categories** the slug name would `category`.
* For **WooCommerce Product Categories** the slug name would be `product_cat`.

To exclude categories from the list you can enter each category ID separated by comma's under the **Exclude a category** option.

If you wish to hide empty categories you can do this by enabling the **Hide empty categories** option.

Whenever you need to retrieve child categories based on a parent category you can enter the category parent ID under the **Based on parent ID** option. You will have the ability to either return the `Slug`, `Title` or `ID` of the category.

## Specific posts

This retrieve method allows to filter on posts based on the given `Post type`.

* For **Pages** the post type would be `page`
* For **Posts** the post type would be `post`
* For **WooCommerce Products** the post type would be `product`

To exclude posts from the list you can enter each post ID separated by comma's under the **Exclude a post** option.

Whenever you need to retrieve child post based on a parent post you can enter the post parent ID under the **Based on parent ID** option. You will have the ability to either return the `Slug`, `Title` or `ID` of the post.

## Tags

This retrieve method allows you to filter on post tags.

You will have the ability to either return the `Slug`, `Title` or `ID` of the tag.

## CSV file

This retrieve method allows you to filter based on a CSV file you uploaded.

This option works the same as the [Custom Items](broken://pages/Ss4cGlMwua87zD6X5ztJ) retrieve method, except that you will upload a CSV file that will represent the options to filter on.

{% hint style="warning" %}
**Important:** The CSV file only requires two columns in order to work properly. The first column represent the **Value**, and the second column it's **Label**. If you don't need separate values for the label and value, then you can simply define one column.
{% endhint %}

Depending on the CSV you might need to set a custom delimiter or enclosure, this can be optionally changed if required.

An **example CSV** file with a list of products and their color and price: <https://shorturl.at/adtKT>. This CSV example uses multiple values for the `value` column.

This allows you to retrieve the selected product title, color and price separately by using advanced tags: `{fieldname;1}`, `{fieldname;2}` `{fieldname;3}` respectively. You can use these tags inside [Conditional logic](/features/advanced/conditional-logic), [Variable fields](/features/advanced/variable-fields) and to populate them into fields inside your form if needed. You can even use a validation method to compare user entered data with values from the CSV file. In case you need to confirm some personal details such as "birthdate", "address" etc.

See [this demo form](https://super-forms.com/example-forms/search-csv-file-and-populate-form-with-advanced-tags/) to see it in action.


# Keywords

under construction...


# Radio button

## Features & Options

This element shares the same options as the Checkbox element.


# Keyword Field

under construction...


# Button

under construction...


# Audio Recording (microphone)

Audio recording via microphone

This is not a native field that is included in Super Forms, instead for the time being it's possible with a small JavaScript code to allow users to upload a audio recording with the use of a microphon.

Please read the [Developers > Code Examples > Audio Recording](/developers/code-examples/audio-recording-field) Field page for more details.

{% content-ref url="/pages/wojMXFwZsyFAl6jKEZtO" %}
[Audio Recording Field](/developers/code-examples/audio-recording-field)
{% endcontent-ref %}


# HTML elements


# Heading

Add titles (headings) inside your WordPress form

Compatible with [Tags system](/features/advanced/tags-system)


# HTML (raw)

Allows you to insert custom HTML / CSS / JavaScript on your WordPress form

The HTML element is a powerful element which is compatible with the [Tags system](/features/advanced/tags-system), allowing for complex WordPress form creations where entered data becomes available to your HTML element on the fly. You can use it to embed pages, or just for custom HTML coding.

The HTML element allows you to use [foreach loops](/features/advanced/foreach-loops) over dynamic column to print out or display a summary or just information to the user based on their selection/input.

You can also use if statements inside your HTML elements allowing you to display content inside your WordPress form conditionally based on the user selection/input.


# Image

Used to display images inside your WordPress form

You can browse any images from your Media Library or upload a new image. You can define the dimensions as well as the alignment and an optional image link.

You can define [conditional logic](/features/advanced/conditional-logic) on images to display an image based on a user selection if needed.

The images are compatible with the [PDF Generator](/features/integrations/pdf-generator) Add-on.


# TinyMCE

Use this if you are not familiar with HTML and want to display text with markup to your users on your WordPress form

Allows you to add rich text in a "MS Word" like experience, adding bold text, headings, tables, images etc. without the requirement to have knowledge of HTML.


# Divider

Used to visually divide sections of your WordPress form for a more user friendly experience allowing the user to continue to the next step or previous step in your form

{% hint style="info" %}
If you are looking for a way to create a WordPress form with steps (with next / previous buttons) check out the [Multi-part element](/elements/layout-elements/multi-part-step) instead.
{% endhint %}


# Spacer

Used to add space between elements in your WordPress form

This element is solely for creating vertical spaces between elements in your WordPress form!


# PDF page break

Used to start a new PDF page when using the PDF Generator for your WordPress form

{% hint style="info" %}
**Note:** this element is only used in combination with the [PDF Generator Add-on](/features/integrations/pdf-generator)
{% endhint %}

Add page breaks to the generated PDF file for your WordPress form, or change the orientation of the next/upcoming page.

When [generating PDF file](/features/integrations/pdf-generator) for your WordPress form, you can use the **PDF Page Break** element to divide your PDF into multiple pages. This allows you to push any elements below the PDF Page Break onto the next page in the generated PDF.


# Google map element WordPress form

Used to display (or generate) a google map (or route) based on user input for your WordPress form

{% hint style="info" %}
When using the Google Map element you must have a valid API key. You can obtain an API key from within your [API manger](https://console.developers.google.com/). Make sure to enable the `Google Maps JavaScript API` for your API.
{% endhint %}

You can find the google map element under `HTML Elements` > `Google Map`.

**The Google Map comes with several features:**

* Option to set region code e.g `nl`, `de`, `uk`, `us` etc.uu
* Option to set/adjust `zoom`
* Option to enable/disable `UI (buttons)`
* Option to `draw Route` from address A (origin) to address B (destination)
* Option to optionally display the `directions panel` (list with route instructions)
* Option to set it's travel mode `DRIVING`, `BICYCLKING`, `TRANSIT`, `WALKING`
* Option to populate `distance` to field (including Calculator element)
* Option to populate `duration` to field (including Calculator element)
* Option to define the unit system `METRIC` or `IMPERIAL`
* Option to draw Route with `Waypoints` (stops in between the route)
* Option to optimize route with waypoints (to rearrange it in a more efficient order)
* Option to avoid `Ferries`, `Major highways`, `Toll roads` (if possible)


# Basic


# Confirmations emails

How to configure E-mail confirmations for your WordPress forms (form submissions).

{% hint style="info" %}
In case you are having problems with email delivery, read the [Email delivery problems](/common-problems/index/email-delivery-problems) guide on possible solutions.
{% endhint %}

{% hint style="info" %}
If you just want to know how to edit/change the recipient of your emails, you can skip to the [Email recipient(s)](#email-recipient-s) section below.
{% endhint %}

### About

There are two types of emails sent after a form is being submitted. One to the **Admin** (site owner) also known as `Admin E-mail` and one to the **User** (the person who fills out the form) also known as `Confirmation E-mail`.

Typically you would want to sent a confirmation email to the user who fills out the form so they know it was successfully submitted. The actual form data (all information and details) would typically be sent to the Admin (site owner) or a [specific department](/tutorials/sending-emails-to-specific-department-for-wordpress-contact-forms) to process the inquiry.

Apart from sending an email, the WordPress form will also create a so called `Contact Entry` with all the data which you can view via **Super Forms > Contact Entries** via your WordPress menu.

Both emails can have different body contents and both can be enabled or disabled depending on your use case via the Form Settings as shown in the below two pictures.

<div align="left"><figure><img src="/files/QEWb1NJOzTIfnf13ccR6" alt="Enabling Admin E-mail for your WordPress form"><figcaption><p>Enabling Admin E-mail for your WordPress form</p></figcaption></figure></div>

<div align="left"><figure><img src="/files/TMGMh6HEcBHHrEzJPjUD" alt="Enabling Confirmation E-mail for your WordPress form"><figcaption><p>Enabling Confirmation E-mail for your WordPress form</p></figcaption></figure></div>

### Email recipient(s)

The Confirmation E-mail will be sent to the email address entered by the user in your form. By default the tag `{email}` is defined. So make sure your form has an E-mail field named `email` in order for this to work. By default the `E-mail address` field has the name `email` when added, so it should work out of the box unless you re-named it to something different. In that case you can update the {tag} inside the setting or re-name the field back to `email`.

By default the form will sent admin emails to the administrative email address of your WordPress site via the tag `{option_admin_email}`.

You can find this email address via the WordPress menu **Settings > General > Administration Email Address** as shown below.

<div align="left"><figure><img src="/files/nUfw8OiBkgC3J3ZQHmGk" alt="Viewing or changing your WordPress administration email address"><figcaption><p>Viewing or changing your WordPress administration email address</p></figcaption></figure></div>

If you wish to sent the emails to a different address, you can change it via one of the following methods:

* [Editing the individual Form Settings](#editing-the-individual-form-settings) (**recommended**)
* [Using Global Overriding](#using-global-overriding) (if you want to use the same email address for all forms)
* [Dynamically based on user selection/input](#dynamically-based-on-user-selection-input) (e.g. sent to specific department)

#### Editing the individual Form Settings

Edit your form, open the `Form Settings` panel. Choose either Admin E-mail from the dropdown, and change the `Send email to:` setting to the desired E-mail address. In case you have problems with email delivery you can read the [Email delivery problems](/common-problems/index/email-delivery-problems) guide on common causes and how to fix them.

#### Using Global Overriding

You can override your form settings on a global level via `Super Forms > Settings > Global Overriding`. More information about global overriding can be read in the [First Time Setup](/quick-start/first-time-setup#global-overriding) guide.

#### Dynamically based on user selection/input

You can read more about this method in the [Sending emails to specific department](/tutorials/sending-emails-to-specific-department-for-wordpress-contact-forms) guide.

### Email body

By default both will contain all data that was filled out on the form.

Each field element has options to define if the data should be included in the Admin and/or Confirmation emails. By default all fields are included. Keep in mind that if you define it as being excluded the data will not be displayed inside the email body (content) unless you explicitly use[ {tags}](/features/advanced/tags-system) to retrieve the field value.

{% hint style="warning" %}
Fields that are conditionally hidden (see [Conditional Logic](/features/advanced/conditional-logic) section) will be excluded completely and can not be retrieved even when using {tags}.
{% endhint %}

Your email body content will loop over all fields and display it inside a table in your **Body content** via the tag `{loop_fields}` (which retrieves what is defined under **Field Loop** setting).

The **Field Loop** acts as a row for each field by retrieving the field **Label** using the tag`{loop_label}` and the field **Value** using the tag `{loop_value}` as shown below:

<div align="left"><figure><img src="/files/sXuezZFBUYGLWxuIPYqX" alt="WordPress form email body content"><figcaption><p>WordPress form email body content</p></figcaption></figure></div>

Of course you are not required to use this as your content, and you are free to create your custom HTML E-mail. You can use field [{tags}](/features/advanced/tags-system) to retrieve any of your form data in your email body. You may also use [if statements](/features/advanced/if-statements) to conditionally display additional information or text based on a field value or loop over [dynamic columns](/elements/layout-elements/column-grid#dynamic-add-more) (allows users add more fields dynamically) with the use of [foreach loops](/features/advanced/foreach-loops).


# Save Form Progression (continue later)

How to save entered data when a user fills out a form on your WordPress website so that they can continue later without losing their current progress.

{% hint style="info" %}
Saving form progression works for both logged in users and none logged in users.
{% endhint %}

### What does form progression stand for? <a href="#h_01ge7jqk1kd16bmxn3gz93rgd9" id="h_01ge7jqk1kd16bmxn3gz93rgd9"></a>

Form progression stands for the progression that a user made when filling out a form.

In other words, a user might have filled out 7 out of 14 fields of a form, which means 50% of the form was filled out by the user.

The 7 fields that the user has filled out is the progression the user made filling out the form.

### How does it work? <a href="#h_01ge7jqr4wn98mg82ny9j06ena" id="h_01ge7jqr4wn98mg82ny9j06ena"></a>

Normally when a user fills out a form, and leaves the page, all the work the user had done, would now be gone. To avoid this inconvenience you can enable the **Save Form Progression** feature so that all the progression will be saved.

Let's say a user filled out your form for 50% percent, and leaves your website, and returns back at a later time. As soon as the user returns she/he can continue where they left off.

### How to enable this feature? <a href="#h_01ge7jqw38c01ten38yzbeexk0" id="h_01ge7jqw38c01ten38yzbeexk0"></a>

To use this feature you can go to **Form Settings > Form Settings** and enable the option **Save form progression**.

When enabled the progress of the user will be saved at the moment they leave the form page or your website completely. As soon as the user returns to your site and wishes to continue filling out the form, all the data the user entered will still be in place.


# Build In Translation System

Translate your forms on the fly without requiring an additional plugin. You can translate elements and form settings so that everything can be read in a different language properly.

## Defining translation for your form

Simply visit the `Translations` TAB when editing your form and define the languages required for your specific form as shown below.

<figure><img src="/files/59YK4zgyBGO96vvOK6Sc" alt="Define languages for your form under the Translations TAB on the builder page."><figcaption><p>Define languages for your form under the Translations TAB on the builder page.</p></figcaption></figure>

## Enabling RTL (right to left) layout for your language

In case your language requires **RTL** (right to left layout) you can enable it per language individually:

<figure><img src="/files/RFAnQ7zKKBMPekaK9eLi" alt="Enabling RTL (left to right) layout for your languages."><figcaption><p>Enabling RTL (left to right) layout for your languages.</p></figcaption></figure>

## Allowing users to switch to a different language manually

Enable the **Language Switch** if you want to display a dropdown above the form so that the user can change to a different language manually:

<figure><img src="/files/TVcpubJvrbK0pqUoBLrx" alt="Option to display a dropdown on the front-end so that users can switch to a different language manually."><figcaption><p>Option to display a dropdown on the front-end so that users can switch to a different language manually.</p></figcaption></figure>

<figure><img src="/files/jq1XclU4cSTrqpdScq2K" alt="User manually switching language via the dropdown."><figcaption><p>User manually switching language via the dropdown.</p></figcaption></figure>

## Loading a specific language via a shortcode

You can also display a fixed language for your form by grabbing the **shortcode** e.g. `[super_form i18n="nl_NL" id="1234"]` by defining the language attribute e.g `en_GB`.

That way you can disable the **Language Switch**, and use a build in language plugin like WPML to display the correct form based on the language of the page.

<figure><img src="/files/JgEtS667Z5zmIzA8JQd6" alt="Language specific shortcode to display the form on your multilingual WordPress site"><figcaption><p>Language specific shortcode to display the form on your multilingual WordPress site</p></figcaption></figure>

## Demonstration of Translation form on the front-end

A front-end demo can be found here:

{% embed url="<https://super-forms.com/example-forms/build-in-translation-system/>" %}
Front-end demo of the build-in Translation system.
{% endembed %}


# Populate form

How to automatically populate your WordPress form with previous data or predefined data via parameters or previous form submission.

### What does "auto population" mean?

Auto population refers to the process of automatically filling in a field in a form with a predetermined value, which the field did not originally have on its own. In simpler terms, it means that a value is automatically inserted into a form field without the user having to manually enter it.

### Basic example of auto population

A basic example of auto population is to have an URL containing some information that you wish to process in your form. The URL could look like `domain.com/contact/?name=John&age=45&country=US`. When your form has fields named `name`, `age`, `country` those fields would then be auto populated with the values `John`, `45`, `US`.

### When and why would I use auto population?

Auto population is commonly used in two scenarios. First, when you have a multi-form setup and need to **transfer data from one form to another**. By automatically populating fields in subsequent forms with data from the previous form, users can easily navigate through the process without having to re-enter the same information.

The second scenario is when you want to retrieve data from a previously saved contact entry in your database. This can be useful for updating existing contact information or creating new entries based on the existing data. By auto-populating the fields, users can make updates where necessary and leave the rest untouched, saving time and effort.

These are just a couple of examples, but there are many other use cases where auto population can be implemented to streamline data entry processes and enhance user experience.

### How can I populate fields with data?

There are a few methods available to auto-populate fields with predefined values:

* [GET request](#get-request-via-query-strings) (via query strings)
* [POST request](#post-request) (via post data)
* [Auto populate form with last Contact Entry data](#auto-populate-form-with-last-contact-entry-data)

#### GET request (via query strings):

This is the most commonly used and straightforward method. It can be used to set a predefined value for one or multiple fields in your form via the URL that the user visits. You can also use it to **transfer data from one form to another**. You can have two forms where the first form asks for the user's first name and last name. The form then redirects to a second page that contains the second form, and the data is passed through the query string. By setting a custom redirect URL for your form and including the field values in the URL (e.g., `domain.com/page2/?first_name={first_name}&last_name={last_name}`), the second form will automatically populate the corresponding fields with the values entered in the first form.

A simple example would be to have two forms, where the first form would ask for the users **Frist name** and **Last name**. The form will then redirect to a second page that contains the second form and parse it's data via the query string.

You can set a custom redirect for your form under `Form Settings > Form Settings`. Then choose from **Form redirect option** to use a **Custom URL**.

Now you can enter your URL which would look something like this: `domain.com/page2/?first_name={first_name}&last_name={last_name}`. This will redirect to `page2` which should contain your second form.

Your second form will also require two fields named `first_name` and `last_name`. They will now automatically contain the values that the user entered on the first form.

<div align="left"><figure><img src="/files/0zvJfWqSwDnMlurHngGh" alt="Redirecting to different form and populating the form with data."><figcaption><p>Redirecting to different form and populating the form with data.</p></figcaption></figure></div>

#### POST request

This method works similarly to the GET request, but the data is not visible in the URL. It provides a cleaner approach but functions in the same manner. Instead of using a redirect, you enable the form POST method and map the key-value pairs using custom parameter strings.

Instead of using a redirect method, you would use the **Enable form POST method**.

You can then map your key value pairs under **Enter custom parameter string**, which would look something like:

```
first_name|{first_name}
last_name|{last_name}
```

<div align="left"><figure><img src="/files/UdgHl4HUJu3ww0uiVQMs" alt="Enable form POST method with custom parameters."><figcaption><p>Enable form POST method with custom parameters.</p></figcaption></figure></div>

#### Auto populate form with last contact entry data

{% hint style="info" %}
**Please note:** this method will only work when a user is logged in
{% endhint %}

This method requires the user to be logged in. If a user is logged in and has previously submitted a form that creates contact entries, you can auto-populate a form with their last submitted data. This is particularly useful when users need to submit the same form multiple times, with some data remaining unchanged. By retrieving the last submitted data for that user, the form fields can be automatically populated with the corresponding values.

### Update an already existing form submission (contact entry)

Another option that you have is to update the previous entry without creating a new one as shown below:

<div align="left"><figure><img src="/files/invTFFqNq7TyKbcq7NKm" alt="Retrieve last form submission and update existing entry."><figcaption><p>Retrieve last form submission and update existing entry.</p></figcaption></figure></div>


# Popups

How to display a form via a popup or modal on your WordPress website

### Creating a form and enabling the popup

Create your form and define the popup settings under **Form Settings > Popup Settings** ([see advanced popup settings below](#advanced-popup-settings)).

### Adding the popup to a single page or multiple pages

Grab the form shortcode and add it on the page(s) where you want to display the popup (form).

<figure><img src="/files/uBqMbmDMnYuaIo4GUUIE" alt="Grab the form shortcode"><figcaption><p>Grab the form shortcode</p></figcaption></figure>

### Adding the popup to all pages

If you want to display the popup on all of your pages, it is recommended to use a **Text Widget** with the form shortcode and to put it into the footer of your website. This way the popup and form will be loaded on all pages and can be triggered on all pages. Via your WordPress main menu **Appearance > Menu** you can also add a **Custom Link** with it's URL set to `#super-popup-XXX` to open the Popup from your site menu.

### Opening the popup via a link or button

There are two different methods to open the popup manually. In the below examples simply replace `XXX` with your form ID. When using these methods you will probably want to configure the Popup settings on your form so that the popup does not display on page load.

{% hint style="danger" %}
**Important:** don't forget to put the actual form shortcode \[super-forms id="XXX"] on the page(s) where you wish to display a "Open form popup" button.
{% endhint %}

#### Open popup with URL

```html
<a href="#super-popup-XXX">Open the Popup</a>
```

#### Open popup with shortcode

```html
[super-popup id=XXX]Click Here for Extra Bonus[/super-popup]
```

### Advanced popup settings

<div align="left"><figure><img src="/files/OOmOTlQkEK9JNrX5Axy5" alt="Advanced popup settings for WordPress forms"><figcaption><p>Form popup settings for WordPress website</p></figcaption></figure></div>


# Import & Export

How to export and import form settings, contact entries and form elements on your WordPress site.

## Forms

There are 2 ways to export Forms

* [Export specific forms](#export-specific-forms)
* [Import specific forms](#import-specific-forms)
* [Export all forms](#export-all-forms)

{% hint style="warning" %}
**Note:** exports will not contain any media files such as images or CSV files. When importing a form on a different website you will have to make sure all the files (images, CSV etc.) are available on this server and reconnected with any of your elements that require them.
{% endhint %}

### Export specific forms

{% hint style="info" %}
This method allows you to export a single form.
{% endhint %}

*This is probably one of the most used and easiest ways to import your forms cross-site. This method comes in handy if you just need to export and import a couple of forms and not all of them.*

In order to do this you have to go to the form builder page of the form you wish to export and import. You can do this by navigating to `Super Forms` > `Your Forms` and clicking on the form.

Click on `Form Settings` TAB, and select `Export & Import` from the dropdown menu.

Now click `Export` (this should save the export file to your computer)

The exported file will hold both the form elements and the form settings.

### Import specific forms

To import a form, you will first need to [export an existing form](#export-specific-forms). Create a new form and navigate to **Form Settings > Export & Import**. Browse the media library for files. If you haven't uploaded your export file yet, you can do so right now. Select the file and click "Add file". As show in the picture below:

**Browse the export file:**

<div align="left"><figure><img src="/files/qmO88LOfRQEbwVQSApKs" alt="Importing a form"><figcaption><p>Importing a form</p></figcaption></figure></div>

**Select or upload the export file:**

<div align="left"><figure><img src="/files/v0xinJXEkHJkSvrPWQeZ" alt="Select the form export file"><figcaption><p>Select the form export file</p></figcaption></figure></div>

**Import the form:**

<div align="left"><figure><img src="/files/ccQu8WcVf2HJGmrgee3E" alt="Importing the form elements and settings"><figcaption><p>Select to import both settings and elements</p></figcaption></figure></div>

### Export all forms

{% hint style="info" %}
This method allows you to export all forms at once.
{% endhint %}

To export your forms navigate to `Super Forms` > `Settings` > `Export & Import`. Scroll down to the **Export Forms** section. Click the `Export Forms` button to start downloading the file which will contain all forms.

After the file has been downloaded successfully you can import the file on your new site by clicking the `Select Import file` button. Now search the import file on your computer and upload it.

The import will now run. Give it a couple of minutes (depending on the amount of forms) to process. After the import finished your forms should have been imported and available for usage.

## Global Settings

If you have 2 WordPress websites and you wish to import the same settings you have for **website 1** to **website 2** you can simply do this by going to `Super Forms` > `Settings` on **website 1**.

On this page navigate to the `Export & Import` TAB.

Here you will see a code named "**Export Settings**".

Now simply copy (*CTRL+C* ) this code and navigate to the same location on **website 2** and paste (*CTRL+V* ) it in the "**Import Settings**" section.

Click on the `Import Settings` button to override the current settings with the one you just pasted.

Super Forms will now save the settings and you will now have the same global settings that you have on **website 1**.

## Form Settings

To export just the form settings, you can go to (on the form builder page) `Form Settings` > `Export & Import`

A new section should appear where you can simply click `Export`.

A file will be downloaded (this is your export file).

If you'd like to import these settings into another form you can do this by going to the same location on that other form and upload the file.

Now you can choose to import both the `Settings` and `Elements`, in our case we will only want to select `Settings`.

This way your form elements will not be replaced with those from the exported form.

## Contact Entries

There are multiple ways to export Contact Entries

* [Export all entries to XML](#export-all-entries-to-xml)
* [Export entries based on date range to CSV](#export-entries-based-on-date-range-to-csv)
* [Export specific entries to CSV](#export-specific-entries-to-csv)

### Export all entries to XML

{% hint style="info" %}
This method will download all of your Contact Entries as an **XML file**.
{% endhint %}

This is the standard way WordPress would export Post types. Since Contact Entries are a custom post type you can do this by going to `Tools` > `Export`. By default WordPress has not installed this tool, so you will have to install it first. After installing the Export tool you can choose post types from a list.

Since we are going to export Contact Entries we can choose **Contact Entries** from the list and click on the `Download Export File` button. This will download all of Super Forms **Contact Entries** in an **XML** format. This XML file can now be used to import it into any other WordPress website. Of course you can also use the XML file for other purposes.

### Export entries based on date range to CSV

{% hint style="info" %}
This method allows you to export your Contact Entries as a **CSV file** based on a selected date range.
{% endhint %}

Navigate to `Super Forms` > `Settings` > `Export & Import`. Scroll down to the **Export Contact Entries** section. Optionally choose your date range (or leave blank to export all contact entries). Optionally change the **Delimiter** and **Enclosure** characters. Click on the `Export Contact Entries to CSV` button to download the CSV file.

This CSV file can be used to import Contact Entries on your other WordPress website. To do this navigate to `Super Forms` > `Settings` > `Export & Import`. Scroll down to the **Import Contact Entries** section. Click the `Select CSV file` button and choose the .csv file.

After you have selected the file, you will have to map all the columns accordingly so Super Forms knows what type of field it should be saved as, it's label and the unique field name. After mapping all the columns you can optionally choose to skip the first row of the CSV file. This comes in handy whenever your CSV file has heading columns that do not require to be imported. (which is the case when you exported the CSV via `Export Contact Entries to CSV`).

*Of course you can also use the CSV export file to do anything else, for instance import it into your MailChimp lists or any other program's that support CSV importing.*

### Export specific entries to CSV

{% hint style="info" %}
This method allows you to export specific selected Contact Entries to a CSV file.
{% endhint %}

In case you need only a couple Contact Entries to be exported to a CSV file you are able to this by going to `Super Forms` > `Contact Entries`. Select the entries that you wish to export, for instance the first 6 Contact Entries.

At the action bar click on the `Export to CSV` button. This will open up a popup where you can choose only the fields you wish to export to the CSV file. Each field will become it's own column in the CSV file. After selecting the fields you require in your CSV file click on the `Export` button. *Your CSV file will now be downloaded.*


# Hide form after submitting

Hide the WordPress form after it has been submitted by a user.

To hide the form after it was submitted by the user, you can go to `Form Settings > Form Settings` and enable the option **Hide form after submitting**.

When enabled, the form will fade out as soon as the form was successfully submitted by the user.

{% hint style="info" %}
**Please note:** The success message will still appear if the success message is enabled. If you do not want to display a message, you can disable this in the form settings.
{% endhint %}


# Hide or lock out user from your forms

How to hide, password protect or lock out user from submitting a WordPress form.

{% hint style="info" %}
If you are looking for a way to prevent duplicate entries read [this article](/features/advanced/prevent-duplicate-entries) instead. If you want to lock a form after specific amount of submissions read [this article](/features/advanced/lock-and-hide-form). And if you are looking for a way to password protect a form read [this article](/features/advanced/password-protect). And in case you want to just hide the form after it was successfully submitted by the user read [this article](/features/basic/hide-form-after-submitting).
{% endhint %}

In this article we will explain what different option you have in regards to hiding, locking and password protecting your WordPress form. With these options you can hide a form, password protect or lock forms for specific users, so that they won't be able to submit the form.

For instance you can hide the form from logged out users or from specific user roles. You can also display a "lockout" message based on these conditions to the user.

### Only allow logged in users to submit a form

If you only want currently logged in users to be able to submit a form, you can enable the **Allow only logged in users** setting. Optionally you can choose to **Hide the form from not logged in users** (those that are logged out). Another options you have is to display a message to those that are logged out. And in case you are not hiding the form from the logged out users, you may also display a message after they tried to submit the form, as shown below.

<div align="left"><figure><img src="/files/iZo2SqUHucm6ub1W8a9Q" alt="Allow only logged in users to submit the form."><figcaption><p>Allow only logged in users to submit the form.</p></figcaption></figure></div>

### Hide form from logged in users

In some cases you might want to hide your form from already logged in users. For instance when you have a [Registration form](/features/advanced/custom-registration-form-for-wordpress), you don't really require a logged in user to see this form, simply because they are already registered. You can do so by enabling the **Hide form from logged in users** settings as shown below.

<div align="left"><figure><img src="/files/DP2zMSEMfe1sVooMOXbR" alt="Hiding forms from currently logged in users."><figcaption><p>Hiding forms from currently logged in users.</p></figcaption></figure></div>

### Allow only specific user roles to submit the form

To allow only specific user roles from being able to submit the form you can enable the **Allow only specific user roles** setting. Followed by the roles you wish to allow to submit the form. You can select multiple roles by holding the **CTRL** key on your keyboard while **left clicking** the roles as shown below.

<div align="left"><figure><img src="/files/AcSwW1MmTBbaPPRdXMRP" alt="Allow only specific user roles to submt the form."><figcaption><p>Allow only specific user roles to submt the form.</p></figcaption></figure></div>

### Hiding the form from locked out users

In most cases when a user is locked out, you will probably want to hide the form from this user. You can do so by enabling the **Hide form from locked out users** setting, as shown below.

<div align="left"><figure><img src="/files/8ATyYCmciURkaa8WNFXn" alt="Hiding the form from a locked out user."><figcaption><p>Hiding the form from a locked out user.</p></figcaption></figure></div>

### Display a message for the locked out user

Whenever a user is locked out based on any of the conditions, you can optionally display a message to the user to inform them.

<div align="left"><figure><img src="/files/YP2ZmLNms22qHnmU6THD" alt="Display a message or notification regarding the lockout."><figcaption><p>Display a message or notification regarding the lockout.</p></figcaption></figure></div>

### Password protect a form

We have a dedicated guide on how to password protect your forms here: [Advanced > Password protect](/features/advanced/password-protect).


# Validation

The Validation option gives you the ability to quickly add a specific validation to any of your fields. This will decrease the risk of a user making mistakes or typos while filling out the form.

Below you can find the available validation methods:

## Letters only

Only allow input field to contain letters, and nothing else

```js
^[a-zA-Z]+$
```

## Required Field (not empty)

This is the most used validation method, it will simply check if the field was entered or not.\
This allows you to make a field a so called **Required field**\*.

## E-mail address

This validation method checks if the entered email address was a possible valid

*The regex used for this validation is:*<br>

```js
^([\w-\.]+@([\w-]+\.)+[\w-]{2,63})?$
```

## Phone number

Validations phone numbers with a minimum of 10 characters in length and only allows **numbers, spaces, -, +**

*The regex used for this validation is:*<br>

```js
^((\+)?[1-9]{1,2})?([-\s\.])?((\(\d{1,4}\))|\d{1,4})(([-\s\.])?[0-9]{1,12}){1,2}$
```

## Numeric

This validation checks if the entered value contains numbers only and no other characters.

*The regex used for this validation is:*<br>

```js
^\d+$
```

## Float

This validation method can be used whenever you require to validate the user input to be a float value. A float value never contains a comma, and only contains numbers and a dot (.).

*The regex used for this validation is:*<br>

```js
^[+-]?\d+(\.\d+)?$
```

## Website URL

This validation method is used whenever you require the user to enter a valid URL address.

*The regex used for this validation is:*<br>

```js
^(http(s)?:\/\/)?(www\.)?[a-z0-9]+([\-\.]{1}[a-z0-9]+)*\.[a-z]{2,5}(:[0-9]{1,5})?(\/.*)?$
```

## IBAN

Whenever you are asking for an IBAN number you can use this validation method to make sure the entered IBAN is a valid number.

## Custom Regex

If you require a specific validation this option allows you to use a custom regular expression on the value entered by the user. If no match was found based on the entered value the Error Message will be displayed to the user.

*Some example regular expressions that you might like to use are:*

#### match password that is at least 8 characters long, contains a lower case and upper case letter, contains at least one number and at least a special character/symbol.

`^(?=.*[A-Z])(?=.*[0-9])(?=.*[a-z])(?=.*[$&+,:;=?@#|\/\\[\]{}'"<>.^*()%!-]).{8,}$`

#### match username

`^[a-z0-9_-]{3,16}$`

#### match any ip address

`^(?:(?:25[0-5]|2[0-4][0-9]|[01]?[0-9][0-9]?)\.){3}(?:25[0-5]|2[0-4][0-9]|[01]?[0-9][0-9]?)$`

#### match credit card numbers

`^(?:4[0-9]{12}(?:[0-9]{3})?|5[1-5][0-9]{14}|6(?:011|5[0-9][0-9])[0-9]{12}|3[47][0-9]{13}|3(?:0[0-5]|[68][0-9])[0-9]{11}|(?:2131|1800|35d{3})d{11})$`

#### match email address

`^[A-Z0-9._%+-]+@[A-Z0-9.-]+.[A-Z]{2,4}$`

#### match email address except specific domains

`^(?!.*@(spamgourmet|mailinator))[\w-.+]+@([\w-]+.)+[\w-]{2,63}$`

#### select integers only

`^[0-9 -()+]+$`

#### match number in range 0-255

`^([01][0-9][0-9]|2[0-4][0-9]|25[0-5])$`

#### match number in range 0-999

`^([0-9]|[1-9][0-9]|[1-9][0-9][0-9])$`

#### match ints and floats/decimals

`^[-+]?([0-9]*.[0-9]+|[0-9]+)$`

#### Match Any number from 1 to 50 inclusive

`^(^[1-9]{1}$|^[1-4]{1}[0-9]{1}$|^50$)$`

#### match elements that could contain a phone number

`^[0-9-()+]{3,20}$`

#### MatchDate (e.g. 21/3/2006)

`^(d{1,2}/d{1,2}/d{4})$`

#### match date in format MM/DD/YYYY

`^(0[1-9]|1[012])[- /.](0[1-9]|[12][0-9]|3[01])[- /.](19|20)dd$`

#### match date in format DD/MM/YYYY

`^(0[1-9]|[12][0-9]|3[01])[- /.](0[1-9]|1[012])[- /.](19|20)dd$`

#### match a url string (Fixes spaces and querystrings)

`^(http(s)?:\/\/)?(www\.)?[a-z0-9]+([\-\.]{1}[a-z0-9]+)*\.[a-z]{2,5}(:[0-9]{1,5})?(\/.*)?$`

#### match domain name (with HTTP)

`(.*?)[^w{3}.]([a-zA-Z0-9]([a-zA-Z0-9-]{0,65}[a-zA-Z0-9])?.)+[a-zA-Z]{2,6}$`

#### match domain name ([www](http://www). only)

`[^w{3}.]([a-zA-Z0-9]([a-zA-Z0-9-]{0,65}[a-zA-Z0-9])?.)+[a-zA-Z]{2,6}$`

#### match domain name (alternative)

`(.*?).(com|net|org|info|coop|int|com.au|co.uk|org.uk|ac.uk|)$`

#### match sub domains: www, dev, int, stage, int.travel, stage.travel

`(http://|https://)?(www.|dev.)?(int.|stage.)?(travel.)?(.*)+?$`

#### Match jpg, gif or png image

`([^s]+(?=.(jpg|gif|png)).2)$`

#### match all images

`<img .+?src="(.*?)".+?/>$`

#### match just .png images

`<img .+?src="(.*?.png)".+?/>$`

#### match RGB (color) string

`^rgb((d+),s*(d+),s*(d+))$`

#### match hex (color) string

`^#?([a-f0-9]{6}|[a-f0-9]{3})$`

#### Match Valid hexadecimal colour code

`(#?([A-Fa-f0-9]){3}(([A-Fa-f0-9]){3})?)$`

#### match a HTML tag (v1)

`^< ([a-z]+)([^<]+)*(?:>(.*)< /1>|s+/>)$`

#### match HTML Tags (v2)

`(< (/?[^>]+)>)$`

#### match /product/123456789

`(/product/)?+[0-9]+$`

#### Match Letters, numbers and hyphens

`([A-Za-z0-9-]+)$`


# Advanced


# WordPress form with Google sheets dropdown

How to setup a WordPress form that has a dropdown with items retrieved from a Google (drive) sheets file.

{% hint style="danger" %}
This feature is currently only available in the [BETA version](/developers/beta-version).
{% endhint %}

{% hint style="info" %}
This guide will walk you through the steps to setup a [Dropdown element](/elements/form-elements/dropdown) for your form that implements Google Sheets service to retrieve the rows from your sheet as the dropdown items. Note that this can also be used for [Keyword](/elements/form-elements/keywords) element, [Autosuggest ](/elements/form-elements/autosuggest)element and any other elements that implement the "Retrieve method" setting.
{% endhint %}

First open the Google Cloud Console and [Create a New Project](https://console.cloud.google.com/projectcreate) if you haven't already.

Enter the project name, billing account and company (optional) and click **CREATE**.

Enable the [Google Sheets API](https://console.cloud.google.com/apis/library/sheets.googleapis.com) for your project. Direct link to Google Sheets API: <https://console.cloud.google.com/apis/library/sheets.googleapis.com>

Confirm you are still on the correct project and enable the API by clicking **ENABLE** as shown below.

<div align="left"><figure><img src="/files/R7dKiwtIOPycvf0X3L6f" alt="Enable Google Sheets API."><figcaption><p>Enable Google Sheets API.</p></figcaption></figure></div>

Next we will want to create our credentials so that we can communicate with Google Sheets API. Click on the **CREDENTIALS** tab, then click **+ CREATE CREDENTIALS** and choose **Service account** as shown below.

<div align="left"><figure><img src="/files/H6cKTYy4haKbbhNvL3lk" alt="Creating a new Service account credential."><figcaption><p>Creating a new Service account credential.</p></figcaption></figure></div>

Enter the Service account name, ID and description. For our demo we will name it `superforms`. Click **DONE**.

<div align="left"><figure><img src="/files/IOhwOavINDRReH0SiJIx" alt="Entering service account details."><figcaption><p>Entering service account details.</p></figcaption></figure></div>

{% hint style="danger" %}
**Important:** Make sure to copy the service account email address as shown in the picture below. You will need it later on to share the Google Sheet document.
{% endhint %}

<div align="left"><figure><img src="/files/aVLUs3FhTC2t23I45FFs" alt="Copy the service account email address"><figcaption><p>Copy the service account email address</p></figcaption></figure></div>

Now go ahead and click on the account you just created, in our case `superforms@xxxxxx`:

<div align="left"><figure><img src="/files/GlP85UO7Szm2WaSsnCma" alt="Select the Service Account to create a key."><figcaption><p>Select the Service Account to create a key.</p></figcaption></figure></div>

Create a new key for this account. Click on the **KEYS** tab and click **ADD KEY**. Choose **Create new key** from the dropdown to create a new one as shown below.

<div align="left"><figure><img src="/files/ibx6JQe2WgiAe4UG9Jot" alt="Creating a new key for your service account."><figcaption><p>Creating a new key for your service account.</p></figcaption></figure></div>

Choose **JSON** as the key type and click **CREATE** as shown below.

<div align="left"><figure><img src="/files/O3YYERYoAX1wRUrahH04" alt="Create private key for service account as type JSON."><figcaption><p>Create private key for service account as type JSON.</p></figcaption></figure></div>

A `.json` file should now be downloaded. Open the file and copy the contents to your clipboard. Navigate to your form and add or edit your [Dropdown element](/elements/form-elements/dropdown). Set the **Retrieve method** to **Google sheets** and paste the contents of the json file under **Google API credentials.json**.

Change the **Range** if needed, but by default this will be `Sheet1` which will read all the rows from Sheet1.

The last step is to [create a Google Sheet](https://docs.google.com/spreadsheets) (if you haven't already). A sheet can be set to public or private. If you choose for a private sheet, you will require to add (share) the sheet with the service account created so that it has permissions to view the contents. To do this click the "Share" button or go to File > Share. Here you can paste the service account address:

<div align="left"><figure><img src="/files/J4QHC2doZtfClVJFW9Kx" alt="Share google sheet document with service account."><figcaption><p>Share google sheet document with service account.</p></figcaption></figure></div>

<div align="left"><figure><img src="/files/mbUldNOI3kjHIwDHCEN5" alt="Sharing the google sheet and giving &#x22;Viewer&#x22; permissions only."><figcaption><p>Sharing the google sheet and giving "Viewer" permissions only.</p></figcaption></figure></div>

Now copy the sheet ID. You can find your sheet ID from the URL in your browser as shown below.

<div align="left"><figure><img src="/files/49Q0NshPTEEtD3jlW7CU" alt="Find the google sheet ID from the URL."><figcaption><p>Find the google sheet ID from the URL.</p></figcaption></figure></div>

Paste this ID under **Google sheet ID** for your Dropdown element on your WordPress form, and click **Update Element** to save the settings for the Dropdown element.

<div align="left"><figure><img src="/files/HuKHC2abaGOq2CcZjx1B" alt="Define the google sheet ID for the Dropdown element."><figcaption><p>Define the google sheet ID for the Dropdown element.</p></figcaption></figure></div>

If setup correctly your Dropdown settings should look something like this:

<div align="left"><figure><img src="/files/kBrRIM2t5u85ra2eVwSU" alt="Dropdown configured to retrieve Google Sheets rows as items."><figcaption><p>Dropdown configured to retrieve Google Sheets rows as items.</p></figcaption></figure></div>

Now Save the form and test if the changes made to the Google Sheet are reflected on the form Dropdown element.

{% hint style="success" %}
You should now be able to manipulate the dropdown items by editing the Google spreadsheet.
{% endhint %}


# Custom registration form for WordPress

How to create custom registration form for your WordPress site to register users with a specific user role and optionally custom user meta data.

{% hint style="info" %}
This article explains how to setup and configure your custom **Registration form** for WordPress. In most use cases a registration form will work in combination with a Login and Lost password form so you may also be interested on how setup a [Login form](/features/advanced/custom-login-form-for-wordpress) and or [Lost password](/features/advanced/custom-lost-password-form-for-wordpress) form.
{% endhint %}

{% hint style="success" %}
A demo form is available under **Super Forms > Demos** named "Register form" which should help to quickly get a working Registration form up and running.
{% endhint %}

### Creating a custom WordPress registration form <a href="#creating-a-login-form" id="creating-a-login-form"></a>

{% hint style="danger" %}
**Important:** Your form must contain fields named `user_email` (E-mail address) and optionally a `user_login` (username) field. Note that a Password field exactly named `user_pass` should be added, otherwise a random password will be generated on the fly instead. You are also strongly advised to not store or save the password field since for most use cases this is not desired. However Super Forms does give you the ability to do so. So please double check that your password field is not saved as Contact Entry data, and that you are excluding it from E-mails.
{% endhint %}

First edit your form and navigate to **Form Settings > Register & Login**. From the **Actions** option choose **Register a new user**. You should now see all settings that relate to registering a new user. Make sure to configure all the options that fits your use case.

### Verification of E-mail address

In case you enable the option to send a verification E-mail to the user, you must make sure you added the **Verification Code** element to your login form as described [here](/features/advanced/custom-login-form-for-wordpress#verification-of-e-mail-address).

### Defining the login page URL

{% hint style="warning" %}
Make sure to define the **Login page URL** so that it points to the URL where the Login form is located, for instance: `https://mydomain.com/login` as shown in the image below. This URL can be retrieved with the tag `{register_login_url}` inside your E-mails if needed.
{% endhint %}

<div align="left"><figure><img src="/files/drjny8mxQH5PrOf61kM3" alt="Defining the login page URL for your WordPress site."><figcaption><p>Defining the login page URL for your WordPress site.</p></figcaption></figure></div>

{% hint style="info" %}
Please understand that the status of an account is not the same thing as the verification of the E-mail address. Whenever you have a form that has no verification requirement for the E-mail address, and the status is set to "Active" by default after registration, the user can login instantly after registration.
{% endhint %}

### Hiding the default WordPress toolbar for the user

If you wish to hide the default WordPress toolbar to the user when they are logged in, you can uncheck the setting **Show Toolbar when viewing site (enabled by default).**

<div align="left"><figure><img src="/files/QWaZLZEIbLM3zUooenVe" alt="Hiding the WordPress toolbar for newly registered users."><figcaption><p>Hiding the WordPress toolbar for newly registered users.</p></figcaption></figure></div>

### **Saving custom user meta data**

If you require to store some custom user meta data, for instance in combination with a custom plugin or perhaps ACF (Advanced Custom Fields) plugin, you can define each user meta data under the setting **Save custom user meta**. Simply put each field and it's corresponding meta key on a new line. For instance, by default WordPress users do not have a "Age" field. If you ask the user for their age (or birthdate) on the registration form, you can map it like so:

```
age|field_6424a30691ebb
```

In the above example **age** is the fieldname in our form, and **field\_6424a30691ebb** is the meta key. If you use a plugin like ACF for custom user profile fields, you can find the meta key for your field under the column "Key" as shown below.

<div align="left"><figure><img src="/files/uTPWLHPXjkD4c5Uz1kfB" alt="Mapping registration form fields with meta key to save custom user meta data in WordPress."><figcaption><p>Mapping registration form fields with meta key to save custom user meta data in WordPress.</p></figcaption></figure></div>

### Manually approving registrations

It is also possible to manually approve registrations. To do so, you will want to change the **User login status after registration** from "Active (default)" to the option "Pending". Now whenever a user registers (and optionally verified their E-mail address) their account won't be active yet. When they try to login they will see the message that their account is being reviewed before becoming activated.

### Block user accounts

Super Forms also provides you an extra option to completely block a specific user from being able to login until further notice. You can for instance change the **User login status after registration** setting to **Blocked** for any new registrations. Alternatively you can change any existing user's status to **Blocked** by editing the user and changing the **User status** to **Blocked** as shown below:

<div align="left"><figure><img src="/files/2rVna55LZDphZ8V9TYJ8" alt="Temporarily block a user from being able to login to your WordPress site."><figcaption><p>Temporarily block a user from being able to login to your WordPress site.</p></figcaption></figure></div>

###

### Allowing registration without entering a password

To create a registration form where a user doesn't require to enter a password, simply remove (or make sure to not add) a Password element. That way Super Forms will generate a new password for the user on the fly.

{% hint style="warning" %}
Don't forget to provide the generated password inside the E-mail with the use of tags `{user_pass}` or`{register_generated_password}` so that they can actually login.
{% endhint %}

This way you could have a registration form that only consists of a E-mail field named `user_email` (and optionally a `user_login` field if you wish to have the username different from the email address which might be desired in some cases).

### Sending an "Account approved" E-mail to the user

For this to work you must first define the **User login status after registration** to "Pending". As shown in the image below. When using this method, you may also want to enable the option so that a new **random password** is being generated for the user upon approving. If you leave this unchecked, you might want to delete the row that displays the users password inside the E-mail since the user should know their password already. Alternatively you could add an extra link to the E-mail that points to your [Lost password/Reset password](/features/advanced/custom-lost-password-form-for-wordpress) form in case they forgot their E-mail. However, your [login form](/features/advanced/custom-login-form-for-wordpress) should (in normal use cases) already contain a link to the Lost password form. So this might be redundant.

<div align="left"><figure><img src="/files/jZruaWSBlDlGyJK4LHpG" alt="Sending an &#x22;Account approved&#x22; E-mail to the user"><figcaption><p>Sending an "Account approved" E-mail to the user</p></figcaption></figure></div>

### Skipping the registration conditionally

Perhaps you only want the form to register a new user based on a specific condition. In this case you can enable the following option (see image below) and place your `user_email` and or `user_login` inside a [Column](/elements/layout-elements/column-grid) and [conditionally hide the column](/features/advanced/conditional-logic#how-to-set-conditions).

This allows you to skip the registration whenever you don't require the form submitter to become registered or create a new account. But still allow the form to be submitted.

<div align="left"><figure><img src="/files/2xADFAlTYGOhmkrRJqcz" alt="Conditionally registering a new user on your WordPress site."><figcaption><p>Conditionally registering a new user on your WordPress site.</p></figcaption></figure></div>


# Custom login form for WordPress

How to create custom login form for your WordPress site where (optionally) only specific user roles are allowed to login.

{% hint style="info" %}
This article explains how to setup and configure your custom **Login form** for WordPress. In most use cases a login form will work in combination with a registration and lost password form so you might also be interested on how setup a [Registration form](/features/advanced/custom-registration-form-for-wordpress) and or [Lost password](/features/advanced/custom-lost-password-form-for-wordpress) form.
{% endhint %}

{% hint style="success" %}
A demo form is available under **Super Forms > Demos** named "Login form" which should help to quickly get a working Login form up and running.
{% endhint %}

### Creating a custom WordPress login form <a href="#creating-a-login-form" id="creating-a-login-form"></a>

{% hint style="danger" %}
**Important:** Your login form must have fields named exactly `user_login` and a password field named exactly `user_pass`. These are required for WordPress login to function properly. You are also strongly advised to not store or save the password field since for most use cases this is not desired. However Super Forms does give you the ability to do so. So please double check that your password field is not saved as Contact Entry data, and that you are excluding it from E-mails.
{% endhint %}

First edit your form and navigate to **Form Settings > Register & Login**. From the **Actions** option choose **Login (user will be logged in)**. Now when the form is being submitted it will try to login the user.

<div align="left"><figure><img src="/files/JwAAQfWEsFIZHNtEySd2" alt="Enabling the form to act as a login form for your WordPress site."><figcaption><p>Enabling the form to act as a login form for your WordPress site.</p></figcaption></figure></div>

### Allowing only specific user roles to login to your WordPress site

Now select the roles that should be allowed to login, or leave black to allow all roles.

<div align="left"><figure><img src="/files/gOnoIS18S0D2U1m9Q64b" alt="Allowing only specific user roles to login to your WordPress site."><figcaption><p>Allowing only specific user roles to login to your WordPress site.</p></figcaption></figure></div>

### Defining the login page URL

{% hint style="warning" %}
Make sure to define the **Login page URL** so that it points to the URL where the Login form is located, for instance: `https://mydomain.com/login` as shown in the image below. This URL can be retrieved with the tag `{register_login_url}` inside your E-mails if needed.
{% endhint %}

<div align="left"><figure><img src="/files/drjny8mxQH5PrOf61kM3" alt="Defining the login page URL for your WordPress site."><figcaption><p>Defining the login page URL for your WordPress site.</p></figcaption></figure></div>

### Verification of E-mail address

If your [registration form](/features/advanced/custom-registration-form-for-wordpress) is configured to send a verification E-mail after registering a new account, you will want to make sure you add the **Verification Code** element to your **Login form**.

<div align="left"><figure><img src="/files/7BtknGlLxCYLI3l7GYpP" alt="Adding the &#x22;Verification Code&#x22; element to allow registered users to verify and activate their account on your WordPress website."><figcaption><p>Adding the "Verification Code" element to allow registered users to verify and activate their account on your WordPress website.</p></figcaption></figure></div>

Whenever the user clicks the [verification link](/features/advanced/custom-registration-form-for-wordpress) inside the E-mail, they will be redirected to the [defined login page](#defining-the-login-page-url) where they can enter the **verification code** to activate their account. As shown below.

<figure><img src="/files/tGpNIr0MF1uY6vWr9pKv" alt="Login form for WordPress with verification code to verify their E-mail address was valid."><figcaption><p>Login form for WordPress with verification code to verify their E-mail address was valid.</p></figcaption></figure>

{% hint style="success" %}
You should now have a working login form which allows user to login to your WordPress site. Now might be a good time to read how to setup a [registration form](/features/advanced/custom-registration-form-for-wordpress) and or [lost password form](/features/advanced/custom-lost-password-form-for-wordpress).
{% endhint %}


# Custom lost password form for WordPress

Using the default WordPress "Lost password" form or creating your own custom "Lost password" form to let users reset their password.

{% hint style="info" %}
This article explains how to link your custom [Login form](/features/advanced/custom-login-form-for-wordpress) with the default WordPress **Lost password form**, and how you can configure and setup your own custom **Lost password form** for your WordPress website. You may also be interested in reading how setup a [Login form](/features/advanced/custom-login-form-for-wordpress) and or [Registration form](/quick-start/registration).
{% endhint %}

### Using the default WordPress lost password form

By default WordPress already has a Lost password form that (on a default installation) can be accessed via the below URL which should look like this:

<pre><code><strong>https://domain.com/wp-login.php?action=lostpassword
</strong></code></pre>

<div align="left"><figure><img src="/files/phiR4Bwx9BRDcJi6zpqu" alt="The default WordPress reset/lost password form."><figcaption><p>The default WordPress reset/lost password form.</p></figcaption></figure></div>

#### Changing the "Lost password" link on your login form

This works great for most use cases so if you are OK with having this as your "Lost password" form, then you can edit your custom [Login form](/features/advanced/custom-login-form-for-wordpress) and make sure you point the "Lost password" link to the correct URL as shown below.

<figure><img src="/files/0DyWkvZE5XpZ30VtTThH" alt="Changing the Lost password link to point to the default Lost password form of WordPress"><figcaption><p>Changing the Lost password link to point to the default Lost password form of WordPress</p></figcaption></figure>

#### Using a Button to act as the "Lost password" link

{% hint style="warning" %}
If you wish to have a **Button element** to act as your "Lost password" link then you can simply add a Button element and define it to act as a regular link instead of submitting the form. Note that when you go this route, you will have to add another Button element that acts as a regular "Submit" as shown in the images below.
{% endhint %}

<div align="left"><figure><img src="/files/Clx9NKlbBab6iS9hETKR" alt="Adding a Button to your form."><figcaption><p>Adding a Button to your form.</p></figcaption></figure></div>

<div align="left"><figure><img src="/files/91iOHRBcZySeRkCTMh1f" alt="Adding a custom Button to act as the &#x22;Lost password&#x22; link."><figcaption><p>Adding a custom Button to act as the "Lost password" link.</p></figcaption></figure></div>

<div align="left"><figure><img src="/files/Kkt31k2rx8bOJbOQgCDX" alt="Adding a custom Login button that acts as the &#x22;Submit form&#x22; button."><figcaption><p>Adding a custom Login button that acts as the "Submit form" button.</p></figcaption></figure></div>

### Creating your custom "Lost password" form

{% hint style="success" %}
A demo form is available under **Super Forms > Demos** named "Lost Password Form" which should help to quickly get a working reset password form up and running.
{% endhint %}

If you prefer using a custom "Lost password" form over the default WordPress "Lost password" form, you can edit your form and navigate to **Form Settings > Register & Login**. From the **Actions** option choose **Reset password (lost password)**. You should now see all the settings that relate to resetting a password. Configure them as you see fit.

{% hint style="danger" %}
Make sure the **Login page URL** points to the URL where your custom [Login form](/features/advanced/custom-login-form-for-wordpress) is displayed. Also make sure that your form has a field named `user_email`, which is where the user will receive the "Lost Password E-mail" at.
{% endhint %}

<div align="left"><figure><img src="/files/OBIr2MwQcASRL4aba1DB" alt="Configuration options for your custom WordPress Lost Password form."><figcaption><p>Configuration options for your custom WordPress Lost Password form.</p></figcaption></figure></div>


# Update current logged in user

Updating a currently logged in WordPress user through a form or register as new if the user is not currently logged in.

{% hint style="info" %}
This article explains how to setup a custom form where a logged in user can edit their user data, and where (optionally) logged out users can register a new account. If you are just looking for a way to register new users please read the [Registration form](/features/advanced/custom-registration-form-for-wordpress) article.
{% endhint %}

### Updating current logged in user

Let's assume you have a single form where you want your users to be able to edit their data, and (optionally) if the user is logged out, you want them to be able to register a new account.

To do this, first edit your form and navigate to **Form Settings > Register & Login**. From the **Actions** option choose **Update current logged in user**. You should now see all settings that relate to updating a logged in user (as shown in the image below).

{% hint style="warning" %}
In case you enable the option to **Register new user if user is not logged in** you will want to make sure you first configure all the settings as per the [Registration form](/features/advanced/custom-registration-form-for-wordpress) article.
{% endhint %}

Now whenever a logged in user submits the form their data would be updated. And when a logged out user tries to submits the form a new account would be created instead.

### Leave the "User role" setting empty

{% hint style="danger" %}
**Important:** in most cases you will want to leave the `User role` option empty when updating existing users, this will make sure that the current user role is left untouched. Always double check these type of settings because they can potentially have a big impact if setup incorrectly.
{% endhint %}

<div align="left"><figure><img src="/files/tKemw0tB6e4qK52NGAyy" alt="Updating a currently logged in user or register a new one if logged out via a custom WordPress form."><figcaption><p>Updating a currently logged in user or register a new one if logged out via a custom WordPress form.</p></figcaption></figure></div>


# Secrets

With WordPress secrets you can define values inside your form without disclosing the value itself to the client. Instead the value will be retrieved only upon form submission on the client side.

### What are secrets? <a href="#what-are-secrets" id="what-are-secrets"></a>

Secrets are values (or data) which you can store locally or globally. The value will only be rendered on the server side and won't be visible inside the HTML source code on the client side.

You can retrieve these secrets inside your form settings with the use of tags prefixed with a `@` sign e.g. `{@secret_email}` or `{@my_secret_name}`.

It's also possible to use these secrets inside your fields. The difference with normal {tags} ([Tags system](/features/advanced/tags-system)) being that they will not be replaced with their underlaying value upon page load. This prevents it's value from being exposed to the client via the source code.

### When to use secrets? <a href="#when-to-use-secrets" id="when-to-use-secrets"></a>

A good use case on when to use secrets is when you wish to conditionally ([Conditional Logic](/features/advanced/conditional-logic)) send an email to a specific email address based on what the user selected/choose in the form.

For instance: your company might have different departments `support@domain.com`, `sales@domain.com`.

Normally you could do this by inserting these email addresses directly inside a [Dropdown element](/elements/form-elements/dropdown), or perhaps via the use of a hidden field or [Variable field](/elements/form-elements/variable-field).

This would however expose the email address inside the HTML source code (client side). This would allow bots to crawl/scrape the email address from the source code and ending up sending SPAM to the email address.

By using `Secrets` you can prevent this. The value of a secret is not retrieved upon page load, and will never be visible to the client.

A secret tag e.g. `{@sales_email}` will only be replaced with it's underlaying value upon form submission on the server side. This way Super Forms can still retrieve this value inside the form settings so that you can have a dynamic value for your settings.

### Difference between local and global secrets <a href="#difference-between-local-and-global-secrets" id="difference-between-local-and-global-secrets"></a>

There are two types of secrets: `local` and `global`.

The difference between the two are that local secrets can only be used on the form you are working on while global secrets are site wide and are available inside all other forms.

{% hint style="info" %}
**Note:** Keep in mind that it's best practice to use **local** secrets unless you have a good usecase that requires the use of global secrets. This is because if you change one of your global secrets it can possibly cause issues on forms that also use this global secret.
{% endhint %}

### How to use secrets? <a href="#how-to-use-secrets" id="how-to-use-secrets"></a>

There are a couple of ways to implement secrets into your forms. The most common situation would be when you need to conditionally retrieve sensitive value based on some user selection.

A good example would be sending the form submission to a specific department conditionally.

First you will want to define your secrets. You can do so by editing your form and navigating to the TAB `Secrets` at the top left of the builder page. In this example we will define the following secrets:

* `sales_email` - `sales@domain.com`
* `support_email` - `support@domain.com`

You can add multiple secrets by clicking the `+` icon as shown below:

<figure><img src="/files/PzSS6qKZc50J3bXSgBe5" alt="Define secrets to securely retrieve values server side inside your WordPress forms"><figcaption><p>Define secrets to securely retrieve values server side</p></figcaption></figure>

Once you defined your secrets you can copy the tags `{@sales_email}` and `{@support_email}`.

Now create a [Dropdown element](/elements/form-elements/dropdown) and define the items of your dropdown. We will set a **Label** and **Value** for each dropdown item where the **Value** will contain the secret tag like so:

Label: `Sales department`, Value: `{@sales_email}`\
Label: `Support department`, Value: `{@support_email}`

<figure><img src="/files/3axRMeT3eNsNTKSXDegP" alt="Define secret tags for your dropdown items"><figcaption><p>Define secret tags for your dropdown items.</p></figcaption></figure>

Rename the dropdown to `department` and update the element. Now open up your `Form Settings` and choose `Admin E-mail` from the dropdown. Now enable the sending of Admin emails for the form and update the `Send email to:` setting so that it retrieves the secret tag from the dropdown field. Since the dropdown field is named **department** we can use the tag:`{department}`.

{% hint style="info" %}
You are also allowed to use the secret tags `{@secret_tag}`directly in your form settings if you don't require to retrieve it dynamically based on user input.
{% endhint %}

<figure><img src="/files/01GvfQdMDsYyqY5VCKQ9" alt="Retrieve the department dropdown (secret) value in your Email settings"><figcaption><p>Retrieve the department dropdown (secret) value in your Email settings</p></figcaption></figure>

{% hint style="info" %}
**Note:** When configuring your Email settings, make sure to double check that your **Send email from:** is correctly set to send emails from your actual domain name e.g. no-reply@**mydomain.com**.
{% endhint %}


# Prevent duplicate entries

Prevent duplicate form submissions based on email address or other form values entered in your form on WordPress.

{% hint style="info" %}
If you are looking for a way to lock specific user roles or to password protect your form read [this article](/features/advanced/password-protect) instead. If you want to allow users to only submit a form a maximum of X times read [this article](/features/advanced/lock-and-hide-form) instead..
{% endhint %}

For this to work you must have the option to save contact entries enabled. This will be used to compare any previous form submission and decide if the user is allowed to submit the form with the entered data.

First edit your form and open up the "Form Settings" panel. From there, choose "Form settings" from the dropdown. Make sure that "Save data" is set to "Save as Contact Entry".

Scroll down to and enable the "Enable custom entry titles". As it's value enter `{email}` so that the email address the user entered will be used as the title.

Now also enable the "Prevent submitting form when entry title already exists". This will make sure that whenever the user submits the form it will first check if a similar entry existists with the same title. If this is the case the user will be displayed the error message as defined.

{% hint style="info" %}
By default Super Forms will only compare the title to any entries that where created via the current form. If you want to globally check the title you might want to change that option too.
{% endhint %}

<div align="left"><figure><img src="/files/zDGd2sDJemG9oJp1hFZm" alt="Prevent submitting form when entry title already exists"><figcaption><p>Prevent submitting form when entry title already exists</p></figcaption></figure></div>


# Lock & hide form

How to lock or hide your WordPress form when it has been submitted for an X amount of times.

{% hint style="info" %}
If you are looking for a way to password protect or to only allow specific user roles to submit the form read [this article](/features/advanced/password-protect).
{% endhint %}

### Lock form after specific amount of submissions by user

If you need to set a limit as to how many times a user can submit a specific form you can do so via **Form Settings > User Form locker / submission limit**.

Here you can define how many times a user is allowed to submit the form. And you can also define a message to display to the user whenever they reached this limit.

Optionally you can hide the form if needed. And you can also reset the counter so you can allow users to submit again when needed.

<div align="left"><figure><img src="/files/5VCoXGVqMQfywzzO9ILo" alt="Lock form submission on your WordPress site based on user"><figcaption><p>Lock form submission on your WordPress site based on user</p></figcaption></figure></div>

### Lock form after specific amount of submissions

To enable a global form lock after X amount of submission you can go to Form **Settings > Global Form locker / submission limit**.

Here you can configure some parameters to lock the form after it was submitted for for instance 10 times.

When the limit is reached the next user will see a message that they can no longer submit the form or that it is no longer available.

Optionally you can hide the form. You can also reset the submission counter if required.

<div align="left"><figure><img src="/files/sv9Dy5bsZDzKMeVLNMRG" alt="Lock WordPress form after X amount of submissions globally"><figcaption><p>Lock WordPress form after X amount of submissions globally</p></figcaption></figure></div>


# Password protect

How to password protect your WordPress form or only allow specific user roles to submit the form.

{% hint style="info" %}
If you are looking for a way to prevent duplicate entries read [this article](/features/advanced/prevent-duplicate-entries) instead. If you want to lock a form after specific amount of submissions read [this article](/features/advanced/lock-and-hide-form).
{% endhint %}

Simply edit your form and go to Form Settings > Password Protect (see image below). Here you can define the password required to submit the form.

Optionally you can also define the form to be only submitted by specific user roles. For instance, you can only allow users with the `administrator` role to submit the form.

You might also just want to hide the form from any locked out users, this works well together with the [Lock & hide form](/features/advanced/lock-and-hide-form) feature.

Another option is to only allow logged in users or to hide the form from not logged in users and visa versa.

<div align="left"><figure><img src="/files/9N9LwVtlWIy2zcq2YIXU" alt="Password protect WordPress form and based on user roles"><figcaption><p>Password protect WordPress form and based on user roles</p></figcaption></figure></div>


# Conditional Logic

With conditional logic you can show or hide specific elements or a set of elements that are inside a column based on a field value.

### What is conditional logic?

Conditional logic allows you to **show** or **hide** specific elements based on a other fields value. Whenever you have set a condition that was met and the method or action of this condition was to hide the element, it will no longer be visible to the user and will not be submitted by the form either.

### When to use conditional logic?

You should use conditional logic to exclude fields from being submitted/saved. When a field or element is conditionally hidden it will not be visible to the user. *(the field will not be send in emails, and will not be saved in contact entries, the form basically does not submit the field at all)*

Whenever you wish to hide fields but still want them to be submitted to emails and saved in contact entries, instead use either a **Hidden field**, or put the fields in a **Column** and make the column invisible and make sure the column does not have any conditional logic enabled.

You can also use conditional logic to conditionally hide/show a Button element (submit button). For instance whenever you do not allow a user to submit the form based on specific input, you can conditionally hide the submit button and instead display a message to the user. You can do this by adding a Column element and adding a Button inside the column and applying the conditional logic on the column. The same thing you can do for the message to be displayed, you can add either a Heading or HTML element to display a message.

### How to set conditions

A great example use case would be to have the submitter ask if they are registering as a **person** or as a **business**. Whenever they choose **business**, you will also want their **Company name**. But when they register as a **person** we do not want to display the **Company name** field because it is obsolete in this case. In this case we would apply the conditional logic on the `company_name` field to show when the submitter chooses to register as a **business**.

Given the above example with **personal** or **business** registration we will have a field called `company_name` that we only want to display when the user chooses to register as a **business** so they can enter their **Company name**. In this example we have the following fields:

* Radio button named `account_type` with the following options
  * Personal (with value: personal)
  * Business (with value: business)
* A text field named `company_name`

To apply the conditional logic on the `company_name` field edit the field and choose `Conditional Logic` from the dropdown menu.

You will now be asked if you want to **Show or Hide** the element when condition is met. In our case we will choose to **Show** the element when the condition is met.

Now we have to choose **When to Trigger** the condition(s) and show the field. You can choose from the below options:

* All (when all conditions matched) < this will show the element whenever all the conditions where met
* One (when one condition matched) < this will show the element whenever at least 1 condition was met

In our example it does not matter which one we choose, but for ease of use we leave it on the default option which is **All (when all conditions matched)**

The last step is to define the condition itself. You will be able to set the following options per condition:

* **Field** (in our example this would be the `account_type` field)
* **Logic** (in our example we will use the `== equals` condition, which is called the constructor) Possible constructors to choose from are:
  * ?? Contains
  * !! Not contains
  * \== Equal
  * != Not equal
  * \> Greater than
  * < Less than
  * \>= Greater than or equal to
  * <= Less than or equal
* **Value** (in our example this would be `business` based on the **account\_type** field value)
* **Or/And method** (each condition can have an `OR` or `AND` method to do an extra conditional check, but in our example we do not need it so leave it as is)

### Example Form

You can find an example form that uses conditional logic under: `Super Forms` > `Demos` > `Conditional Logic`


# Tags system

How to retrieve any data or user input inside your WordPress forms with the use of the tags system and how to correctly use them in your WordPress forms.

### What are {tags}?

The tags system in **Super Forms** is a very simple but yet very powerfull feature that gives any form the **flexibility** you require.

A so called `{tag}` can retrieve the form data entered by a user **on the fly** for either later use in your emails, or to directly display it somewhere in your form to be displayed to the user itself.

A simple usecase would be to **summarize** the information entered by the user.

### How to use tags?

A tag is written with the so called curly braces `{}` with in between the curly braces the unique field name of the element you wish to retrieve the value from.

When you have a field name called `first_name` and you want to retrieve this value in your email body you can retrieve it by placing `{first_name}` in the body.

#### **Example:**

```
Dear {first_name} {last_name},
...
```

#### **Above will translate to:**

```
Dear John Doe,
...
```

With checkboxes, radio buttons and dropdowns this will work exactly the same way except that you will also have the ability to retrieve the **label** instead of the **value**.

Let's say you added a checkbox element with the following options:

* My fav color is red | Red
* My fav color is green | Green
* My fav color is orange | Orange

The left side is your option `label` and on the right your `value`.

If you would call your checkbox `fav_color` then you would retrieve the selected option values with the tag `{fav_color}`. But if you want to retrieve the label you can use `{fav_color;label}`.

#### **Example:**

```
Selected color(s): {fav_color}
Selected color(s): {fav_color;label}

...
```

#### **Above will translate to:**

```
Selected color(s): Orange
Selected color(s): My fav color is orange
...
```

### Advanced tags

#### Setting and retrieving multiple values per options

Another feature you have with checkboxes, radio buttons and dropdowns is to **save multiple values** per value. In order to do this the only thing you will have to do is **separate each value** per option with a semicolon `;`.

For instance, when you sell multiple packages based on a specific membership, you might need a different price per membership. Let's say we have a **Standard membership** and a **Gold membership**. We will ask the user to select a package. We will use a dropdown field so the user can select the according membership.

The dropdown will be named `membership` and will have 2 items with Label / Value:

* `Standard` / `standard;10`
* `Gold` / `gold;25`

Now whenever the user has selected an item from the dropdown, we can retrieve the correct price depending on their membership.

* To retrieve the **Standard membership** price we would use the tag `{membership;2}` which would return `10`
* To retrieve the **Gold membership** price we would also use the tag `{membership;2}` which would return `25`

Now you might ask where should I actually place this tag? You can choose to use it in one of the following locations/functions:

* Inside a HTML element (to display it to the user in for instance a summary)
* Inside Conditional logic
* Inside Variable fields
* Inside any of the **Form Settings**, think of setting a custom **Contact Entry Title**, or defining a custom **Subject** for your emails or perhaps inside the email body itself

### Regular expressions

{% hint style="info" %}
Because this feature is especially useful in combination with the **Calculator** element, you can read about using regular expressions within tags here: Calculation examples
{% endhint %}

### When and where can I use tags?

* Inside your E-mail bodies, Subjects, and all other email headers you could think of.
* In combination with E-mail if statements
* Within your HTML elements
* Inside the Success Message that is displayed to the user after a successfull submitted form
* In combination with Variable fields and also within the conditional logic statements
* When redirecting form to a custom URL to add dynamic parameters e.g: domain.com/?first-name={first\_name}\&last-name={last\_name}
* In validation option for text fields to conditionally check for same value as other field (to compare two field values)
* You can use tags when saving contact entries with a custom title

### Predefined {tags} that are useful

#### **Retrieve the total words, chars from a Textarea field:**

* `{your_textarea_field_name_here;word}` (will count all words entered in the textarea)
* `{your_textarea_field_name_here;chars}` (will count all characters entered in the textarea, excluding carriage return, line-feed/newline, tab, form-feed, vertical whitespace)
* `{your_textarea_field_name_here;allchars}` (will count all all characters entered in the textarea, including carriage return, line-feed/newline, tab, form-feed, vertical whitespace)

#### **Retrieve pre-uploaded file information from the file upload element:**

{% hint style="info" %}
Also checkout the [file upload foreach loop example](/features/advanced/foreach-loops#how-to-loop-over-files) for the file upload element
{% endhint %}

* `{fieldname}` (retrieve list with file name(s))
* `{fieldname;count}` (retrieve total amount of files connected to this file upload element)
* `{fieldname;new_count}` (retrieve total amount of files that are yet to be uploaded)
* `{fieldname;existing_count}` (retrieve total amount of files already/previously uploaded)
* `{fieldname;url}` (retrieve file "blob" or "URL")
* `{fieldname;size}` (retrieve file size)
* `{fieldname;type}` (retrieve file type)
* `{fieldname;name}` (retrieve file name)
* `{fieldname;ext}` (retrieve file extension)
* `{fieldname;attachment_id}` (retrieve file ID after file has been uploaded when form is submitted)
* `{fieldname;url[2]}` (retrieve specific file data, this example retrieves the third file URL if it exists based on array index)
* `{fieldname;allFileNames}` (retrieve list with all file names, it's possible to filter this list with filter hook: `super_filter_all_file_names_filter`
* `{fieldname;allFileUrls}` (retrieve list with all file URLs, it's possible to filter this list with filter hook: `super_filter_all_file_urls_filter`
* `{fieldname;allFileLinks}` (retrieve list with a link to the file, it's possible to filter this list with filter hook: `super_filter_all_file_links_filter`

#### **Retrieve the current page or post title:**

* `{post_title}`

#### **Retrieve the the current page or post ID:**

* `{post_id}`

#### **Retrieve the the current post custom meta data:**

* `{post_meta_****}`

#### **Retrieve the IP-address of the submitter:**

* `{real_ip}`

#### **Retrieve Cart information (when WooCommerce is installed and activated):**

* `{wc_cart_total}`, `{wc_cart_total_float}`, `{wc_cart_items}`, `{wc_cart_items_price}`

#### **Retrieve the total submission count (if form locker is used):**

* `{submission_count}`

#### **Retrieve the latest Contact Entry ID that was created for this form:**

* `{last_entry_id}`

#### **Retrieve the latest Contact Entry status that was created for this form:**

* `{last_entry_status}`

#### **Retrieve the latest Contact Entry ID that was created by the logged in user:**

* `{user_last_entry_id}`

#### **Retrieve the latest Contact Entry status that was created by the logged in user:**

* `{user_last_entry_status}`

#### **Retrieve the previous location (URL) in a session so it will not be subject to change after navigating away and returning back at later time:**

* `{server_http_referrer_session}` (saves HTTP\_REFERRER (previous page URL) into session)

#### **Retrieve the previous location (URL) where the user navigated from before landing on the page with the form:**

* `{server_http_referrer}` (saves HTTP\_REFERRER (previous page URL) into session)

#### **Retrieve current date values in server timestamp (UTC/GMT):**

* `{server_timestamp_gmt}`, `{server_day_gmt}`, `{server_month_gmt}`, `{server_year_gmt}`, `{server_hour_gmt}`, `{server_minute_gmt}`, `{server_seconds_gmt}`

#### **Retrieve current date values in server timestamp (Local time):**

* `{server_timestamp}`, `{server_day}`, `{server_month}`, `{server_year}`, `{server_hour}`, `{server_minute}`, `{server_seconds}`

#### **Retrieve current post URL (permalink):**

* `{post_permalink}` (will retrieve the current post permalink where the form is placed on)

#### **Retrieve contact entry ID that was created after submitting form:**

* `{contact_entry_id}` (can only be used in **Success Message** and E-mails)

#### **Retrieve author information based on the current page/post the form is placed on:**

* `{post_author_id}` and `{post_author_email}` (can be used in both the Hidden field and Text field **Default value** option)

#### **Retrieve values of logged in user:**

* `{user_login}`, `{user_email}`, `{user_firstname}`, `{user_lastname}`, `{user_display}`, `{user_id}`, `{user_roles}` (can be used in both the Hidden field and Text field **Default value** option)
* `{user_meta_****}` tag to retrieve user custom meta data

#### **Retrieve any option from the wp\_options database table:**

* `{option_****}`

#### **Retrieve any option from the wp\_options database table that is of type Array, which allows you to retrieve a specific value from that array based on the provided index/key. When no index/key is provided a json representation of the array will be returned:**

* `{option_****;arrayKey}`

#### **Retrieve the e-mail address of blog administrator:**

* `{option_admin_email}`

#### **Retrieve the weblog title; set in General Options:**

* `{option_blogname}`

#### **Retrieve the tagline for your blog; set in General Options:**

* `{option_blogdescription}`

#### **Retrieve the blog Charset:**

* `{option_blog_charset}`

#### **Retrieve the date Format:**

* `{option_date_format}`

#### **Retrieve the default post category; set in Writing Options:**

* `{option_default_category}`

#### **Retrieve the blog's home web address; set in General Options:**

* `{option_home}`

#### **Retrieve the WordPress web address; set in General Options:**

* `{option_siteurl}`

#### **Retrieve the current theme's name; set in Presentation:**

* `{option_template}`

#### **Retrieve the start of the week:**

* `{option_start_of_week}`

#### **Retrieve the default upload location; set in Miscellaneous Options:**

* `{option_upload_path}`

#### **Retrieve the posts per page:**

* `{option_posts_per_page}`

#### **Retrieve the posts per RSS feed:**

* `{option_posts_per_rss}`

#### **Retrieve any field value submitted by the user:**

* `{field_XXXXX}`

#### **Retrieve the field label for the field loop {loop\_fields}:**

* `{loop_label}`

#### **Retrieve the field value for the field loop {loop\_fields}:**

* `{loop_value}`

#### **Retrieve the loop anywhere in your email:**

* `{loop_fields}`

#### **Retrieve timestamp from datepicker value:**

* `{datepickerfieldname;timestamp}`
* `{datepickerfieldname;month}`
* `{datepickerfieldname;year}`
* `{datepickerfieldname;day}`
* `{datepickerfieldname;day_name}`
* `{datepickerfieldname;day_name_short}`
* `{datepickerfieldname;day_name_shortest}`
* `{datepickerfieldname;day_of_week}`

#### **Retrieve the current/total PDF pages (PDF Add-on):**

* `{pdf_page}`
* `{pdf_total_pages}`

#### **Retrieve the generated PDF file label/name/url:**

* `{_generated_pdf_file_label}`
* `{_generated_pdf_file_name}`
* `{_generated_pdf_file_url}`


# Address lookup/auto complete

How to lookup/autocomplete an address within your WordPress form and populating form input fields with the address data.

### About

This feature allows you to convert a regular [Text field](/elements/form-elements/text-field) into an [Address search](/features/advanced/address-lookup-auto-complete) field to search for an address (place).

### Getting started

{% hint style="info" %}
To use this feature you must first obtain a Google API key via your [API manager](https://console.developers.google.com/).
{% endhint %}

In order to enable the **Address Auto Complete** function you will have to edit your Text field and select the `Address auto complete (google places)` option from the dropdown.

Now make sure you enable the feature by checking **Enable address auto complete**.

Now enter your **Google API key** and make sure you have enabled these libraries in your [API manager](https://console.developers.google.com/):

* Google Maps JavaScript API
* Google Places API (New)

{% hint style="danger" %}
Since March 2025 new Google API users are required to enable the Places API (New) since Google does not allow usage of their Places API (legacy) for new users.
{% endhint %}

### Restrict by country

It's possible to restrict results based on countries (up to a maximum of 5).

* `fr,nl,de` would restrict results for France, Netherlands and Germany
* `us,pr,vi,gu,mp` would restrict your results to places within the United States and its unincorporated organized territories.', 'super-forms' ),

### Return results by type

You can define what type of results you wish to return, you can choose one of the below types (leave blank to return all types):

* `geocode`: return only geocoding results, rather than business results. Generally, you use this request to disambiguate results where the location specified may be indeterminate.
* `address`: return only geocoding results with a precise address. Generally, you use this request when you know the user will be looking for a fully specified address.
* `establishment`: return only business results.
* `(regions)`: return any result matching the following types: locality, sublocality, postal\_code, country, administrative\_area\_level\_1, administrative\_area\_level\_2
* `(cities)`: type collection instructs the Places service to return results that match locality or administrative\_area\_level\_3

### Mapping data with fields

It's also possible to automatically populate other text fields with data based on the selected place. For instance, you could add fields named `street`, `city`, `zipcode`. You can then map the text field where the user searches for a place/address so that it automatically fills out these individual fields.


# Analytics Tracking

How to track form submissions in WordPress with the use of Event Tracking provided by Google Analytics.

{% hint style="info" %}
**Please note:** You will require a Tracking ID from your Google Analytics account to make this work. If you haven't one yet you can get yours from Google Analytics
{% endhint %}

### About

If you are using Google Analytics to track web traffic, you might also wish to track form submissions. This guide will provide you with the steps required to set it up correctly.

{% hint style="info" %}
**Please note:** the JavaScript code snippet used is based on the latest version of the Google Analytics library. If you use the [Legacy library (ga.js)](https://developers.google.com/analytics/devguides/collection/gajs/) you will need to change the code accordingly to the official Google Documentation.
{% endhint %}

### Configuration

Tracking form submissions with your **Google Analytics** account is very easy with Super Forms.

The only thing you will have to do is add the code snippet to your site and setting up the events for the forms you wish to track.

Go to `Super Forms` > `Settings` > `Form Settings`.

Enable the option **Track form submissions with Google Analytics**.

Add the following code snippet and replace **UA-XXXXXX-X** with your Tracking ID.

```js
(function(i,s,o,g,r,a,m){i['GoogleAnalyticsObject']=r;i[r]=i[r]||function(){
(i[r].q=i[r].q||[]).push(arguments)},i[r].l=1*new Date();a=s.createElement(o),
m=s.getElementsByTagName[o](0);a.async=1;a.src=g;m.parentNode.insertBefore(a,m)
})(window,document,'script','//www.google-analytics.com/analytics.js','ga');

ga('create', 'UA-XXXXXX-X', 'auto');
ga('send', 'pageview');
```

### Event Tracking

The last step is to add an **Tracking Event** that will be send to Analytics.

#### **Tracking a specific form only:**

The only thing you have to do is prepend the form ID before `send` with a colon `:` like so:

`3519:send|event|Contact Form|submit`

This event will only be triggered for the form with ID `3519`.

#### **Tracking all forms:**

In order to setup a global tracking event you can simply add the following line:

`send|event|Contact Form|submit`

Replace **Contact Form** with a more suitable name if needed. This will be visible in your Analytics dashboard.

#### **Tracking event with a Label and Value:**

In some cases you might need or want to give some additional information, for instance if you are running multiple campaigns in a specific time period. You can append the Label and Value like this:

`send|event|Campaign Form|submit|Fall Campaign|43`

### Testing & Debugging

If you have setup everything correctly you should be able to see some activity in your Analytics Dashboard when a form has been submitted.

Current form submissions will now be listed under `Realtime` > `Events`.

Earlier form submissions will now be listed under `Behavior` > `Events` > `Overview`.

#### **For developers:**

If you are not sure if everything is correctly setup, you can use the [Google Tag Assistant](https://chrome.google.com/webstore/detail/tag-assistant-by-google/kejbdjndbnbjgmefkgdddjlbokphdefk?hl=en) extension for Google Chrome to debug any issues.


# Conversion Tracking

How to track WordPress form submissions as conversions with Google Tag manager

Add the following code at the bottom of your child theme **functions.php** and set your CONVERSION\_LABEL accordingly. Make sure to also change the values that you wish to send for this conversion.

These are values retrieved from the form submission itself. So any field that you are using on your form can be retrieved. In the above example we retrieve `product_name`, `quantity` and `total`.

You will need to change them accordingly for your form. Optionally you can use the `args.form_id` to only execute the conversion tracking for specific forms only.

```php
add_action('wp_footer', function(){
    ?>
    <script type="text/javascript">
        // Execute after form submission
        if(typeof SUPER === 'undefined') window.SUPER = {}; // Custom JS script was loaded to early
        SUPER.custom_form_conversion_tracker = function(args){ // Grab form fields
            var product_name= (args.data.product_name? args.data.product_name.value : '');
            var quantity= (args.data.quantity? args.data.quantity.value : '');
            var total= (args.data.total? args.data.total.value : ''); 
            // Submit conversion event
            gtag('event', 'conversion', {
                'send_to': 'AW-CONVERSION_ID/CONVERSION_LABEL',
                'currency': 'USD',
                'formID': args.form_id,
                'product_name': product_name,
                'quantity' : quantity,
                'total' : total
            });
        }
    </script>
    <?php
}, 100);

// Add custom javascript function 
function f4d_custom_form_conversion_tracker( $functions ) {
    $functions['after_email_send_hook'][] = array(
        'name' => 'custom_form_conversion_tracker'
    );
    return $functions;
}
add_filter( 'super_common_js_dynamic_functions_filter', 'f4d_custom_form_conversion_tracker', 100, 2 );
```


# Distance & Duration Calculation

How to calculate traveling duration or distance between two locations (addresses) in your WordPress form.

{% hint style="info" %}
**Note:** To use this feature you must first obtain a Google API key via your API manager. Also make sure the Directions API library is enabled in your API manager. After you obtained your API key you require to enter it under "Super Forms > Settings > Form Settings".
{% endhint %}

### About

With this feature for Text fields you can calculate either the distance or duration between 2 different locations. When calculating the distance you can return the total kilometers (metric) or miles (imperial). When calculating the duration (travel time) you can return the total seconds or minutes.

The distance and duration between the two locations are calculated with the **google directions API**.

{% hint style="info" %}
**Note:** In order for this feature to work you must enable the Directions API within
{% endhint %}

### When to use this feature?

You will want to use this feature whenever you need to calculate **travel time** or **travel distance** between 2 different locations. The value returned can be populated to another Text field that you can optionally set to be disabled to not allow the user to edit the field. You can also put this field in a hidden column to make it invisible to the end user.

### How to enable it?

This feature can be enabled for any Text field in your form.

In order to do so, go ahead and edit the element. Now choose `Distance & Duration Calculation (google directions)` from the dropdown menu. Now check the **Enable distance calculator** option to enable the feature for this field.

{% hint style="info" %}
**Note:** It is strongly suggested to also enable the Address Auto Complete feature.
{% endhint %}

When enabled, you will have to choose if the field acts as the Start or Destination address. You can select this via the **Select if this field must act as Start or Destination** option.

Depending on whether the field is the Start or Destination you will now see some extra options.

When the field acts as **Start address**, you will have to define what the **Destination address** is. When the field acts as **Destination address**, you will have to define what the **Start address** is.

{% hint style="info" %}
**Note:** For **Destination address** or **Starting address** you can either enter a fixed address/zip code or enter the unique field name to retrieve dynamic location from user entered.
{% endhint %}

When you have chosen to use the field as the Start address, you can now choose what value you wish to return from the API. You can choose one of the following options:

* **Distance in meters** (Tip: use this option in combination with Calculator element to do calculations)
* **Duration in seconds** (Tip: use this option in combination with Calculator element to do calculations)
* **Distance text in km or miles**
* **Duration text in minutes**

Now we have to **Select a unit system** for the value returned by the API. You can choose between **Metric** (kilometer/meters) or **Imperial** (miles/feet) unit system.

The final step is to enter the Unique field name which the distance/duration value should be populated to. This can either be a Text field or Hidden field (only enter the unique field name without any brackets).

### Example form

You can find an example form that uses conditional logic under: `Super Forms` > `Demos` > `Distance calculator`


# If statements

Displaying data/content conditionally inside your HTML element and or email body with the build in "if statements" for your WordPress forms

{% hint style="info" %}
If statements can be used inside your [HTML element](/elements/html-elements/html-raw) and inside your [email body content](/features/basic/confirmations-emails). You can also combine it within [foreach loops](/features/advanced/foreach-loops).
{% endhint %}

### What is an email if statement? <a href="#what-is-an-email-if-statement" id="what-is-an-email-if-statement"></a>

With the build in **if statements** feature you will have more flexibility as to how your email body and or HTML element is generated based on user input in your WordPress form.

In short it allows you to (just like any programming language) construct your own if statements inside your HTML element and or email body content.

### Construction of "if statements" explained <a href="#construction-of-quotif-statementsquot-explained" id="construction-of-quotif-statementsquot-explained"></a>

Each **if statement** has a so called `operator` to do a so called "Comparison Operation". Inside our WordPress forms (and email body content) we can use one of the following operators for our statements:

* `==` (equal to)
* `!=` (not equal)
* `>` (greater than)
* `<` (less than)
* `>=` (greater than or equal to)
* `<=` (less than or equal to)
* `??` (contains)
* `!??` (does not contains)

### How to create my own if statements? <a href="#how-to-create-my-own-if-statements" id="how-to-create-my-own-if-statements"></a>

A basic example of this would be to compare a field value with a hardcoded value, for instance if you want to display some additional information only to users who are named **John** we could do the following:

```html
if({first_name}=='John'):
    Your custom HTML here...
endif;
```

When you require to output a default text whenever `first_name` is not equal to **John** we can use the `elseif` statement as shown below:

```html
if({first_name}=='John'):
    This text is only for John :)
elseif:
    This text is for everyone who isn't named John
endif;
```

### Practical example use cases <a href="#practical-example-use-cases" id="practical-example-use-cases"></a>

*Below we will cover some practical use cases that you can apply to your own application(s).*

#### Use case 1: Show extra information based on a selected package: <a href="#use-case-1-show-extra-information-based-on-a-selected-package" id="use-case-1-show-extra-information-based-on-a-selected-package"></a>

A simple use case would be to add some text that is specific for a package that a user selected inside your WordPress form. Let's say the package name is called `package_1` and it's value when chosen by the user is `daily_backups`. When the user selected this package to be included in their order, we would want to display some important information regarding how these backups are being created by the company.

Inside our [Confirmation email body](/features/basic/confirmations-emails) (delivered to the user who filled out the WordPress form) we can enter the following if statement:

```html
if({package_1}=='daily_backups'):
    Your backups are being stored daily on 3 other independent servers.
    By default your server has a fallback server that will be activated whenever the server is down for more than 2 min.
    If you need more technical information about how we process backups read our <a href="domain.com/faq">FAQ</a>
endif;
```

The above if statement will output the content depending on your own needs whenever the tag `{package_1}` is equal to `daily_backups`

#### Use case 2: Ask for parental consent when underaged: <a href="#use-case-2-ask-for-parental-consent-when-underaged" id="use-case-2-ask-for-parental-consent-when-underaged"></a>

Another example could be to check if a user is underaged or not and display some information about needing a parental consent:

```html
if({age}<18):
    Because you are underaged we need a parental consent.
    Your parent(s) or guardian(s) need to sign the attached PDF file and return it by replying directly to this email address.
    They can also send it to the following post address: ...
endif;
```

The above if statement will display the message only when the user is underaged

### Checking if a field exists <a href="#checking-if-a-field-exists" id="checking-if-a-field-exists"></a>

When you are using [conditional logic](/features/advanced/conditional-logic) in your form, in some cases a field might not be set due to it being conditionally hidden.

In these cases you might want to check if a field exists (is set). You can do so by using the `isset()` method. For example:

```html
if(!isset(company_name)):
    The field named `company_name` does not exists, this registration is not a business registration.
endif;

if(isset(tax_id)):
    The Tax field was conditionally shown, this is a business registration.
elseif:
    This is a regular customer registration.
endif;
```


# Foreach loops

How to loop over dynamic form data inside your E-mails to retrieve user input inside the email body content.

{% hint style="info" %}
**Note:** This feature also works with HTML elements since v4.6.0+
{% endhint %}

### What is a foreach loop?

A foreach loop is a method used inside your E-mails, HTML element and generated PDF file.

It can be used in combination with Dynamic column.

This will allow you to loop over all the dynamically added fields by a user and display this information either in your E-mails, HTML elements on the front-end or inside your generated PDF file.

### How to create my own foreach loops?

In order for the foreach loop to work you must have a `Dynamic` column added to your form.

{% hint style="info" %}
**Note:** Make sure that the HTML element is placed outside your dynamic column!
{% endhint %}

For example, let's say you have a form that users fill out to register for a team based game/match. They are required to enter 3 to 5 persons per team.

In this case you will add a Dynamic column to your form and set it's limits to a minimum of 3 and a maximum of 5.

Now inside the dynamic column add two Text fields `First name` and `Last name`.

The final step is to place the HTML element with the below content outside the dynamic column (do not put it inside the dynamic colum):

```html
foreach(first_name):
    Team member #<%counter%>: <%first_name%> <%last_name%><br />
endforeach;
```

As you can see we used `first_name` to loop over the dynamic column that contains the field named `first_name`.

The example above also implements the `<%counter%>` tag to retrieve the current index of this team member.

The result of above foreach loop with a total of 4 team members filled out on the form could be as follows:

```html
    Team member #1: Bill Gates
    Team member #2: Steve Jobs
    Team member #3: Elon Musk
    Team member #4: Mark Zuckerberg
```

### How to loop over selected checkboxes and dropdown items?

The below example loops over all selected items of a `Checkbox` field and prints both the item Label and Value. This can be used inside the Dynamic column itself:

```html
foreach(option;loop):
    #<%counter%>: Label: <%label%> / Value: <%value%><br />
endforeach;
```

If you wish to combine multiple checkboxes that are inside a dynamic column you could merge them with the use of a HTML element. First create a dynamic column with your checkbox element inside. Now add a HTML element and set it's content to below (rename `option` to your checkbox field name). You can name the HTML field `options_list`.

```html
foreach(option;loop):
    #<%counter%>: <%value%><br />
endforeach;
```

Now outside of the dynamic column add a final HTML element and set it's content as follows. This will loop over all the `option` fields in the form, and then it prints out the `options_list` that belongs to this dynamic column. If there are multiple columns then the below foreach loop will simply append them after eachother. As you can see the foreach loop above contains a horizontal rule so that each checkbox items are seperated nicely. Of course you are totally free to design this in the way you wish, because this is plain HTML and CSS.

```html
foreach(option):
    {options_list}
endforeach;
```

### How to loop over files?

When you are using a `File upload` element you can display the file info (including the image itself) before they are being uploaded.

Super Forms does this by default, but if you need the picture to be displayed somewhere else in your form you can do so with the use of the below example code inside your HTML element:

```html
foreach(file;loop):
    <strong>Name (<%counter%>):</strong> <%name%>
    <strong>URL (<%counter%>):</strong> <%url%>
    <strong>Extension (<%counter%>):</strong> <%ext%>
    <strong>Type (<%counter%>):</strong> <%type%>
    <strong>ID (<%counter%>):</strong> <%attachment_id%>
endforeach;
```

The below example loops over the files and links to the file itself:

```html
foreach(file;loop):
    <strong>File <%counter%>:</strong> <a href="<%url%>"><%name%></a>
endforeach;
```

To display the image directly to the user you can use the below HTML.

Keep in mind that if you allow users to upload files other than images, you might want to make sure you add a custom File upload element purely for image file types.

```html
foreach(file;loop):
    <img src="<%url%>" style="max-width:200px;max-height:200px;" /><br />
endforeach;
```


# E-mail Reminders

How to send E-mail reminders after user submits the form in WordPress. For Appointment reminders or follow E-mails for your customers.

### Example

A live demo can be found here: <https://super-forms.com/example-forms/e-mail-reminders-add-on/>

And a 1-click installable form is available via your WordPress menu: `Super Forms` > `Demos` > `E-mail Reminder`

### Description

Send E-mail reminders before and after a specific date (either form submission date or user defined date through `{tags}`). This is useful whenever you want to do the following:

* A simple appointment or event reminder e.g. **Don't forget your appointment with your dog!**
* Asking customers about their experience e.g. **How was your trip?**
* Ask customers to leave a review e.g. **Please rate our product!**

### Features

* Configure unlimited amount of reminders per form
* Send reminder based on form submission date or based on user defined date through `{date;timestamp}` tag (consult Tags System for more information about {tag} usage)
* Define how many days **before** or **after** the base date the reminder should be send example:\
  `0` = The same day, `1` = Next day, `5` = Five days after, `-1` = One day before, `-3` = Three days before
* Send reminder at a fixed time, or by offset
  * **Fixed** (e.g. always at 09:00)
    * *Define at what time the reminder should be send (Use 24h format e.g: 13:00, 09:30)*
  * **Offset** (e.g. 2 hours after date)
    * *Define at what offset the reminder should be send based of the base time example:*\
      `2` = Two hours after, `-5` = Five hours before, `0.5` = 30 minutes before

### Setup Guide

All settings for your email reminders can be found under each form via `Form Settings` > `E-mail Reminders`.

See below for some example use cases:

#### **1. Appointment reminder:**

When you wish to send an email reminder 1 day before the actual appointment you can grab your **Datepicker** field with a {tag} e.g. {date}.

You will put this tag in the setting `Send reminder based on the following date`.

{% hint style="info" %}
Please note that when you are using a none English date format you will want to use a tag that explicit retrieves the timestamp from the selected date by entering `{date;timestamp}`. This allows you to use any date format on your datepicker element.
{% endhint %}

Now define on which day you require it to send a reminder. In our case we want to send it a day before the actual appointment. This can be defined in the next setting by entering `-1` (1 day before).

Now define at what time the reminder should be send, this can be a fixed time, but also a dynamic time, we will be using the `Fixed` time here and send a reminder at `09:00`.

The last step is to actually define the E-mail subject, body and other related settings required to send the desired E-mail.

#### **2. Please rate our product:**

When you want to get feedback from your service or product you can send emails after a specific amount of time the form was submitted.

Let's say we want to send this email after 30 days to the customer. `Send reminder based on the following date` can be left blank in this case, and we can simply enter `30` to send the reminder 30 days after the form was submitted.

The time does not matter what and can be set to `Fixed` at `09:00`. Last thing is to change the email Subject and content that you desire.


# Variable Fields

How to create a variable field for your WordPress form that gets updated dynamically based on other field values or user input

Creating the most complex forms is possible with **variable fields** (Hidden field). A variable field it's value can be updated dynamically on the fly based on other fields values. This allows you to have more flexibility within your final value or for doing complex calculations and speed things up when building your form.

### What is a variable field?

A variable field is a Hidden field that contains a value that dynamically changes based on other field(s) values. In programming languages you also have a so called $variable. In general this will act the same way.

### When to use a variable field?

You should use a variable field whenever you require to have a specific final value that can vary based on user selected options in an other field or in other fields. A simple example would be whenever you want to apply 3 different discounts based on a selected quantity.

#### **Example use case**

When a user orders 10 products 0% discount should be applied, when more than 10 products are ordered the user receives 15% discount and when 30 or more products are ordered the user receives 35% discount.

In the above example, the discount amount/value is dynamic. That's when a variable field comes into play. Based on user input you can assign the correct value to your variable field and use it to display information to your user, or to calculate the correct prices with the use of the [Calculator](/elements/form-elements/calculator) element.

### How to create a variable field?

From the `Form Elements` TAB drag and drop the `Hidden field` element in place. Edit the element and choose `Conditional Variable (dynamic value)` from the dropdown. Now set the **Make field variable** option to: Enable (make variable). Now apply the conditions and enter the value that you require when the conditions are met.

These conditions work the exact same way as Conditional Logic do except that it will update the value instead of showing/hiding elements.

### Creating variable conditions with CSV file

It is also possible to use a CSV file instead of manually adding each condition for your variable field. You can do this by setting the `Retrieve method` to **CSV file**.

Let's say we need retrieve the **price** (our variable field) of a flyer based on the dimension in pixels.\
The user would choose the dimensions in pixels via two quantity fields.\
In this example we have a quantity field named **height** and **width**.\
When the user chooses a dimension of **150**x**10** (height x width) the price should be **$1.25**.\
\&#xNAN;*the price of course being our variable field*

With the above example in mind our spreadsheet would look something like the below table.\
\&#xNAN;*this spreadsheet can then be saved as a CSV file which you can then use on your variable field*

|         | **10** | **20** |
| ------- | :----: | -----: |
| **150** |  1.25  |   1.50 |
| **160** |  2.25  |   2.50 |
| **170** |  3.25  |   3.50 |

{% hint style="info" %}
You can download the above example spreadsheet via google drive: <https://goo.gl/s6Etgk>. **Please note:** make sure to save it as a CSV file in order for it to work.
{% endhint %}

Once you have downloaded and edited the example, you can save it as a CSV file.\
Now edit your variable field, and upload the CSV file.

The last thing we will have to do is map the correct fields in your form with the **Row** headings and **Column** headings of your spreadsheet.

To map the fields correctly we have to edit the `Row heading` and `Column heading` options for our variable field.\
In our case we will map the **height** field as our Row heading, so we can enter `height` in `Row heading`.\
In our case we will map the **width** field as our Column heading, so we can enter `width` in `Column heading`.

> When above steps where correctly followed your variable field should now work correctly, you can test this by adding a HTML element and retrieve the value by placing the {tag} inside the HTML

### Using {tags} with variable fields

Variable fields can deal with {tags}, please read the {tags} system section for more information about tags.

### Example form

You can find an example form that uses conditional logic under: `Super Forms` > `Demos` > `Variable Fields`


# Form templates - Include elements into other forms - WordPress

If you require multiple forms that consist partially of the same elements, you can use the "Include Form" element to inject elements from another form. Reduces the editing time while building forms.

> View the short [explanation video](#include-form-element-explanation-video) about the "Include Form" element.

{% hint style="info" %}
In short, this allows you to "inject" elements from an already existing form into another. It acts as a "template" system.
{% endhint %}

### When should you use this?

You should use the `Include Form` layout element whenever you have Fields or Elements that are the same for multiple forms.

This will help reduce editing time since you do not have to re-do (or edit) these across all your forms. It also means you don't have to copy/paste these across all your forms.

They are managed from one single location. Any edits made to the "Template form" will automatically be applied across all of the forms that included this form.

Basically the `Include Form` element injects an already existing form's elements into another. You can find the `Include Form` under the **Layout Elements** section on the builder page as shown below:

<div align="left"><figure><img src="/files/3Y8eeXmTEx9wPqOlmq3Y" alt="Include an existing form into another (injecting) on WordPress website."><figcaption><p>Include an existing form into another (injecting) on WordPress website.</p></figcaption></figure></div>

### Step 1: Create a form that acts as your template

Create a new form called `Template XYZ` and simply build the form as you would normally. Add all the Layout and Form elements. For instance if you require all other forms to have an E-mail and Name field in a 1/2 layout, simply add the Columns and the fields. Once done, click the `Save` button to save the form.

### Step 2: Create your actual form(s) and Include the template

Now create your actual form(s) that you want to display on your website. Now add the "Include Form" element and set the form ID of your form template. It will now automatically load the elements from that form into your current form.

<div align="left"><figure><img src="/files/OF9ZbAmZFnEKIXEJsW1I" alt="Form injected with the &#x22;Include form&#x22; element - WordPress"><figcaption><p>Form injected with the "Include form" element - WordPress</p></figcaption></figure></div>

{% hint style="success" %}
When you preview or view the form on your front-end you will now see the elements are added from your template form.
{% endhint %}

### "Include Form" element explanation video

{% embed url="<https://youtube.com/shorts/o3vjlibgnto>" fullWidth="false" %}


# How to Transfer Form Fields Between Forms in WordPress

Transferring form elements from one form to another in WordPress is quick and easy. This guide will show you step by step how to copy elements from one form into another without losing data or layout.

### What Happens When You Transfer Fields?

When you transfer fields:

* The original elements will **remain in the source form**.
* The same elements will also appear in the destination form.
* If you want to remove the fields from the source form, you must delete them manually by clicking the delete icon **\[x]**.

Example: If you transfer three fields (Email, First Name, Last Name) from **Form A** to **Form B**, both forms will now contain these fields.

### Step 1: Start the Transfer Process

1. Open the form containing the fields you want to copy.
2. Click the **transfer icon** (see image below).
   * The icon will turn **green with a downward arrow**.
   * This means the fields are ready for transfer.

<figure><img src="/files/5V28tOa5FOcMw0LZTBWR" alt="Click the transfer icon to start the transfer process."><figcaption><p>Click the transfer icon to start the transfer process.</p></figcaption></figure>

<figure><img src="/files/SN1A8stkQ5u8tktRW86J" alt="Transfer process is activated when icon turns green"><figcaption><p>Transfer process is activated when icon turns green</p></figcaption></figure>

### Step 2: Choose the Destination Form

1. Open the target form where you want to place the fields.
   * Tip: You can open it in a new browser tab if you need to transfer multiple items to different locations.
2. Click the **green transfer icon** inside the destination form.
3. The selected fields will instantly appear in the new form.

### Final Result

After completing the transfer, you will now see the **exact same fields** inside your other form. The process works whether you’re moving elements to a new form or reusing them inside the same form.


# Integrations

Extend your form functionality with third party integrations and tools.

{% content-ref url="/pages/VdeBUVKCKn5MDCvWA8Rz" %}
[PDF Generator](/features/integrations/pdf-generator)
{% endcontent-ref %}

{% content-ref url="/pages/Iv6uRu4yWS2apPTZEj5i" %}
[Listings](/features/integrations/listings)
{% endcontent-ref %}

{% content-ref url="/pages/xWFNvn3z4fZndaeI0n7V" %}
[Zapier](/features/integrations/zapier)
{% endcontent-ref %}

{% content-ref url="/pages/CxgfLsQ6GdW8VW08P5RC" %}
[WooCommerce Checkout](/features/integrations/woocommerce-checkout)
{% endcontent-ref %}

{% content-ref url="/pages/7SNjs0n8X4wIRateYZtV" %}
[PayPal](/features/integrations/paypal)
{% endcontent-ref %}

{% content-ref url="/pages/ifvzuI6naN26hXmPFKre" %}
[MailChimp](/features/integrations/mailchimp)
{% endcontent-ref %}

{% content-ref url="/spaces/l6Kz0R6S7z3Fb6KLZYVE/pages/OosCoQqwbLxZYO6pZA4W" %}
[Broken mention](broken://spaces/l6Kz0R6S7z3Fb6KLZYVE/pages/OosCoQqwbLxZYO6pZA4W)
{% endcontent-ref %}

{% content-ref url="/pages/SSn30pQRFgUX4CJwviUT" %}
[WooCommerce Instant Order (in progress)](/features/integrations/woocommerce-instant-order-in-progress)
{% endcontent-ref %}


# PDF Generator

Form to PDF converter/generation for WordPress. Creates a PDF file based on the form submission. The PDF will look identical to what the user sees on the front-end. Custom HTML and CSS can be used.

### About

This Add-on allows you to convert any form submission into a PDF file which would look identical to how the form was displayed on the front-end in the browser.

When a user submits the form, the PDF will be generated and optionally (if enabled) attached to the Admin and/or Confirmation E-mail.

The PDF file will also be attached to the Contact Entry (if enabled).

You also have the option to specifically include or exclude elements from the PDF, which should give you a ton of flexibility to choose from.

You can also define a Header and Footer element which would then be visible on all pages of the generated PDF file.

### Quick start

Login to your WordPress site and navigate to: **Super Forms > Licenses**. Start the 15 day trial for the PDF Generator Add-on. Once the trial is activated, you can navigate to any of your existing forms via **Super Forms > Your forms**, or create a new form via **Super Forms > Create form**.

Now click on the **\[PDF]** TAB at the top of the builder page. Here you will find all the settings and options for the Add-on. To enable PDF generation you can simple check the option Enable Form to PDF generation.

<div align="left"><figure><img src="/files/JrBTlqa2lmLyztTuWjGT" alt="Enable form to PDF generation for your WordPress form."><figcaption><p>Enable form to PDF generation for your WordPress form.</p></figcaption></figure></div>

When the form is submitted a PDF file will be generated with all the form data.

### Include and exclude elements from the PDF

When [creating your form](/quick-start/creating-a-form), you will [add some elements](/quick-start/adding-form-elements) which by default are visible to the user unless defined otherwise. Any element that is visible to the user will also be visible in the generated PDF. However you can override this behavior be [editing any element](/quick-start/editing-elements#editing-a-single-element) in your form and navigating to the **PDF Settings** section where you can choose between one of the following options:

* Show on Form and in PDF file (default)
* Only show on Form
* Only show in PDF file
* Use as PDF header
* Use as PDF footer

### Setting up a Header and Footer for your PDF file

In order to enable a header or footer for your PDF file, you must define which element in your form should act as such.

{% hint style="warning" %}
**Note:** your form can only have one element defined to act as the header, and only one to act as the footer.
{% endhint %}

When you require more elements to be placed in either one, you can simply use a [Column ](/elements/layout-elements/column-grid)element and define it as your header or footer. Just put the elements that you require inside this column.

You can enable a header by [editing your element](/quick-start/editing-elements#editing-a-single-element) and navigating to the **PDF Settings** section. There you can choose between **Use as PDF header** or **Use as PDF footer**.

#### Displaying pagination

Inside your header and footer you can use the tags **{pdf\_page}** and **{pdf\_total\_pages}** inside a HTML element to display the current page. For example, the below HTML:

```
Page {pdf_page} of {pdf_total_pages}
```

Would translate to:

```
Page 2 of 13
```

### Using a dynamic PDF filename

When the PDF file is saved or downloaded it will have a default name **form.pdf**.

You can change this under the PDF filename setting. This setting is compatible with the [Tags system](/features/advanced/tags-system) so that you can generate dynamic filenames based on user input data.

For instance, when you have a form with the fields named `first_name` and `last_name`, you can define your filename as follows:

```
{first_name}-{last_name}.pdf
```

Which could translate to:

```
John-Doe.pdf
```

### Attaching the generated PDF file to your E-mails

By default the PDF will be attached to the Admin and Confirmation E-mail, but you can disable this by unchecking the option **Attach generated PDF to admin e-mail** or **Attach generated PDF to confirmation e-mail**.

### Exclude the PDF from contact entry data

By default the PDF will be saved in the Contact Entry (if you enabled to save Contact Entries that is). You can disable this by checking **Do not save PDF in Contact Entry**.

### Show download PDF button

In some cases you might not send any E-mails and perhaps not even save a Contact Entry, but you might just want to download the PDF file that was generated. In that case you can display a \[Download PDF] button to the user after the form was submitted.

You can enable this by checking the Show download button to the user after PDF was generated setting. Optionally you can define the download button text e.g. "Download Summary" or "Download PDF file" (or anything that suits your use case). You can also define the text that should be displayed during the PDF generation itself e.g. "Generating PDF file..."

### Page orientation portrait and or landscape

By default the generated PDF file has it's orientation set to "Portrait", but for some use cases you might prefer the "Landscape" orientation.

You can change the orientation via the **Page orientation** setting.

{% hint style="info" %}
**Tip:** you can also change the orientation of the next page with the [**PDF page break**](/elements/html-elements/pdf-page-break) element which can be found under the [HTML Elements](/elements/html-elements) section.
{% endhint %}

### Unit of measure, page format and margins settings

There are several more settings which you can define, which are listed below:

* **Unit** `mm (default)`, `pt`, `cm`, `in`, `px`
* **Page format** `a3`, `a4 (default)`, `a5`, `letter`, `legal`, `Custom page format` etc.
* **Body margins** top/right/bottom/left
* **Header margins** top/right/bottom/left
* **Footer margins** top/right/bottom/left

### PDF Render scale (resolution/sharpness/quality)

This option allows you to fine tune the resolution of the generated PDF file. This setting should be left to the default value for best results, unless you require a higher resolution.

{% hint style="info" %}
**Note:** you will lose "pixel" quality when lowering the render scale.
{% endhint %}

If your PDF file size is becoming to large you might want to consider lowering the render scale setting at a rate of **0.1** at a time during testing. When working with large forms it is important to check the PDF file size during development and to adjust the render scale accordingly if needed.

### Native PDF elements

{% hint style="info" %}
This feature is currently only available in the [BETA version](/developers/beta-version).
{% endhint %}

When you enable the PDF to generate native elements, it will not take a snapshot (image) of the form. Instead it will use native PDF elements which makes the render process quicker, and the PDF file size smaller.

In most cases you will want to enable this mode. This is now the preferred method. The downside is that it might not look 100% identical to how the form looks on the front-end. So you might want to try both methods, and see which one suits your use case best.

### Smart page breaks

{% hint style="info" %}
This feature is currently only available in the [BETA version](/developers/beta-version).
{% endhint %}

With smart page breaks enabled any element and or text will automatically be pushed onto the next page in case it didn't fit on the previous page for the full 100%.

### Pricing

<table><thead><tr><th width="152">Volume</th><th width="189">Price per license</th><th>Total</th></tr></thead><tbody><tr><td>1+</td><td>$5</td><td>1 license would cost $5 p/m</td></tr><tr><td>5+</td><td>$3</td><td>5 licenses would cost $15 p/m</td></tr><tr><td>10+</td><td>$2.5</td><td>10 licenses would cost $25 p/m</td></tr><tr><td>20+</td><td>$2</td><td>20 licenses would cost $40 p/m</td></tr><tr><td>40+</td><td>$1.5</td><td>40 licenses would cost $60 p/m</td></tr></tbody></table>


# Listings

Display contact entries (form submissions) on your WordPress front-end page in a table like fashion (list).

{% hint style="info" %}
**Tip:** Read the [Quick start](#quick-start) guide to get your first listing up and running quickly.
{% endhint %}

### About

This Add-on allows you to display contact entries on your front-end in a table like fashion (list). Hence the name "Listings". A quick preview of how a listing might look on your Front-end:

<figure><img src="/files/Ymr6qfuxtl5DHzlX8SOt" alt="A table/list on the WordPress front-end displaying contact entries (form submissions)."><figcaption><p>A table/list on the WordPress front-end displaying contact entries (form submissions).</p></figcaption></figure>

{% hint style="info" %}
You can try this Add-on for 15 days for free by going to **Super Forms > Add-ons** in your WordPress dashboard.
{% endhint %}

### Quick start

The Add-on comes with a 15 day free trial, so you can try it out for free. To enable the trial, login to your WordPress site and navigate to **Super Forms > Licenses**. On this page you can start the 15 day trial for the **Listings** Add-on. Once the trial is activated, you can navigate to any of your existing forms via **Super Forms > Your forms**, or create a new form **Super Forms > Create form**.

Now click on the **\[Listings]** TAB at the top of the builder page:

<div align="left"><figure><img src="/files/z568Bxua9vMSNoywGgRu" alt="Creating and configuring a listing for your WordPress form."><figcaption><p>Creating and configuring a listing for your WordPress form.</p></figcaption></figure></div>

Here you will find all the settings and options for the Add-on. To create your first listing, you can check the option **Enable listings for this form**. To edit your listings settings you can click the cogwheell icon as shown below:

<div align="left"><figure><img src="/files/71g3brfMcwAGLdRiWPvA" alt="Edit an existing listing from the back-end."><figcaption><p>Edit an existing listing from the back-end.</p></figcaption></figure></div>

{% hint style="info" %}
**Tip:** you most likely will want to setup a page with a Fullwidth layout (if your theme supports it), this way the most columns can be visible at once (in case you have many columns defined to be displayed)
{% endhint %}

Depending on your settings your listing should be visible (or not) and might look something like this:

<figure><img src="/files/Ymr6qfuxtl5DHzlX8SOt" alt="Example of how the list/table might look on your WordPress site."><figcaption><p>Example of how the list/table might look on your WordPress site.</p></figcaption></figure>

### Settings

There are many settings that give you control over what and how the listing will be displayed to the end-user, such as:

* Control to who the listing will be displayed and display an optional message to other users that can't view it;
* Control from which forms entries should be retrieved, e.g. "Current form", "All forms", or "Specific form ID's";
* Only retrieve entries between a specific date range (from/till), you can leave from or till blank to have no limit on either side;
* Control who can see which entries
* Optionally display a message to the user if no entries are found
* Allow/Disallow administrators or other roles/ID's to **view** any entries
* Allow/Disallow users to **view** their own entries
* Allow/Disallow administrators or other roles/ID's to **edit** any entries
* Allow/Disallow users to **edit** their own entries
* Allow/Disallow administrators or other roles/ID's to **delete** any entries
* Allow/Disallow users to **delete** their own entries
* Show custom columns that will be mapped to your form fields and whether or not they can filter/sort this column
* Show predefined columns and whether or not they can filter/sort this column
  * Entry title;
  * Entry status;
  * Entry date;
  * WC order *(Add-on required)*;
  * WC order status *(Add-on required)*;
  * PayPal order *(Add-on required)*;
  * PayPal order status *(Add-on required)*;
  * PayPal subscription *(Add-on required)*;
  * Created post title *(Add-on required)*;
  * Created post status *(Add-on required)*;
  * Generated PDF *(Add-on required)*;
  * Author username *(if user was logged in during form submission)*;
  * Author first name *(if user was logged in during form submission)*;
  * Author last name *(if user was logged in during form submission)*;
  * Author full name *(if user was logged in during form submission)*;
  * Author nickname *(if user was logged in during form submission)*;
  * Author display name *(if user was logged in during form submission)*;
  * Author E-mail *(if user was logged in during form submission)*;
  * Author ID *(if user was logged in during form submission)*;
* For each column you can define if the value should have a link to one of the following options
  * None (no link);
  * Edit the contact entry (backend);
  * WooCommerce order (backend);
  * WooCommerce order (front-end);
  * PayPal order (backend);
  * PayPal subscription (backend);
  * Generated PDF file;
  * Created post/page (backend);
  * Created post/page (front-end);
  * The author page (front-end);
  * The author profile (backend);
  * Author E-mail address (mailto:);
  * E-mail address (mailto:);
  * Custom URL;

### Pricing

<table><thead><tr><th width="152">Volume</th><th width="189">Price per license</th><th>Total</th></tr></thead><tbody><tr><td>1+</td><td>$5</td><td>1 license would cost $5 p/m</td></tr><tr><td>5+</td><td>$3</td><td>5 licenses would cost $15 p/m</td></tr><tr><td>10+</td><td>$2.5</td><td>10 licenses would cost $25 p/m</td></tr><tr><td>20+</td><td>$2</td><td>20 licenses would cost $40 p/m</td></tr><tr><td>40+</td><td>$1.5</td><td>40 licenses would cost $60 p/m</td></tr></tbody></table>


# WooCommerce Checkout

Redirect your users to the WooCommerce Checkout after submitting the form. Automatically adding products to the cart and defining other related checkout options for WooCommerce.

### About

This Add-on allows you to redirect your customers to the WooCommerce checkout page (or cart page) after submitting the form. It allows you to dynamically add products based on the entered/selected field data inside the form.

It allows you to apply custom fees and coupons for the checkout.

Optionally you can add custom checkout fields to your checkout forms to request more data from a user during checkout.

Below you can find guides on how you can configure your form or Super Forms to achieve specific functionalities.

{% content-ref url="/pages/aQmXVI4iqfVwSTOxoXLz" %}
[Fixed price checkout](/features/integrations/woocommerce-checkout/fixed-price-checkout)
{% endcontent-ref %}

{% content-ref url="/pages/K8L0j1GvGBfdrFsJUiWm" %}
[Dynamic price checkout](/features/integrations/woocommerce-checkout/dynamic-price-checkout)
{% endcontent-ref %}

{% content-ref url="/pages/539gMPeC52V3cGUKMXrv" %}
[Variable product checkout (variations)](/features/integrations/woocommerce-checkout/variable-product-checkout-variations)
{% endcontent-ref %}

{% content-ref url="/pages/bMIBN2fjeQgVX09Wo4HZ" %}
[Replacing the "Add to cart" on a product page with a form](/features/integrations/woocommerce-checkout/replacing-the-add-to-cart-on-a-product-page-with-a-form)
{% endcontent-ref %}

{% content-ref url="/pages/3tT3TiQcl3UqkWVn5KAh" %}
[Hiding product from shop and order via custom form](/features/integrations/woocommerce-checkout/hiding-product-from-shop-and-order-via-custom-form)
{% endcontent-ref %}


# Fixed price checkout

Checkout a single product in WooCommerce with a fixed quantity and price after submitting the form.

{% hint style="info" %}
This article explains how to add a product with a fixed price to your cart. If you are looking for a way to add dynamic priced products to your cart you can read the [**Dynamic price checkout**](/features/integrations/woocommerce-checkout/dynamic-price-checkout) article.
{% endhint %}

### Enabling WooCommerce Checkout

Go to **Form Settings > WooCommerce Checkout** and enable the WooCommerce Checkout feature as seen below:

<div align="left"><figure><img src="/files/6m2HBw3EdFHelooo8Iky" alt="Enabling the WooCommerce checkout feature for your form."><figcaption><p>Enabling the WooCommerce checkout feature for your form.</p></figcaption></figure></div>

### Empty the cart before redirecting to checkout

In our case we will configure it so that the cart will be emptied before submitting the form. This way the cart will always start from a fresh/empty basket. Of course this is optional and depends on your use case.

### Remove existing coupons and fees

We will also enable the option to remove any existing coupons and or fees.

This keeps things clean, especially for testing purposes. In case you are selling multiple products, and or you have multiple forms, you will probably not want to enable these settings.

<div align="left"><figure><img src="/files/RkGez8bDTaUJE1fnVyFC" alt="Empty/clear the WooCommerce shopping cart, remove coupons and clear any fees before submitting the form."><figcaption><p>Empty/clear the WooCommerce shopping cart, remove coupons and clear any fees before submitting the form.</p></figcaption></figure></div>

### Configure which product(s) to add to the cart

Now we will configure the most important setting which is:

**Enter the product ID(s) that need to be added to the cart.**

Here you can define which product(s) you wish to add to the cart after the form was submitted successfully. In our case we will only add a single product, with a fixed quantity and price.

Before defining this setting, we will need to know what our product ID is. You can find your product ID by going to "Products > All products" and hovering over the product with your mouse like so:

<div align="left"><figure><img src="/files/FSBwgIGfh9qy9vokAoaM" alt="Finding the WooCommerce product ID"><figcaption><p>Finding the WooCommerce product ID</p></figcaption></figure></div>

Another way of doing this would be to "Edit" the product and looking at the URL in your browser. You will be able to find the product ID in the URL as shown below:

<https://domain.com/wp-admin/post.php?post=**45579**\\&action=edit>

Now that we have our product ID, we can configure the product ID, and quantity as follows:

<div align="left"><figure><img src="/files/2FfrXou1o0bj1F0HAP1D" alt="Define products that need to be added to the cart, each on a new line"><figcaption><p>Define products that need to be added to the cart, each on a new line</p></figcaption></figure></div>

Now, when you save your form and submit it (even if you have zero fields in it, it will add this specific product to the cart, with a quantity of 1.

After that it will redirect the user to either the Checkout page (unless defined otherwise).

In this example we used fixed values in our settings to add the product.

However you can use the [**Tag system**](/features/advanced/tags-system) to dynamically retrieve the product ID, quantity, variation ID and dynamic price. So if you want the user to select a specific product and it's quantity from a dropdown, then you can retrieve the quantity with the use of tags like so:

```
{your_product_dropdown_field_name_here}|{your_product_quantity_field_name_here}
```

This rounds up the single product checkout example. However, there are a couple of other important settings you can configure which we won't go into details here, but you should configure them based on your personal use case:

<div align="left"><figure><img src="/files/ikfKn7AZCZKdxeWutpn5" alt="Product custom meta data WooCommerce checkout"><figcaption><p>Product custom meta data WooCommerce checkout</p></figcaption></figure></div>

<div align="left"><figure><img src="/files/kByZ3B5f9wLmkJyT69Oi" alt="Populate the checkout fields with form data."><figcaption><p>Populate the checkout fields with form data.</p></figcaption></figure></div>

<div align="left"><figure><img src="/files/N3ZZzwBCKW0dawVRX5aL" alt="Adding custom checkout fields to the Checkout page."><figcaption><p>Adding custom checkout fields to the Checkout page.</p></figcaption></figure></div>

<div align="left"><figure><img src="/files/FBAY1K1JYdyNgyCEhxJj" alt="Update the entry status after the payment was completed."><figcaption><p>Update the entry status after the payment was completed.</p></figcaption></figure></div>


# Dynamic price checkout

How to add a product with a dynamic price to your WooCommerce cart based on user selected options.

{% hint style="warning" %}
In order for this to work you must have the official [**Name Your Price**](https://woocommerce.com/products/name-your-price/) plugin installed and activated. And you must enable the "Name Your Price" option for your product.
{% endhint %}

### Enable Name Your Price for the product

First make sure you have the official Name Your Price plugin installed and activated on your WordPress site. Now create a new product or edit an existing product. Make sure you enable the "Name Your Price" option for the product as shown below and Save the product to apply the changes.

<div align="left"><figure><img src="/files/5cJx9L5Z9iajjpaMtWVe" alt="Enabling dynamic &#x22;Name Your Price&#x22; for your WooCommerce Product"><figcaption><p>Enable "Name Your Price" for your product.</p></figcaption></figure></div>

### Enabling WooCommerce Checkout on your form

Now we need to enable the WooCommerce Checkout on our form. Go to "Super Forms > Your Forms" from the WordPress menu and edit your form. Open the "Form Settings" panel and choose "WooCommerce Checkout" from the dropdown. Check the "Enable WooCommerce Checkout" to enable it.

<div align="left"><figure><img src="/files/6m2HBw3EdFHelooo8Iky" alt="Enabling the WooCommerce checkout feature for your form."><figcaption><p>Enabling the WooCommerce checkout feature for your form.</p></figcaption></figure></div>

### Define the dynamic priced product to be added to the cart

Before we can do so, we must obtain the product ID that we wish to add. You can find your product ID by going to "Products > All products" and hovering over the product with your mouse like so:

<div align="left"><figure><img src="/files/FSBwgIGfh9qy9vokAoaM" alt="Finding the WooCommerce product ID"><figcaption><p>Finding the WooCommerce product ID</p></figcaption></figure></div>

Another way of doing this would be to "Edit" the product and looking at the URL in your browser. You will be able to find the product ID in the URL as shown below:

<https://domain.com/wp-admin/post.php?post=**45579**\\&action=edit>

Now that we have our product ID, we can configure our setting so that it adds the product with ID **45579** a quantity of **1**, no variation (defined as **none**)and a dynamic price by retrieving our price from our form with the use of the [**Tags System**](/features/advanced/tags-system). In the below example we retrieve the price from a [**Calculator element**](/elements/form-elements/calculator) named "price". That's why we use the `{price}` tag in the below example.

<div align="left"><figure><img src="/files/43LFGtXIXeQtHXzKXvUK" alt="Defining dynamic priced product to be added to WooCommerce cart after form submission."><figcaption><p>Defining dynamic priced product to be added to WooCommerce cart after form submission.</p></figcaption></figure></div>

After you Save the form and submit it (either from preview mode or from the front-end), it will add the product the the users cart with the amount that the [Calculator element](/elements/form-elements/calculator) holds. It will then redirect the user to the WooCommerce checkout or cart page (depending on how you configured the settings). The user can now complete the order as usual.


# Variable product checkout (variations)

Checkout a variable product by adding it to the cart after submitting the form. And redirecting the user to the cart or checkout page.

{% hint style="warning" %}
If you haven't already, first make sure you create a [**Variable product**](https://woocommerce.com/document/variable-product/) within WooCommerce.
{% endhint %}

You should now be able to see your variation ID's:

<figure><img src="/files/PywL1WDTr9h6LrEETUgC" alt="Create a variable product in WooCommerce."><figcaption><p>Create a variable product in WooCommerce.</p></figcaption></figure>

You will need these ID's in your form so you you can parse them to the settings in your form under "Form Settings > WooCommerce Checkout".

In our example we will add a "Radio button" element, with three options to choose from. These three options will be called "Green", "Red", and "Test". Each of them will hold the corresponding variation ID.

In our case we named the field **product\_variation\_id** so we can retrieve the variation ID later by calling {product\_variation\_id} tag.

We also added a Quantity element, just so the user can choose the quantity themselves, but this is not required if your users can only order 1 product at a time.

<figure><img src="/files/krlRa7rNRG9YdHURE05K" alt="Define the product ID&#x27;s on each of the Radio button items as their value"><figcaption><p>Define the product ID's on each of the Radio button items as their value</p></figcaption></figure>

Now we can configure the checkout settings.

Go to **Form Settings > WooCommerce Checkout** and check "Enable WooCommerce Checkout", and optionally the other settings as desired.

Under "Enter the product(s) ID that needs to be added to the cart" configure the product ID, along with the tags to retrieve the selected variation ID. Our product ID is **51962**, so our final line will be:

```
51962|{quantity}|{product_variation_id}
```

<figure><img src="/files/NTBJyH1mLUII8dvtgOwU" alt="Define products that need to be added to the cart with the use of the {tags} system"><figcaption><p>Define products that need to be added to the cart with the use of the {tags} system</p></figcaption></figure>

Now test the form, and see if the product along with the chosen variation was added to the cart.


# Replacing the "Add to cart" on a product page with a form

How to replace the WooCommerce "Add to cart" button on product page with a custom advanced form.

By default WooCommerce has a so called "Add to cart" button with a "Quantity" field on the product pages. In case you want to replace this section/area with a form, you can do the following:

1. Make sure you are running Super Forms **v4.9.800** or higher
2. Go to **Super Forms > Settings > WooCommerce Checkout**:<br>

   <figure><img src="https://webrehab.zendesk.com/hc/article_attachments/360018126718/mceclip0.png" alt="WooCommerce Checkout settings"><figcaption><p>WooCommerce Checkout settings</p></figcaption></figure>
3. Map the form with the product under the **Replace the default "Add to cart" area** setting:<br>

   <figure><img src="/files/ouMrWS09XFHUFzWUK9Wp" alt="Replacing the default &#x22;Add to cart&#x22; area/button with a custom form."><figcaption><p>Replacing the default "Add to cart" area/button with a custom form.</p></figcaption></figure>
4. Optionally hide the **Title**, **Rating**, **Price** and or **Short description** from the product page:<br>

   <figure><img src="/files/Bnrn6QWcsqdX0BMDLRcx" alt="Removing the title, rating, price and short description for WooCommerce products on the front-end."><figcaption><p>Removing the title, rating, price and short description for WooCommerce products on the front-end.</p></figcaption></figure>
5. Click **Save Settings**<br>

   <figure><img src="/files/0MHNL9eDoyPDqj0k3cnF" alt="Save WooCommerce settings"><figcaption><p>Save WooCommerce settings</p></figcaption></figure>
6. Visit the product on the Front-end and confirm that the default "Add to cart" button is replaced with the form.


# Hiding product from shop and order via custom form

How to hide a product from the WooCommerce shop and only allowing users to order the product via a custom form.

In order to only allow users to order the product via the form you build, you will have to follow the below steps:

1. Make sure you are running Super Forms **v4.9.800** or higher
2. Go to **Super Forms > Settings > WooCommerce Checkout**:<br>

   <figure><img src="/files/CEEymIPtzZcZdcSbX3ji" alt="WooCommerce Checkout settings"><figcaption><p>WooCommerce Checkout settings</p></figcaption></figure>
3. Map the form with the product ID's and or Product category slugs under the **Hide products from the shop** setting. In the below example we will hide all products that belong to the category "Computers" which slug is "computers".<br>

   <figure><img src="/files/WhFPAjQOcLDryg1lIKrC" alt="Hiding WooCommerce products from the shop based on Category slug or product ID."><figcaption><p>Hiding WooCommerce products from the shop based on Category slug or product ID.</p></figcaption></figure>
4. Click **Save Settings**<br>

   <figure><img src="/files/0MHNL9eDoyPDqj0k3cnF" alt="Save your WooCommerce settings"><figcaption><p>Save your WooCommerce settings</p></figcaption></figure>
5. Visit your shop Front-end and confirm the products are no longer visible. Also confirm you can still order them via your forms.


# PayPal

Accept payments via PayPal such as one time payments, subscriptions, donations or cart checkouts (for multi-product checkout).

## Quick start

### Step 1 – Enabling PayPal Checkout

Go to **Super Forms > Create Form** (or edit an existing form of your choosing). Open the **Form Settings** section on the right hand side. From the dropdown menu choose **PayPal Checkout** (this will open all the settings related to the PayPal checkout process). Make sure to Enable the PayPal Checkout by clicking "Enable PayPal Checkout".

<div align="left"><figure><img src="/files/Iy8UNgG9JuRk61lqXsWE" alt="Enable PayPal checkout for your WordPress form."><figcaption><p>Enable PayPal checkout for your WordPress form.</p></figcaption></figure></div>

{% hint style="info" %}
**Tip:** it is recommended to always enable the PayPal Sandbox mode during testing of your form. That way you can test as many times as you wish without making real transactions with real money. You can create a [sandbox account](https://www.sandbox.paypal.com/nl/webapps/mpp/business) here.
{% endhint %}

To enable the sandbox mode on your form you can check the **Enable PayPal Sandbox mode (for testing purposes only)**.

<div align="left"><figure><img src="/files/HMBzA8KKsQsCSZAXiXl4" alt="PayPal enable sandbox mode for your WordPress form"><figcaption><p>PayPal enable sandbox mode for your WordPress form</p></figcaption></figure></div>

### Step 2 – Adding merchant email to receive payments

You can now go ahead and enter the PayPal merchant email. This will in most cases be your own PayPal email address account where you wish to receive payments on. In some cases you might have a form that requires to dynamically retrieve the email address based on user selected information. In that case you can use {tags} to retrieve this data. For now just enter your sandbox email address (see picture below):

<div align="left"><figure><img src="/files/iqyqHo1WXMRJlWY7txsV" alt="PayPal enter the merchant email"><figcaption><p>PayPal enter the merchant email</p></figcaption></figure></div>

### Step 3 – Choosing your currency

The next important thing to change accordingly is the currency for the PayPal checkouts. Depending on your country you can change this to for instance `USD` ($), `EUR` (€) or any other currency supported by PayPal.

<div align="left"><figure><img src="/files/xwNnL4Mv1bfxpYacjb73" alt="PayPal checkout currency setting."><figcaption><p>PayPal checkout currency setting.</p></figcaption></figure></div>

### Step 4 – Shipping address requirement setting

Normally when a user checkouts out via PayPal you would ask for an address. But because you might already have the address of the user (filled out in the form) you could let the user skip to enter their shipping address. There are 3 options you can choose from. The most common one to choose would normally be the default value, but you can change it to any of the following if required:

<div align="left"><figure><img src="/files/BuJCfFM6rEWfUvCWR9Wk" alt="PayPal shipping requirement settings."><figcaption><p>PayPal shipping requirement settings.</p></figcaption></figure></div>

### Step 5 – Choosing the payment checkout type

In order to be able to checkout with PayPal, PayPal must know what type of checkout you want to do. It allows you to handle 4 different checkout types/methods. Depending on your needs you can choose one of the following methods:

<div align="left"><figure><img src="/files/k0gmDeBKdNbMqJI3LCLR" alt="PayPal checkout payment type."><figcaption><p>PayPal checkout payment type.</p></figcaption></figure></div>

Each payment method is explained here:

* [Single product or service checkout](#single-product-or-service-checkout)
* [Donation checkout](#donation-checkout)
* [Subscription checkout](#subscription-checkout)
* [Cart checkout (for multiple product checkout)](#cart-checkout-for-multiple-product-checkout)

If you do not want information about each payment method you can click here to [Step 6 – Setting up return URL](#step-6-setting-up-return-url)

#### **Single product or service checkout**

This method is meant for only 1 product checkouts. When using this payment method you will only have to set the `Item description` (this will be your product name). The `Item description` option is compatible with {tags} so you can dynamically set this based on user selected options in your form. Of course your product has a price, which you can set under `Item price` (must be float number e.g. 12.59). The `Item price` option is also compatible with {tags} so you can also dynamically set the price based on user selected options in your form. The last requirement is the `Quantity` to be added to the PayPal checkout basket (must be a numeric value).

Below you can see all the settings with example values that you could enter:

<div align="left"><figure><img src="/files/8hdDy4XsHzi9ObTRDIIZ" alt="PayPal single product or service checkout."><figcaption><p>PayPal single product or service checkout.</p></figcaption></figure></div>

#### **Donation checkout**

The Donation checkout method is only used for... (you guessed it) donations. A donation checkout requires the same options as the `Single product or service checkout` method with the exception that there is no `Quantity` option available for this method.

#### **Subscription checkout**

The Subscription checkout can be used when you wish to create a new subscription for the user who filled out the form. When enabled you will be prompted to choose the `Item description` just like you would with the `Single product` and `Donation` methods. The Subscription checkout has an extra option to set `Subscription periods`. Here you will be able to adjust the time frame regarding the subscription. A subscription may also have a trial period and a second trial period. The Subscription periods option is compatible with {tags} so you can dynamically create subscription time periods based on user selected options in your form. A good way to achieve this would be to use a variable field.

Please refer to the below examples to fully understand how to set it up for your own use cases:

**Example without trial period:**

You want to create a subscription without a trial period that costs $20.50 p/m:

<div align="left"><figure><img src="/files/faf1ykRTnSTFoDAAsHWN" alt="PayPal subscription without trial period."><figcaption><p>PayPal subscription without trial period.</p></figcaption></figure></div>

**Example with 1 trial period:**

You want to create a subscription with 1 trial period for 3 days and after trial period is over $2 per week:

<div align="left"><figure><img src="/files/IkngSpA2YFkEq41vUKoS" alt="PayPal subscription with one trial period."><figcaption><p>PayPal subscription with one trial period.</p></figcaption></figure></div>

**Example with 2 trial periods:**

You want to create a subscription with 2 trial periods (1st 1 week trial), 2nd (2 weeks for $3 p/w), after that $18 p/m:

<div align="left"><figure><img src="/files/qW4b5Ads4RfabzhUkx2B" alt="PayPal subscription with multiple trial periods."><figcaption><p>PayPal subscription with multiple trial periods.</p></figcaption></figure></div>

#### **Cart checkout (for multiple product checkout)**

The Cart checkout will only be used and required whenever you want to send users to the PayPal checkout where they will checkout multiple products at once. In other words, it will function as a shopping bag/cart just like with a regular web shop. To add multiple items to the PayPal checkout you have to enter each item under the `Items to be added to cart` option. Each item can contain the following variables:

`{price}|{quantity}|{item_name}|{tax}|{shipping}|{shipping2}|{discount_amount}|{discount_rate}`

In most use cases you will only be using the first 3 options like so:

`{price}|{quantity}|{item_name}`

Where `price`, `quantity` and `item_name` should be replaced with your field names, please read the Tags system for more information about tags. To fully understand how PayPal handles these variables please read the [PayPal's Variable Reference](https://developer.paypal.com/api/nvp-soap/paypal-payments-standard/integration-guide/Appx-websitestandard-htmlvariables/). Please refer to the below examples to fully understand how to set it up for your own use cases:

**Example with fixed values:**

You want to add 2 products to the PayPal cart (5x Flowers $3.49) and (3x Towels $7.25):

<div align="left"><figure><img src="/files/At8tGu53e2R7Qgn7cI5Z" alt="PayPal checkout products with fixed price and quantity."><figcaption><p>PayPal checkout products with fixed price and quantity.</p></figcaption></figure></div>

**Example with dynamic price, retrieved from your form with tags:**

Based on user selected option you want to dynamically return the price for a fixed product and the user selected quantity:

<div align="left"><figure><img src="/files/T79a9fgCzHsC2BJCT1uY" alt="PayPal cart checkout with dynamic price and quantity."><figcaption><p>PayPal cart checkout with dynamic price and quantity.</p></figcaption></figure></div>

**Example with products inside a dynamic column:**

Let's say you have a dynamic column setup with super forms with inside quantity element, dropdown for product name, and a variable field that is updated based on the dropdown option. You will have multiple products depending on how many times the user would add a new set of fields by clicking the + button on the dynamic column. You will be able to simply enter the following {tags} and it will automatically add all the available options to the PayPal checkout.

<div align="left"><figure><img src="/files/51vnoWKNmHcTVaALOF0g" alt="PayPal cart checkout with multiple products."><figcaption><p>PayPal cart checkout with multiple products.</p></figcaption></figure></div>

### Step 6 – Setting up return URL

After you finished all the above steps and chosen your desired payment method for your checkout, you can now setup a proper return URL. This is the URL where a user will be redirect to after the user successfully returns from PayPal. This can be any URL of your choosing. By default it will be `http://yourdomain.com/?page=super_paypal_response` PayPal will post information about the transaction in the form of Instant Payment Notification messages. This can optionally be used by the developer to display any data regarding the payment on the page.

{% hint style="info" %}
**Note:** make sure you properly change this to your own needs before going live.
{% endhint %}

### Step 7 – Setting up cancel URL

This URL will be used to redirect the user back to your website after they canceled the checkout process on PayPal checkout page. User that cancels payment will be redirected to this URL. This can be any URL of your choosing, but by default it will be: `http://yourdomain.com/my-custom-canceled-page`

<div align="left"><figure><img src="/files/g6nq5gZBsSNtrG6kCfX5" alt="Configure PayPal cancel URL."><figcaption><p>Configure PayPal cancel URL.</p></figcaption></figure></div>

{% hint style="info" %}
**Note:** make sure you properly change this to your own needs before going live.
{% endhint %}

### Step 8 – Sending E-mail after payment completed

Of course you'd like to notify your customer after the payment was completed. Perhaps you want to send them an attachment, or a signup URL, or just the overview of their order. You can do so by enabling the option `Send email after payment completed` and configuring the email settings.

### Step 9 – Testing with sandbox account before going live

The last step is to test your form functioning before going live. Use your PayPal sandbox account to simulate payments and various form submissions. If you have created an advanced form with Super Forms, try to test as many of the possible variations your form offers before going live. If everything was setup correctly you should see transactions and/or subscriptions coming in under `Super Forms > PayPal transactions/subscriptions`. If you are not seeing any transactions coming in, you have to look in your sandbox account for response codes from the IPN.

#### **PayPal Transactions:**

<div align="left"><figure><img src="/files/Db4SNeLTXU8XreZXh4Wa" alt="PayPal transactions list WordPress back-end"><figcaption><p>PayPal transactions list WordPress back-end</p></figcaption></figure></div>

#### **PayPal Subscriptions:**

<div align="left"><figure><img src="/files/nUw9H4a5jl6JtUg7erAv" alt="PayPal subscriptions list WordPress back-end"><figcaption><p>PayPal subscriptions list WordPress back-end</p></figcaption></figure></div>


# MailChimp

Connect your form with MailChimp and add new subscribers after they fill out the form.

## About

This allows you to add and update subscribers to your MailChimp lists.

## Quick start

The quickest way to get started is by installing the demo form: `Super Forms > Demos` > `MailChimp`.

If you are starting from scratch you should do the following:

* 1. Register an account with MailChimp and create an `Audience`
* 1. In your MailChimp dashboard navigate to `Audience > All contacts`
* 1. Select your adience and from the `Settings` tab choose `Audience name and defaults`
* 1. Copy the `Audience ID` (which looks like `f14b7103f3`)
* 1. Go back to your wordpress site, edit your form and add the MailChimp element via `Form Elements > MailChimp`
* 1. Edit the MailChimp element and paste in the `Audience ID` under `Mailchimp Audiance ID`
* 1. Optionally configure the other settings for the `MailChimp` element
* 1. Once finished click `Update Element` to save it
* 1. Save the form and test if it works

?> **Note:** Make sure your form has at least an email field named `email` which is required by MailChimp (obviously).

If needed you can map your fields with MailChimp `MERGE` tags.

You can also display `Groups` (or better said interestes) if you configured any for your Audience.


# Mailster

Add subscribers to your Mailster campaign list after they fill out the form.

* [About](broken://pages/RxvjvOwco7MEOpIDhS4s)
* [Quick start](broken://pages/RxvjvOwco7MEOpIDhS4s)

## About

With this you can subscribe users for Mailster after a user submits the form.

Optionally let users select their interests (Lists), and save custom fields set within your Mailster configuration.

## Quick start

You can enable this by editing your form and navigating to `Form Settings > Mailster Settings`. Then check the `Add Mailster subscriber` option, and configure the settings as desired.

Make sure to enter the Mailster **List ID** under `Subscriber list ID('s) separated by comma's`. You are allowed to use tags if needed.

You can conditionally subscribe a user based on form data by enabling `Conditionally save subscriber based on user data`.

Inside the `Subscriber email address` you would always want to use a tag that retrieves the entered user email address. If your email field is named `email` then you should use the tag `{email}`. This is set by default for this setting.

Optionally you can save some custom Mailster user data. To to this you have to map the mailster field name with the field name in your form.

Let's say your form has fields `First name` and `Last name` which are named `first_name` and `last_name` respectively. In that case you could map it like so:

```js
firstname|first_name
lastname|last_name
```


# Zapier

How to connect your WordPress form with Zapier services to connect with tons of third party applications and API's.

{% hint style="info" %}
Looking for a way to connect your WordPress form with Google Sheets, then read this guide here: [WordPress Form to Google Sheet Integration](/tutorials/wordpress-form-to-google-sheet-integration)
{% endhint %}

### Enabling Zapier for your form

If you do not have a Zapier account yet you can [register an account here](https://zapier.com/sign-up/).

Edit your form and go to **Form Settings > Zapier Settings**. Make sure to check **Enable Zapier connection**. Now get your webhook from Zapier, or click the below invitation link:

<https://zapier.com/developer/public-invite/95800/cb161c44ef2edf4eb65fe007c21e34a1/>

Now follow the steps provided by Zapier and once you are asked to make a test submission setup the Zapier webhook URL on your form under **Zapier webhook URL** as shown below.

<div align="left"><figure><img src="/files/wC9FcrW35j83KddNvqwh" alt="Enabling Zapier and entering the Zapier webhook URL for your WordPress form."><figcaption><p>Enabling Zapier and entering the Zapier webhook URL for your WordPress form.</p></figcaption></figure></div>

Now test your "Zap" by submitting the form. When everything was setup correctly Zapier should tell you so.

{% hint style="success" %}
You should be able to connect the form with many different applications!
{% endhint %}


# Stripe (BETA)

Allow payments via Stripe such as one time payments, recurring payments (subscriptions) or donations for your WordPress form.

{% hint style="danger" %}
This feature is work in progress and not yet available to the public. The documentation will be available upon release. If you have any questions regarding the Stripe integration, please [submit a ticket](/support).
{% endhint %}

### Quick start

Navigate to Super Forms > Settings > Stripe checkout. Configure all the Stripe API settings for both **Live** and **Sandbox** mode.

On your form you can navigate to the **\[Stripe]** TAB. Here you can configure all the required settings such as the Stripe product ID or subscription ID in order for Stripe to understand what it needs to add to the cart on the checkout page. You may also configure products on the fly


---

[Next Page](/llms-full.txt/1)